The Basics of Letter Carving
A few key carving techniques handle every letter in the alphabet.

Synopsis: Using a set of core techniques and some double-beveled chisels and gouges, Clark Kellogg can carve any letter in the alphabet. And so can you. He shares the three basic shapes you need to learn for letter carving, plus the techniques he uses to carve them. He also shares tips on using the proper tools, selecting the best type of wood for carving, and more.
I love carving letters. There is something about the crispness of a well-cut letter that just feels like magic to me. Eight years ago, I was fortunate to be able to study with English woodcarver Chris Pye and I still carve letters using the technique he taught me. There are many other approaches to letter carving, but I like this method because you can learn the basics in about a day—the rest is just a matter of practice.
I’ll explain the set of core techniques that, once mastered, can be used to create any letter in the alphabet. This type of carving works well with various styles of lettering (such as italic or Gothic/blackletter), but traditional Roman letters are the best place to start. Although typographical issues such as spacing and layout are essential elements of a successful carving, this article will focus on just the technique of carving the letters themselves.
How to Think Like a Carver by Allan Breed
Being able to rewind the clock and figure
out what the first moves a carver made on
any given project is tricky to do
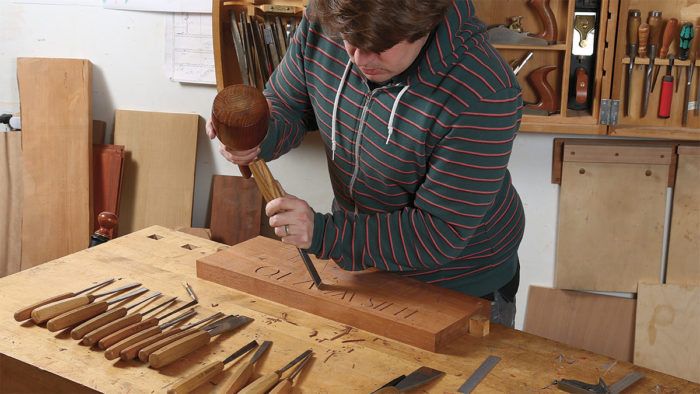
All the letters are cut with double-beveled chisels and gouges. (I have had good luck with both Pfeil/“Swiss Made” tools and those made by Lie-Nielsen/Auriou.) Somewhat counter intuitively, a V-gouge is almost never used for this type of lettering.
There are three basic shapes you need to learn for letter carving: straights, curves, and intersections. All letters in the Roman alphabet comprise some combination of those three elements, and carving a letter is usually just a matter of arranging and connecting them. Straights are cut with (you guessed it) straight chisels, curves are cut with gouges, and intersections are cut with a combination of standard and fishtail gouges.

All letters are cut with the tool roughly 30° off vertical. Each side, or wall, of the letter is cut with a separate action and they should meet in the center of the trench, which is called the root. Most basic lettering is carved along the length of a board, and this is good way to start.
If you look carefully at a set of capital Roman letters, you will notice that each letter is made from a combination of thick and thin strokes. Generally, the width of a thick stroke is 1/6 the total height of the letter. (So, a 24mm-tall I would be 4mm wide.) Most uprights are made of thick strokes. Thin strokes usually have a width 1/8 the height of the letter, and are mostly used for horizontal strokes.
Wood selection
Generally, the harder the wood, the more difficult it is to carve; however, you tend to get a crisper result. Conversely, soft woods such as poplar and cedar are fairly easy to carve, but can be difficult to keep looking sharp. I would avoid pine, as the alternating hard and soft growth rings make it nearly impossible to get consistent cuts. Mahogany is generally considered the gold standard, combining ease of carving with the ability to take fine detail, but using it can present some sustainability issues. I have had good luck with walnut, white oak, pear, cherry, and Osage orange. Feel free to experiment with other woods as well.

From Fine Woodworking #275
To view the entire article, please click the View PDF button below.
More on FineWoodworking.com:
- Beautiful Carving Starts with a Keen Edge by Dan Faia #209–Tools & Shops 2010 Issue
- Carving Lab–A basic exercise for beginners by Robert L. Buyer #9–Winter 1977 Issue
- The Essential Carver’s Tool Kit–A master wood carver shows how to use his favorite gouges and knife for three-dimensional carving by David Sabol
Fine Woodworking Recommended Products

Suizan Japanese Pull Saw

Veritas Micro-Adjust Wheel Marking Gauge

Veritas Precision Square


Comments
I've been fortunate to study with Chris Pye as well (up at the Center for Furniture Craftsmanship) and used his book "Letter Carving in Wood" extensively to learn the basics. I've since then done a fair amount of lettering and as Clark says it's a "...matter of practice". You'll get better and better the more you do it (like anything) and you'll develop your own techniques for lettering (although mine are deeply rooted in those I learned from Chris Pye).
One thing I've found is that you have to take the particular species of wood into account depending on the size of the lettering; obviously a very open-grain wood like oak is difficult for small lettering (at least for me). I find that much smaller than 1/2" high and it gets very difficult to cut clean letters not affected by the grain (although I've not tried lettering in boxwood which takes very fine detail). Walnut is great, so is cherry. I did a large commission in some kind of fir (they were old panels from an existing room) that was a challenge to work with due the species and the fact that about half the panels were oriented with vertical grain (ideally, the grain runs horizontally when lettering since most letter parts run vertically).
Also, lettering is not like writing - you don't complete each letter and word in order. After laying the whole thing out you make all of the same cuts in batches. For example, if you are using a 20mm carving chisel for the vertical elements in the capital letters, you go down the line and make all the initial central vertical cuts using that chisel. Then you come back and make all the right-hand angle cuts, then all the left-hand angles to complete those vertical elements. You're really "building" letters, not writing them, just like if you're cutting mortises and tenons for a table.
Finally, Clark mentions it and I'll second it - you need double-bevel carving chisels to letter not single-bevel bench chisels. I've got probably a dozen of them (#1 sweep...flat...all Pfeils) ranging from 3mm up to 35 mm along with a few fishtails.
And of course the rule with any woodworking tool applies here as well - sharp, sharp, SHARP!!
Log in or create an account to post a comment.
Sign up Log in