Step-by-Step Guide to Tuning Handplanes
How to tune up a handplane to get perfect results.
Choose any type of plane—bench plane, rabbet plane, smoothing plane, or molding plane—and, while they may have different shapes or lengths (and other obvious differences), they share some basic elements. They all have a sole (flat or shaped); a chisel-like iron (also straight or shaped); a wedge or lever cap holding the iron in position; a throat (sometimes called a mouth); and a handle or some way to grip the tool comfortably and to control the cutting direction. Working in harmony, the parts add up to a tool that regulates the cutting depth and the cutting dynamics for you. The trade-off is that planes can be tricky to tune. Think of a plane as a kit, all the elements of which need to be tuned together for the best results.
I suspect that many woodworkers avoid planes because they don’t understand how to tune them or fear they will ruin the tool if they try. Adding to this frustration is the expectation that a tool right out of the box is going to work perfectly—it rarely does. You can expect a new chisel to work well enough after a light sharpening (and better after a thorough one), but it’s a much simpler tool than the combination of parts that make up a plane. Buy any plane, other than one from a high-end specialty maker, and you will have to do some tuning; a flea-market find may require a major overhaul. Tuning is not difficult, but it can be time-consuming. The upside is that you will understand more about the subtleties of how the tool works and be able to tune it for specific situations or troubleshoot problems. You will appreciate the results of that tuning every time you use your plane.
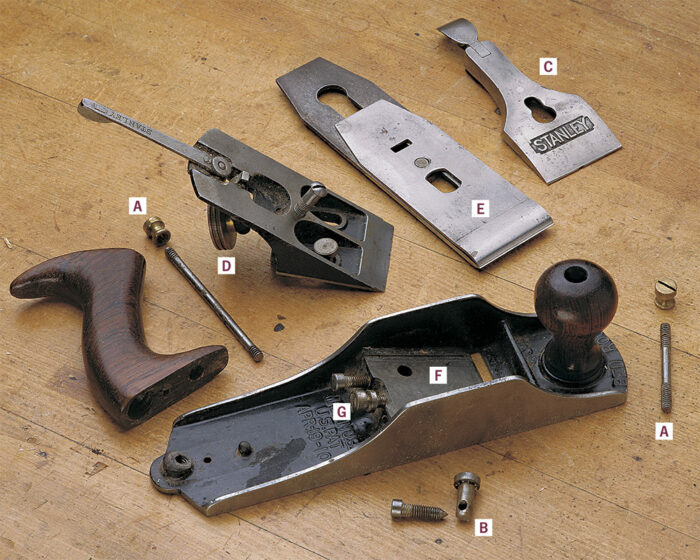
The parts of a planeA —The threaded rods that secure the rear handle and front knob to the plane can be ground slightly shorter to take up any looseness. B —Two screws or pins (as for this Bedrock plane) secure the adjustable frog to the sole; loosen them to move the frog with screw G. C —The lever cap holds the iron and cap iron (E) in position by locking down on the screw in the center of the frog. Don’t tighten it too much—just enough to hold the iron but still adjust it smoothly. D —The depth adjustment for the iron should need little tuning other than a wipe of paste wax. E —Position the cap iron as close as practical to the cutting edge. F —Make sure the surface where the frog beds with the sole is flat and clean. G —Adjust the position of the frog—and the throat opening—with this screw. |
How much tuning you do depends on what you are starting with, how finicky you are, your patience, and what kind of work you expect from the plane. A rough jack plane obviously needs less tuning than a smoothing plane. Small joinery planes that need to be accurate might fall somewhere between the two. Even in the case of a new bench plane of mediocre quality right out of the box, it’s possible to turn it into an accurate and predictable tool if you follow all the tuning steps (and replace the standard iron with a thicker one). No matter what type of plane you’re tuning, the general principles are the same—more or less.
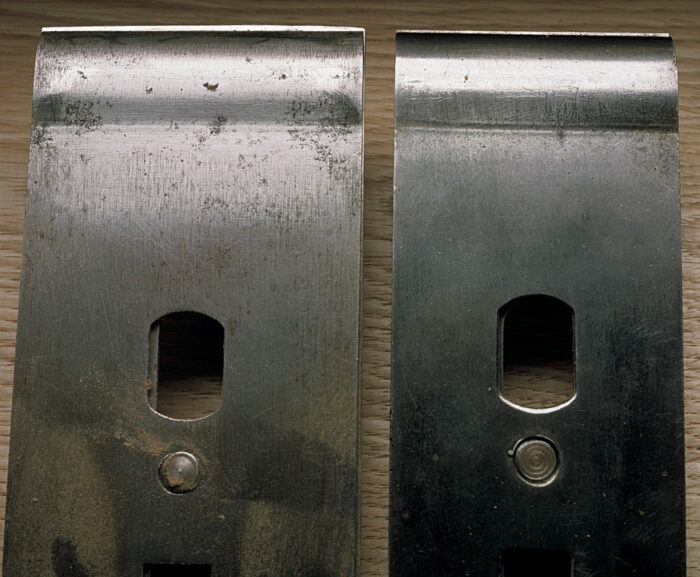
| IF YOU DO NO OTHER tuning than replace your bench-plane irons with thicker ones, the results would still astound you. Whether it’s in a top-of-the-line Bedrock or a low-end Handyman, a thick iron is stable and cuts far more smoothly. Thin Stanley irons are easy to hone, but they’re not stiff enough for the demanding stresses of planing hard woods. Many catalogs sell replacement blades and a two-part cap iron for a turbocharge of your planes you will really feel. |
Handles
Start by tuning the handles (on those planes that have them) for a quick and very satisfying improvement. Bench planes have two wooden handles: a rear tote and front knob. They attach with a threaded rod through the handle into the iron casting and are tightened with a brass nut. The castings sometimes have a raised boss to receive the handle, giving it a more secure seat. Over time and with use the handles work loose. This can be frustrating when you are relying on the handle not only to hold the plane but also to control its direction and apply some downward pressure.
The easiest fix is to tighten the brass nut that secures the handle. This has probably been done before (and probably the nut has run out of threads). If this is the case, slip a washer under the nut (leather works well) or remove the threaded rod and grind or cut off 1/8 in. or so.
You might want to replace the ugly plastic handles on new planes with rosewood aftermarket handles or shopmade ones. No handles quite compare to the beauty and ergonomic perfection of Stanley’s classic rosewood styles, polished by years of handling. Unless it is a historically significant plane, don’t hesitate to smooth or shape any handles (or the body of wooden planes) or strip off the varnish to make them more comfortable. An occasional light rubbing of paste wax or linseed oil will polish the wood to a beautiful and protective finish.
Flattening the sole
Very few planes—new or old—have a truly flat sole, and although they will work, they will work better with some flattening. More important than overall flatness is flatness at important points along the sole. At the very least, the area at either end of the plane and in front of the mouth should be flat. Flatness at the extremities of the sole takes full advantage of its length to guide the plane.
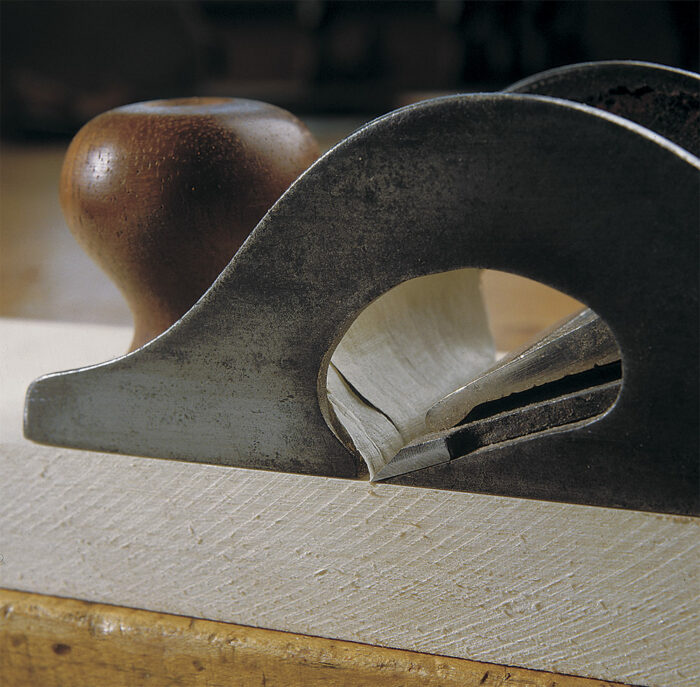
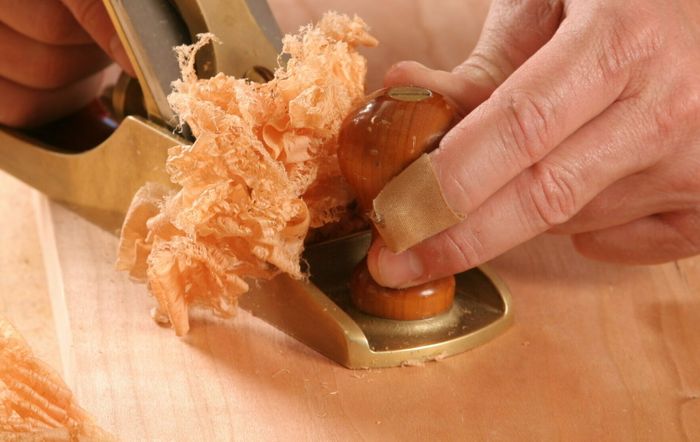
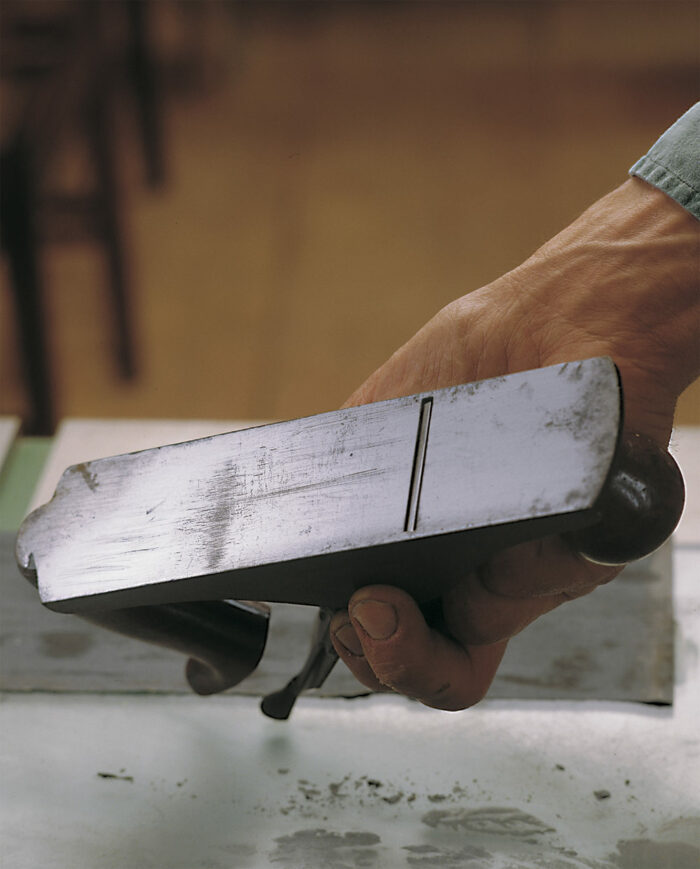
Understanding how a plane cuts explains why it’s also critical to make sure the area in front of the mouth is flat. As a shaving is forced into the mouth against the ramped iron, the shaving is levered and bent against the forward part of the mouth (see the photo). This area of the sole exerts pressure on the wood fibers so splitting away (or tearout) is kept to a minimum. It can do this only if the sole ahead of the mouth is in firm contact with the surface of the wood.
The first step in flattening any sole is checking it with a straightedge. Hold the sole up to a bright light and sight under the straightedge. Depending on what you want to accomplish with the plane, it might be fine as is, or you may have many hours of flattening ahead. For a long plane such as a jointer, used for shooting accurate straight edges, expect to flatten the toe, the heel, and the area in front of the mouth to give the sole good support to cut a flat, straight surface. On planes with smaller soles—joint-cutting planes, for example—the entire sole should be close to flat. There is actually some advantage to a small amount of hollow in the sole for reducing friction. Corrugated or grooved soles supposedly slide more easily, and Japanese craftsmen purposely shape areas of their planes’ soles hollow.
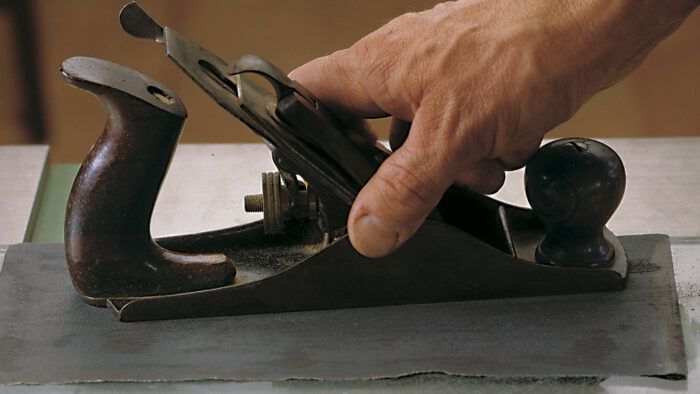
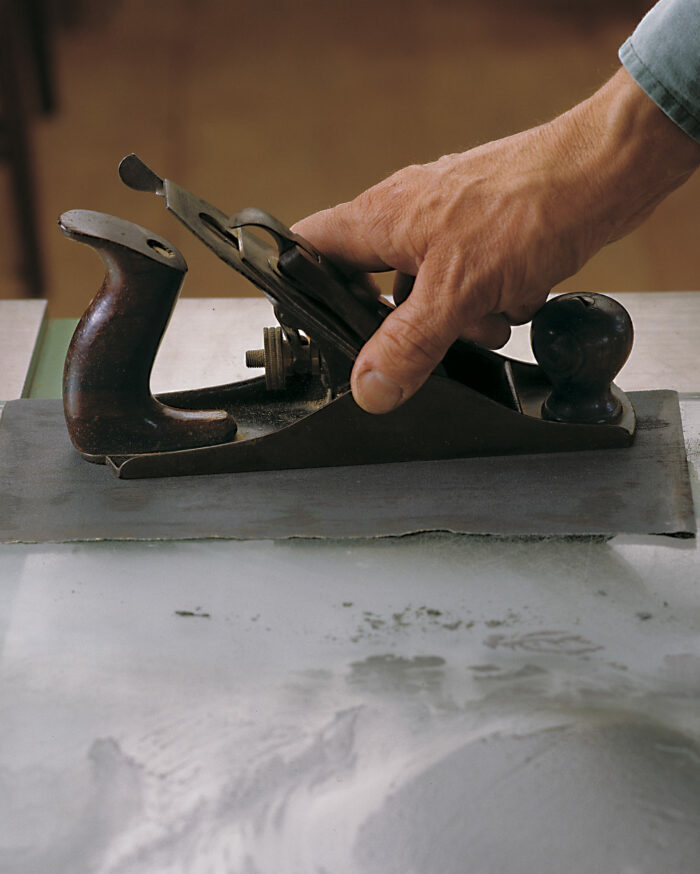
There are no shortcuts to lapping a sole flat, unless you are a machinist or know one you can trust to surface-grind the sole. Surface grinding is tricky, to say the least. Not only is it hard to grip the awkward shape of most planes without a lot of jigging, but the mere act of clamping can also distort the sole. It’s slower but safer to stick with hand lapping on a lapping table, as shown in the photos at right.
Be sure the iron is clamped in place but pulled well back from the throat—the iron exerts pressure on the sole, which should be taken into account when lapping. If lapping seems like too big a job, just do a little. When the spirit moves you again, do some more. Give the lapped sole a wipe of paste wax for an almost frictionless glide.
Tuning the iron and cap iron
The easiest way to improve the performance of almost any plane instantly is to replace the standard iron with a thicker one. This is especially true for smoothing planes and those that you use on difficult woods.
The thin iron typical in most bench planes, particularly Stanley and Bailey planes, is quicker to hone but entirely too flexible to stand up to the considerable stresses at the cutting edge. Remember that these planes were originally made for carpenters working soft woods, and not the hard woods typically used in a shop today. The cap iron helps stiffen the iron, but still not as well as a thicker iron. Find an old iron (old wooden planes are a great source) or buy a new thick replacement iron—it makes a world of difference.
Bevel Angles

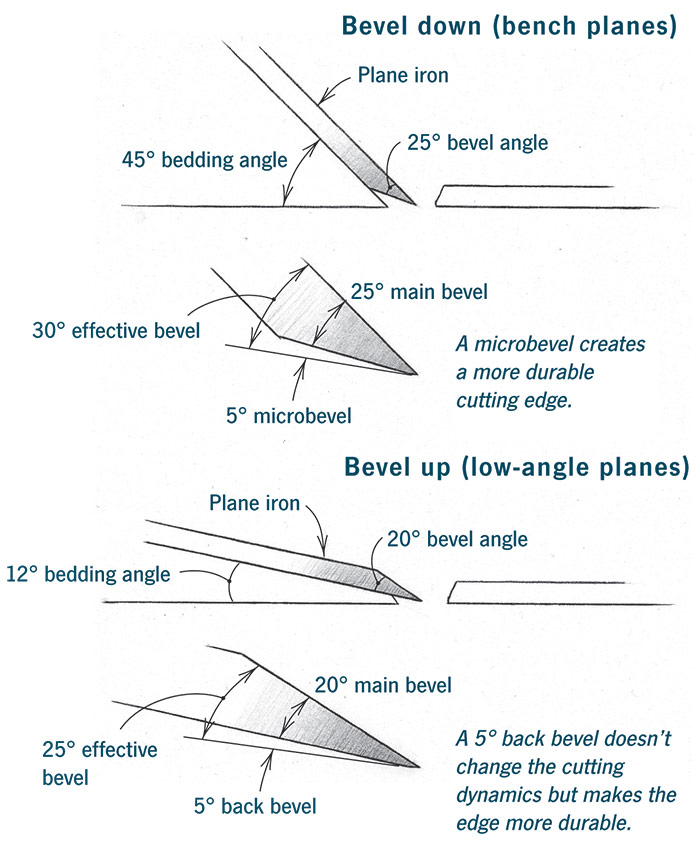
Sharpen the iron as you would a chisel. Generally a bevel of 25° is a good compromise for most planes. (The width of a 25° bevel is about twice the thickness of the iron.) The exceptions are low-angle planes, where the lowest cutting angle possible is used for shaving end grain (see the drawing). For these, a 20° bevel is worth trying, or even lower (though you run the risk of chipping the delicate cutting edge). The back should be polished and flat. If you want, hone on a microbevel or a back bevel.Most of the time the cutting edge is straight, but there are some advantages to a cambered or curved edge. On jack and scrub planes, a well-cambered iron cuts like a gouge for removing wood quickly. Rounding the corners slightly on a smoothing plane helps feather the strokes (see the drawing).
Iron Profiles
Bench planes and some other planes have double irons: an iron and a mating cap iron. The cap iron supports the cutting edge and curls the shaving as it rides up the iron. When you are tuning up your plane, smooth the top of the cap iron with fine emery paper and wax it. Then take the cap iron onto a stone and flatten the tip where it mates with the iron. Trial-fit the two and sight between them; there should be no gaps for a shaving to wedge itself. There need not be a lot of tension between the cap iron and iron; in fact, too much tension can curl a thin iron and cause a whole new set of problems. There should be just enough tension that the cap iron stays in place when you rap the end of the iron gently on the bench.
How you set the cap iron in relation to the cutting edge depends on how the plane will be used. The closer it is to the edge, the more support it provides and the faster it can curl a shaving. A good rule of thumb is to set the cap iron back the thickness of the shavings you expect to cut. On planes doing the most exacting work—smoothing planes and some bench planes—the cap iron is quite close (if the edge has any camber you can’t set the iron as close). For a general-purpose jack plane, set the cap iron and iron as much as a 1/16 in. apart (see the photo).
Bedding the iron
The final area that needs attention is the bed of the iron—or the “frog,” as this piece is called in bench planes. The frog is separate from the body casting for two reasons: It simplifies the casting of the body and allows you to fine-tune the position of the iron and, in turn, the throat opening. I don’t know where the unusual name came from, but it does resemble the frog of a horse’s hoof (or perhaps it originates from the old saying about a frog in your throat). On well-made old planes, the frog probably needs no tuning. The frogs of newer planes (except high-end ones) probably do because expensive milling is usually kept to a minimum. A frog needs two types of tuning: one is to fit it firmly to the sole of the plane, the other to make sure the area the iron lies against is flat.
First, take out the frog and the screw that tightens the lever cap and run over the bed with a fine file. To get a solid fit between the sole and the frog, coat one side of the mating surfaces with a dye called engineer’s blue. When you assemble the parts, the color transfers and you can see where the high spots are.
File the high spots and tighten the screws carefully to avoid stripping them when re-attaching the frog to the sole. Start with the frog positioned in line with the bevel and gradually work it forward, tightening up the throat after you see how the plane performs. One virtue of Bedrock planes, Stanley’s premier line of bench planes, is that you can move the frog with the iron in place, although chances are you’ll set each of your planes and leave them that way.
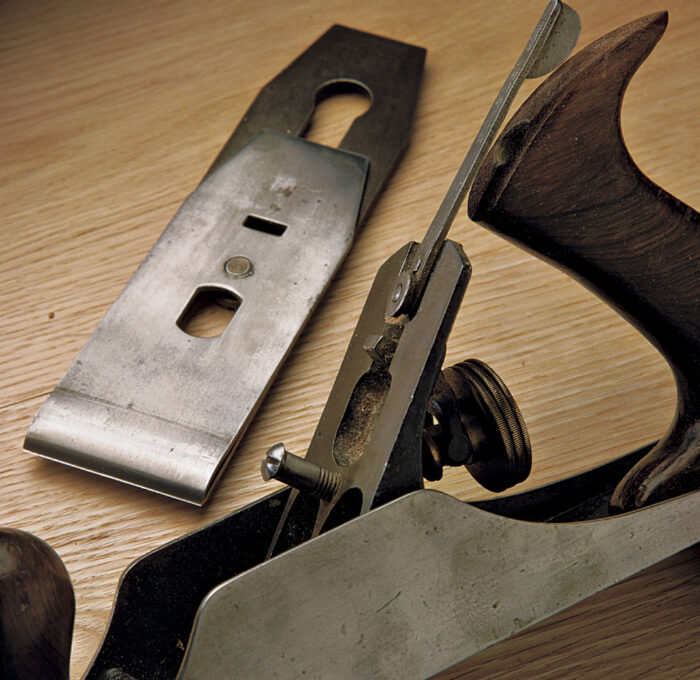
By now you’ve tuned every part of the plane except the depth and lateral adjusters, and the lever cap that secures the iron. A drop of oil on the working parts of the adjusters is all they really need. The lever cap should be smooth and waxed to easily pass the shavings over it. Adjust the tension on the screw through the cap just enough to hold the iron and still adjust easily.
To set the working depth of the iron, turn the depth-adjuster wheel, either while looking at the throat (with the plane turned over) or by feeling the iron’s position with a finger. Using the lateral adjuster, position the iron parallel with the sole, testing it in the same way. It’s safer to start with a shallow cut and deepen it after you see how the plane performs. You’ll be amazed how much a little tuning improves the way your planes feel and work.
 Excerpted from Classic Hand Tools (The Taunton Press, 1999) by Garrett Hack.
Available at Amazon.com.
Fine Woodworking Recommended Products

Stanley Powerlock 16-ft. tape measure
Veritas Micro-Adjust Wheel Marking Gauge

Bahco 6-Inch Card Scraper



Comments
Thanks Garrett, You're a wealth of information!
Log in or create an account to post a comment.
Sign up Log in