How To Set Up Your New Japanese Chisel
Prep work and sharpening are different with the laminated steel blade of a Japanese chisel.
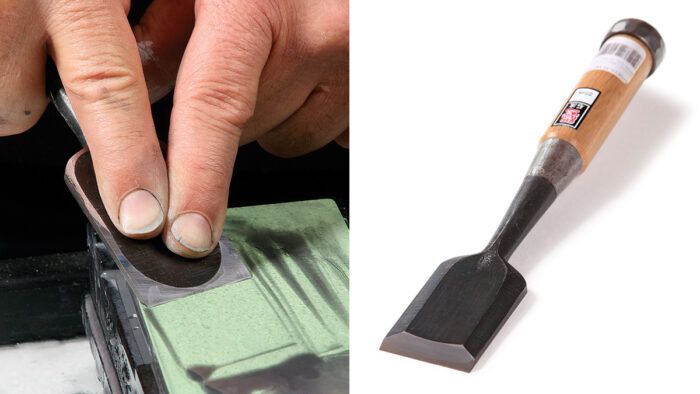
Synopsis: If you’re buying a Japanese chisel for the first time, you need to know that it will require some setup before you can use it. For these tools come in what Westerners might think of as rather unfinished condition. Setting the hoop, creating the appropriate bevel angle, and flattening the back of the blade are left to the craftsman. Jon Reed Fox also strips the finish from the handles and blades of new chisels and replaces it with a coat of oil. Learn how to set up your chisel and start working with these fine tools.
Japanese chisels come in what Westerners might think of as rather unfinished condition. Setting the hoop, creating the appropriate bevel angle, and flattening the back of the blade are left to the craftsman. I also strip the finish from the handles and blades of new chisels and replace it with a coat of oil. (For the rest of the story on these unmatched tools, see “Choosing and using Japanese Chisels,” p. 60.)
Flatten the back
I begin setup by flattening the back of the blade. unlike Western chisels, Japanese chisels have laminated blades: A thin layer of tough, high-carbon steel that can take a very sharp edge is fused to a thick layer of more malleable, shock-absorbing iron, which comprises most of the blade. The thin layer of steel on the back of the blade is the critical part of the tool, and it is hollowed out to facilitate flattening.
When flattening the back, the goal is to get the edges surrounding the hollow flat and highly polished. While the area along the front edge must be completely flat, it is not necessary to have 100% of the area up the sides perfect. Just flatten enough area so that the back will lie flat on your stones and will serve as a flat reference surface when you are using the chisel. I start on a 2,000-grit stone and proceed through the finer grits.
Once the back is flat, you will not have to repeat the flattening process until you have sharpened the bevel so many times that it threatens to intersect the hollow. At that point, using a coarse stone will effectively move the hollow up the blade. For day-to-day resharpening, you’ll just hone the back with your finer stones. If you work the back regularly on coarse stones, you will eventually wear through the layer of high-carbon steel.
Create the bevel
With the back flat, it’s on to the bevel, which comes roughly shaped. Because of their laminated construction, Japanese chisels should be sharpened to a flat bevel, never hollow ground. The thin layer of hard, brittle steel depends on the backing provided by the iron body of the chisel for support. Hollow grinding, especially on a small wheel, removes supporting material where it is most needed and may cause the edge to break.
For the full article, download the PDF below:
Fine Woodworking Recommended Products
Veritas Wheel Marking Gauge

Olfa Knife
Veritas Micro-Adjust Wheel Marking Gauge



Log in or create an account to post a comment.
Sign up Log in