Smooth Curves with a Spokeshave
For curvy furniture and shaped edges, make the spokeshave your secret weapon.
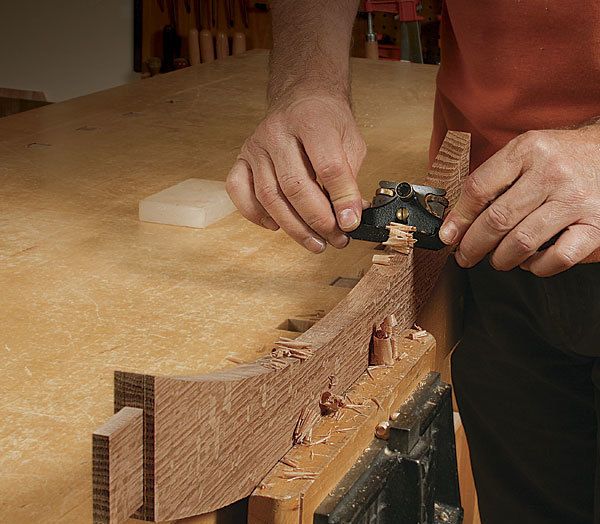
Synopsis: A spokeshave is ideally suited to refining curves and shaping contoured work. It steps in after you’ve cut out your work on a bandsaw or router, removing sawmarks and irregularities with precise control. This guide to the spokeshave by hand-tool expert Chris Gochnour covers the different types of shave, the correct way to set up the tool, and how to use it to smooth both concave and convex curves.
When it comes to refining curves and shaping contoured work, there’s nothing better than a spokeshave. Mechanically, a spokeshave works the same way as a handplane, but its small sole makes it ideally suited for following curves. After you’ve cut out your work on the bandsaw or router, a spokeshave steps in to remove sawmarks and irregularities with precise fingertip control.
Spokeshaves come in a wide array of styles and designs. The most versatile and perhaps the easiest to start out with is a standard-angle shave, with a flat sole and the blade mounted bevel down. This type of shave can handle most of the curves—concave and convex—a furniture maker will encounter. Here I’ll show you how to get the most out of this special tool, from setup to shaping.
As with a bench plane, the first step with a spokeshave is to sharpen the blade. Because of its small size, sharpening can be tough, but I have a jig that takes the pain out of the job. Once sharp, it’s pretty easy to install and adjust the blade for perfect results.
Most newer spokeshaves have twin adjustment screws that move the blade laterally as well as in and out, making it easy to get the blade in the proper alignment. With the blade drawn into the body, begin by tightening the cap screw (or screws) to hold the blade. Slowly rotate the adjusting screws to advance the blade and stop when the blade begins to project proud of the sole. You can sight along the shave’s sole for the initial setup, then try out the shave on a wood scrap and adjust the blade until you get the right setting. It’s best to start with a light cut, and advance the blade as needed. For an even-depth cut, the blade should project evenly and be parallel to the sole. Check it by taking a shaving with each edge of the blade—it should cut the same on each side.
For the full article, download the PDF below.
Fine Woodworking Recommended Products

Bessey EKH Trigger Clamps
Bessey K-Body Parallel-Jaw Clamp
Veritas Micro-Adjust Wheel Marking Gauge


Log in or create an account to post a comment.
Sign up Log in