How to Choose a Smoothing Plane
With so many choices, Megan Fitzpatrick encourages folks to try out a few different smoothing planes before they buy one. But if pushed, she'll tell you to get a No. 3 with a 45° frog.
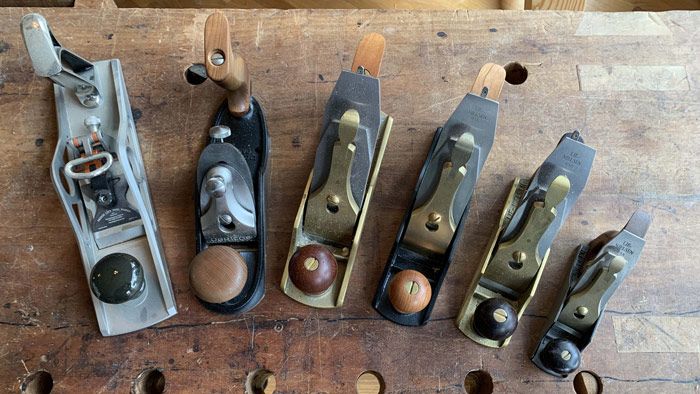
Because I encourage beginners in my classes, I often get questions about which tools to buy; people are still assembling their kits. Case in point: I recently had someone ask about a smoothing plane purchase, specifically for a tool chest class: “For a smoothing plane, there is a No. 4 and No. 4.5. There are also (at least at Lie-Nielsen) 45°, 50°, and 55° angles. What is your suggestion for the right one to purchase for this project?”
My typical response is something along the lines of, “I use a Lie-Nielsen No. 3 in almost every case – but come to the class and try out a few before you plunk down your money.” We have several smoothing planes in the shop to loan, including the first plane I ever bought, my No. 4. I rarely use it now … unless a student has snagged my No. 3.
But a more complete answer includes why that No. 3 is now my favorite, and some general information about smoothing planes. I’ll stick here with manufactured metal planes. While one can of course buy a custom-made smoothing plane, such as an infill, that would be an unlikely choice for one’s first smoothing plane purchase. A wooden coffin smoother is also a viable choice, but, like a custom infill, those are a bit harder to come by on short notice; contemporary makers don’t usually keep many (any?) on the shelf, ready to send out.
So I think for beginners, a manufactured metal smoother is the way to go. And if you get a good one, it might be both the first and last smoothing plane you’ll ever need (Want? Well, that’s a different story).
I’ll start with bevel-down planes. Using the Stanley numbering system, there are five that are typically considered smoothing planes: nos. 1, 2, 3, 4, and 4-1/2. But in deference to David Charlesworth, who sets up a No. 5-1/2 as what he calls a “super-smoother,” I suppose there are six possible smoothing plane choices in the bevel-down style.
Don’t know what bevel-up and bevel-down
even mean? Check out this article
My main consideration in a smoothing plane is its versatility. I always reach for my No. 3 (which has the standard 45° frog) because its shortish sole length and narrowish blade can tackle most jobs easily, getting into small depressions that the jointer plane (or powered planer) left behind. And the No. 3 is a little lighter than the No. 4, which means I don’t use quite as much energy to wield it (plus, I can reach the depth-adjustment knob with my fingers as I’m planing, if I need to retract or advance the iron). Sure, it means that I have to more closely overlap my passes as I work across a panel, but we’re talking only a few extra passes compared to a No. 4.
So why, then, not the No. 4? It’s just a little longer and a little wider, so on those slight depressions left by the jointer plane (or planer), it might actually take more passes than a No. 3 to get down into them. I don’t care if my work is dead flat on the outside (dead flat only matters on the joinery surfaces) – as long as it looks dead flat. And that’s the job of the jointer. All the smoothing plane does is make the surface look and feel smooth. Once it looks and feels good, the smoothing plane’s work is done. I find I get there faster with a No. 3.

Bevel-down smoothing planes
No. 1. Sole, 5-1/2 in. long; iron, 1-1/4 in. wide.
This cutie isn’t terribly useful for most furniture work. It’s too small for most people to even get two fingers comfortably around the tote, so typically it gets cradled in the hand and is used more like a block plane. But once in a while, I’ll grab the No. 1 off the shelf (yep – that’s how much use it sees. It mostly sits on a shelf as a decorative item) to tackle a small spot of tearout that a larger plane just can’t get at, but I’m more likely to grab a scraper. I do, however, sometimes use the No. 1 to break edges if my block plane is in the hands of a student.
No. 2. Sole, 7 in. long; iron, 1-5/8 in. wide.
For most people, this isn’t much more useful than the No. 1. Only those with small hands can wrap at least two fingers around the tote, but I am one of those people. So I do sometimes use the No. 2, again to tackle small areas of tearout that my No. 3 just can’t get into.
No. 3. Sole, 8 in. long; iron 1-3/4 in. wide
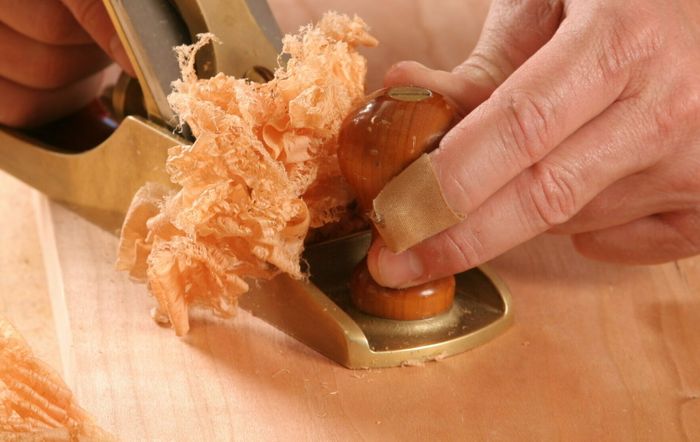
Hello my lovely. This one is large enough that most woodworkers can comfortably get three fingers around the tote, and three fingers is all you need. (Your index finger should be extended along the side of the plane, pointing in the direction of the work, touching the side of the blade.) As I said above, I find the size of this plane to be the best balance of size and weight for getting work done quickly. Also, because it’s a little bit narrower than the No. 4, it’s that much easier to balance on narrow stock when planing an edge.
No. 4. Sole, 9 in. long; iron 2 in. wide
My first plane purchase was a Lie-Nielsen No. 4, and I used it for years, until I bought the No. 3 and decided it worked better for me. That’s partly because my fingers can’t reach the depth-adjustment knob on the fly with the No. 4; I have to stop planing if I want to move the blade in or out. But the 4 is the most common size of smoothing plane, and it has a good balance of sole length and iron width for most furniture work (and most people probably can reach that depth-adjustment knob while planing). I can’t imagine ever getting rid of my No. 4, even if I don’t use it nearly as often as I once did. It does still see a lot of time on the bench, if not always in my hands. I do, however, have all three frogs Lie-Nielsen offers for my No. 4, so if I need to change from the standard 45° frog to tackle a figured hardwood, I can. (More on that below.)
No. 4-1/2. Sole, 10 in.; iron 2-3/8 in.
There are experienced woodworkers who swear by the No. 4-1/2. I use one only if there is no other choice (and because neither I nor my shopmates even have one, well, it is never a choice). For me, this one is just too heavy and hard to push thanks to a combination of its weight and blade width. But if you have large hands or just like a heavy plane (which, some argue, stays more easily in the cut), you might love the No. 4-1/2.
No. 5-1/2 in.. Sole, 15 in.; iron 2-3/8 in. wide
This thing is a monster and would typically be considered a jack plane by the modern American. But a traditional English panel plane is about the same length as this one, and a panel plane is what a traditional English furniture maker would use to smooth the work. I’m not about to argue with David’s experience and results, so if you want to know more, go to the source.
Frog angles
Now about those frogs: The standard frog angle is 45°, and this – along with the chipbreaker set close to the edge of the iron and a tight mouth – is a good setup for tackling most softwoods and hardwoods. The higher the frog angle, the harder the plane is to push, so I don’t like to go to a higher angle unless absolutely necessary. I’d say that 99% of the time, I can tackle figured woods by sharpening the iron, then setting the chipbreaker as close to the cutting edge as I can – just a couple of thousandths back. I do this by setting the chipbreaker on a feeler gauge nestled up to the back of the blade. If I’m still getting tearout, I might switch to a 50° frog…or worst case, a 55° frog…in my No. 4 (because I have them for that plane). And there are more options if you have a Veritas bevel-down smoother; Lee Valley offers any angle from 45° through 60° in 1/2° increments. But honestly, I’m more likely to just reach for a scraper when it comes to hard-to-plane tearout.
Bevel-up planes
Sole: 9-1/2 in. to 10 in. in length; iron, 2 in. to 2-1/4 in. wide
These are popular, probably because they cost less (they have no chipbreaker or moving frog; fewer parts means fewer manufacturing costs), and can easily be sharpened to a higher angle to tackle tearout (but again, too high, and the plane is hard to push). But to adjust the blade in or out, you have to stop working; the control knob is simply too close to the plane body to grab while your hand is on the handle. That’s not such a big deal, and lots of great woodworkers love this style of plane. I find them a bit disconcerting, though, because I learned to plane with a three-fingers grip on a bevel-down plane. I just don’t know what to do with my index finger when there’s no blade for me to rest it against.
One last note: While the bevel-down planes and the Veritas bevel-up plane have a lateral-adjust mechanism, I rarely use them. I simply tap the iron at the top corner with a plane hammer to make small adjustments. I find that’s more accurate.
With so many choices, you can see how it might be hard to make a decision. That’s why I encourage folks to try out a few different planes before they buy. But if pushed, I’ll tell you to get a No. 3 with a 45° frog. And I will steer you away from a vintage smoothing plane, unless it has been restored and set up by someone who absolutely knows what they’re doing. A well set (and sharp) smoothing plane can work wonders, but this is the hardest bench plane to set up well. So buy an inexpensive jack; because it does heavy work, it doesn’t have to be set up with precision. And buy a decent jointer; you don’t want to have to flatten a 22-in. sole. But spend real money on a smoothing plane – it and you are worth it.
 |
|
 |
|
 |
Fine Woodworking Recommended Products

Olfa Knife

Veritas Precision Square
Tite-Mark Marking Gauge


Comments
A Veritas low angle block plane with four blades (or more) and the wooden knob & tote additions, selecting the larger tote. 1-5/8th inch wide blade, 6-1/2 inch sole. You can also have an extremely fine-threaded adjuster for varying the shaving 1 thou or less at a time.
Blades for cutting angles from 37 degrees to 60 degrees are available but you can make your own from a standard 25 degree bevel blade by putting on a microbevel .... very quickly. Get a toothing blade and make a scraping blade from a standard blade too, if they'd be useful.
Blades come in various metals, including the resilient and easily-managed PM-V11.
As a single plane its extremely versatile, as it's a block plane, toothing plane and small smoother (with the knob & tote in place) of any wood type, even the nastiest if you make a scraper blade edge for it on a spare blade.
Eventually you'll need a bigger beast as well; but this wee plane can do a lot and is highly reconfigurable.
Lataxe
4-1/2s were all the rage several years back. I tried one at the Lie Nielsen open house, and felt it needed a harness to hitch a mule team. It's a heavy, wide tool that takes a lot of oomph to push it through a board.
I always thought plane hammers were just for wooden planes with wedges and no mechanical adjusters like in my attachment. This is a revelation of sorts for me.
Fantastic blog post! Really like the author’s take on each bevel-down smoother.
Good article. Rob Cosman uses his 5 1/2 as a smoother all the time. He just uses a freshly sharpened blade and closes the throat down quite a bit. Also he has a separate blade with a significant back bevel on it that helps with tear out if needed.
The #3 is a fine tool. I do find the lighter weight is enjoyable from time to time. You can take twice as many shavings that are half the thickness and still get to the same spot with a bit less effort. Agree with Megan, a vintage #3 is best turned into a scrub plane with it's narrow sole - just widen the mouth and camber the blade.
While the 4 1/2 is heavier by quite a bit, a little wax on the sole and not picking it up on the return stroke decreases the work needed. Lastly the wider sole means less full passes to cover the full width of the board and less plane tracks due to fewer passes.
Log in or create an account to post a comment.
Sign up Log in