Build an 18th-Century Pennsylvania Secretary
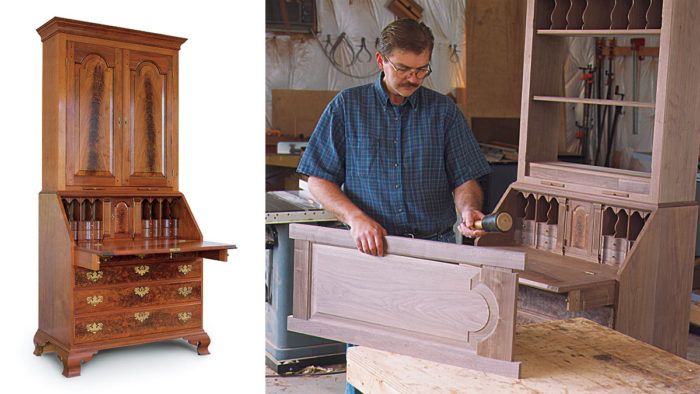
A pair of dovetailed boxes outfitted with drawers and doors make up the bulk of this period piece.

Synopsis: This article is the first installment of a three-part series on building an 18th-century Pennsylvania secretary with furniture maker Lonnie Bird. The key to building this large, complex piece — which has more than 100 parts and joints — is to break down the process into manageable steps. In this article, Bird walks reader through the construction of the upper and lower cases, and shares his detailed project plans. Bird has taught inexperienced students to build this piece in his woodworking classes, and documents the process in this article.
During the 18th century, building a secretary was often considered the culmination of a cabinetmaker’s skill. But for years I’ve taught inexperienced undergraduates to build the secretary seen on these pages. The key to building a large, complex piece, such as this reproduction of a Pennsylvania desk—with more than 100 parts and nearly that many joints—is to break down the process into small, easy steps. This secretary, like all casework, is just a series of boxes fitted within larger boxes. The moldings, curves, feet and other details are easily made but embellish the box, making the completed piece visually stimulating.
In this article—Part I of a three-part series—I’ll focus on building the upper and lower cases. Subsequent articles will walk you through the process of outfitting the gallery with drawers and pigeonholes and then building and hanging tombstone doors on the upper case. Although I have a great appreciation for 18th-century design, aesthetics and joinery, I don’t restrict myself to building absolute reproductions. Before building a piece, I study several related examples and combine the best design elements to come up with a piece that’s my own. And I don’t copy mistakes. If a door proportion doesn’t work or a glue block was attached cross-grain, I’ll make the necessary changes. I want my furniture to capture the spirit of period furniture without the shortcomings.
Build the lower case
Stripped of its drawers, feet and molding, the lower case is simply a box joined with half-blind dovetails. When laying out the joint at the top, keep in mind a couple of key points. First, begin the joint with a tail, which will hide the rabbet for the back boards. Second, the slope on the case sides begins 12 in. from the back edge. Mark the slope location and end the joint with a half pin.
Although you can use a jig to cut and fit the dovetails, I prefer the slight irregularities associated with a hand-cut joint. I use a router freehand to cut away the waste between the pins, then I use a chisel and mallet to square the inside corners between the pins. Finally, I scribe the tails from the pins and saw them by hand. The result is a joint with a handmade look but without much time or fuss.
The next step is to lay out the writing surface, the drawer dividers and the lid slope. The writing surface is positioned 11 in. below the top. Once the feet are attached to the case, the writing surface will be approximately 30 in. from the floor. Next, lay out the drawer placement. I think drawers look best if they graduate, meaning they gradually increase in height.
Lonnie Bird is an author and woodworking instructor. Visit him online at www.lonniebird.com
From Fine Woodworking #154
For the full article, download the PDF below:
Fine Woodworking Recommended Products

Circle Guide

Stanley Powerlock 16-ft. tape measure

Bessey K-Body Parallel-Jaw Clamp


Log in or create an account to post a comment.
Sign up Log in