Make A Contemporary Swing-Arm Lamp
Christian Becksvoort's wall lamp swivels on a wooden bracket and can be made to hold different types of shades.
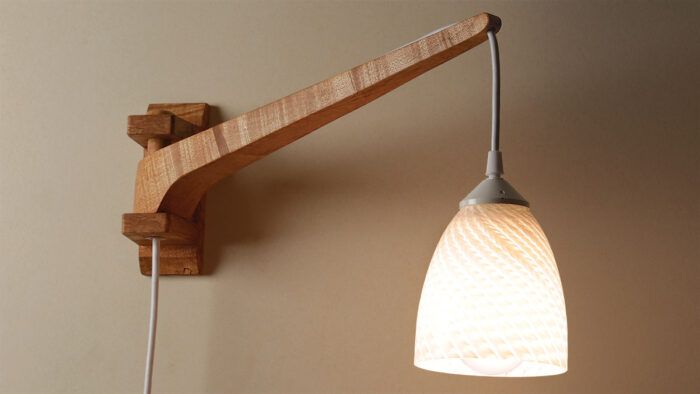
Synopsis: Based on a Scandinavian design, this wall lamp swivels on a wooden bracket and can be made to hold different types of shades. The design is simple, with just five pieces making up the arm, wall bracket, and swiveling post. Chris Becksvoort has made quite a few variations on this basic design. Also included are instructions on how to electrify your lamp.
When I was growing up, my parents had a Scandinavian swinging-arm lamp over the couch. It hung right in the middle, so when I was reading on either end of the couch, I could swing the lamp left or right as needed. I forgot about it for a few years, but it had more influence over me than I realized. In 1974 I bought the book Woodenware by Åke R. Nilsson (Drake Publishers, 1973) and discovered his simpler version of the swinging-arm lamp.
I’ve since made a variety of wall lamps, most in cherry, and most with wooden shades, and I’ve changed shapes and dimensions along the way. The most recent versions I’ve made are in tiger maple and have glass shades custom made by Tandem Glass of Dresden, Maine. But you don’t need a custom glass shade to make this lamp shine. There are a ton of websites as well as hardware stores big and small that carry beautiful glass shades. Playing with different wood species, arm shapes, and shades is fun and can really change the look and feel of the lamp. The design is simple, so select a species and grain to suit.
Begin with the arm
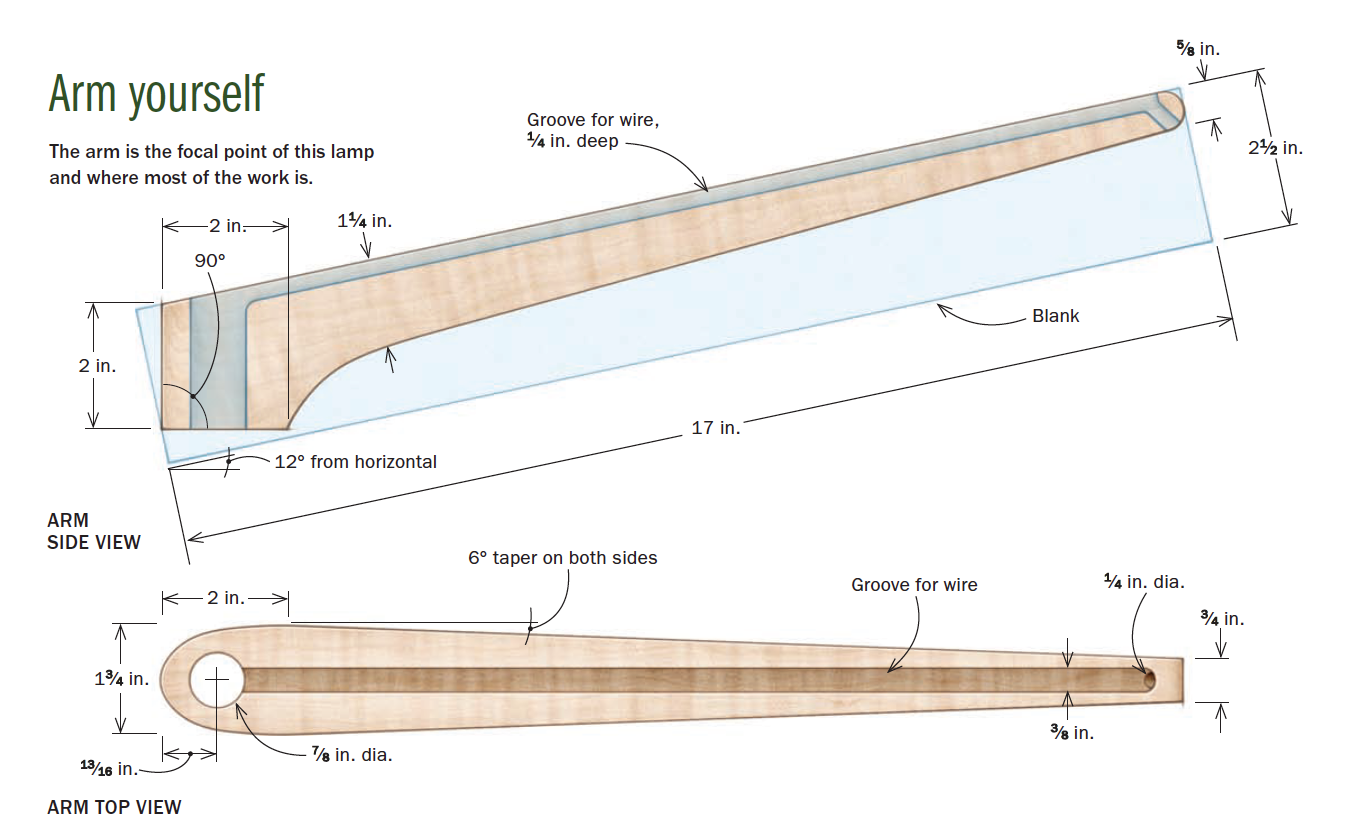
To make the arm, start with a piece of 8/4 stock, 2-1/2 in. wide by 17 in. to 18 in. long. The arm will be tapered in thickness, from 1-3/4 in. at the post to 3/4 in. at the tip, but I do all the other machining before cutting the taper. First, use a template and trace the pattern onto the side of the arm blank. Then bandsaw the underside of the arm and the curved nose on the front end.
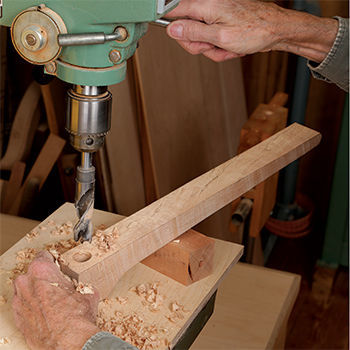
The arm slopes up about 12° from horizontal. To establish and maintain that angle, make sure that the flat section at the base of the arm is exactly 90° to the back edge. Next drill the 7/8-in.-dia. hole for the post, being sure that the base of the arm remains perfectly flat on the drill-press table. A spacer block to support the arm or a wooden hand screw clamp can help with this. Now draw the radius at the back edge of the arm. Cut the curve with the bandsaw and refine the shape with sandpaper (I use the disk sander), being sure to maintain the 90° relationship between the base and the back edge. I also refine the roundover at the front end of the arm at this point.
At the router table, cut the groove for the wire along the top of the arm. Then use a hand drill to cut an angled 1/4-in.-dia. hole about 5/8 in. to 3/4 in. from the front. The wiring will run in the groove and drop down through this hole to the light fixture. Now it’s time to cut the arm to a taper. With a straightedge and pencil, establish the angle on both sides of the arm from the back edge to the nose. Bandsaw both sides and then sand or plane them smooth. Then smooth all the faces of the arm, breaking all edges, and hand-sanding to 220 grit.
 From Fine Woodworking #274
To view the entire article, please click the View PDF button below.
More on Finewoodworking.com:
- Two Unique Lamps by Christian Becksvoort #222–Nov/Dec 2011 Issue
- Turn a Classic Floor Lamp by Ernie Conover #152–Nov/Dec 2001 Issue
- Contemporary Table Lamp by Tom McLaughlin and Christian Becksvoort
Fine Woodworking Recommended Products

Blackwing Pencils
Circle Guide
Compass



Comments
I needed more reference points to cut the bottom of the arm. (The 3/4" mark at the end is the only real reference point offered.
The length of the bracket is not given. (2-1/2" is shown on the side view but not sure if it accounts for the depth of the dado.
In repsonse to user-3639283, there are enough dimensions given in the article to layout the critical parts of the arm. The length of the bracket is also given in the article as well as those for the pin that connects the arm to the bracket.
I assume the horizontal brackets are 2-3/4" in length and the dado itself is 1/4" deep?
Log in or create an account to post a comment.
Sign up Log in