Skip to content
Fine Woodworking
Main Menu
Subscribe
GET THE MAGAZINE & MORE
Magazine Cover
  • Save 69% off the cover price
  • Or, get everything with UNLIMITED, including 40+ years of the online archive.
Subscribe Now!
Subscribe
  • Projects & Plans
  • How-To
  • Shop Tips
  • Tools & Materials
  • Videos
  • Magazine
  • Video Workshops
  • Members
  • Forum
  • Gallery
  • Blogs
  • More
    • Log In
    • Join
    Fine Woodworking Main Menu Subscribe
    How-To

    How to make a simple leg-tapering jig

    Dedicated sled is dead-simple to build and use

    Author Headshot By Tom McLaughlin #268–May/June 2018 Issue
    Article Image

    Synopsis: Tapered legs add elegance and lightness to the appearance of a piece, and there’s an easy, efficient, and safe way to cut the tapers using a dedicated jig. Tom McLaughlin’s tapering jig consists of a platform, some stops, and a couple of toggle clamps. Used on the tablesaw, it helps you to easily cut consistent tapers on multiple legs. It can also be used on the bandsaw.

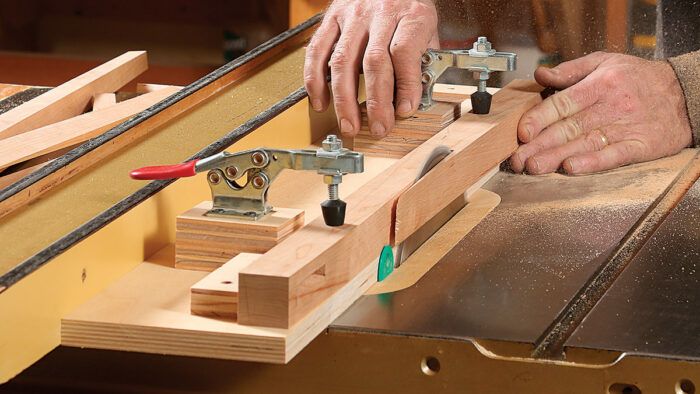
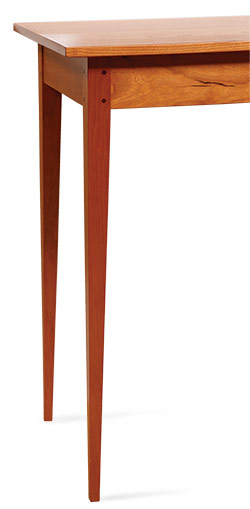
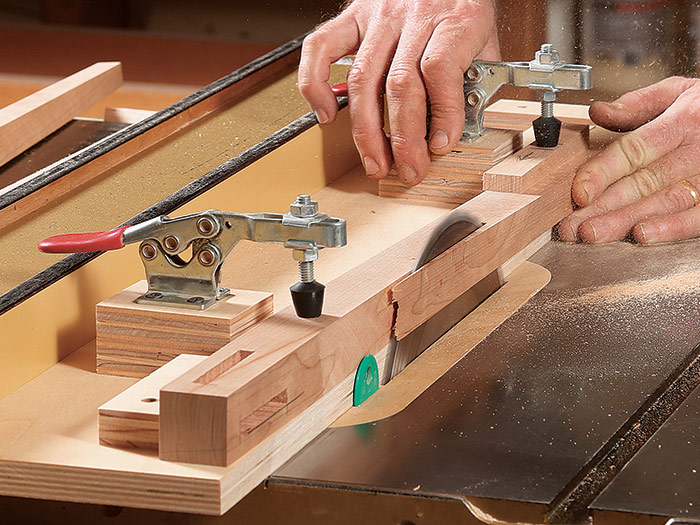
    Tapered legs are a simple design choice that can dramatically affect the appearance of a piece. In most cases, when located at the corners of a table, legs are tapered only on their two inside surfaces. This produces a light and elegant look—not to mention the illusion that the legs are splayed, giving the table a sturdy and stable appearance. To get these results with greater efficiency, accuracy, and safety, I recommend a dedicated jig. The one I use is a breeze to make. It consists of a platform, some stops, and two toggle clamps.

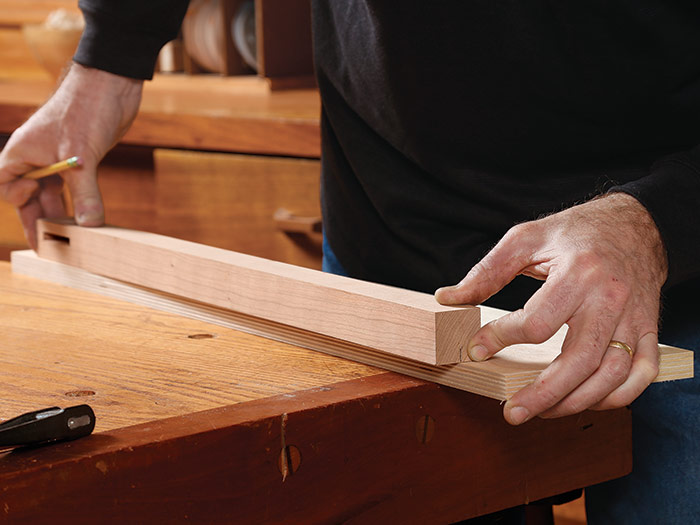
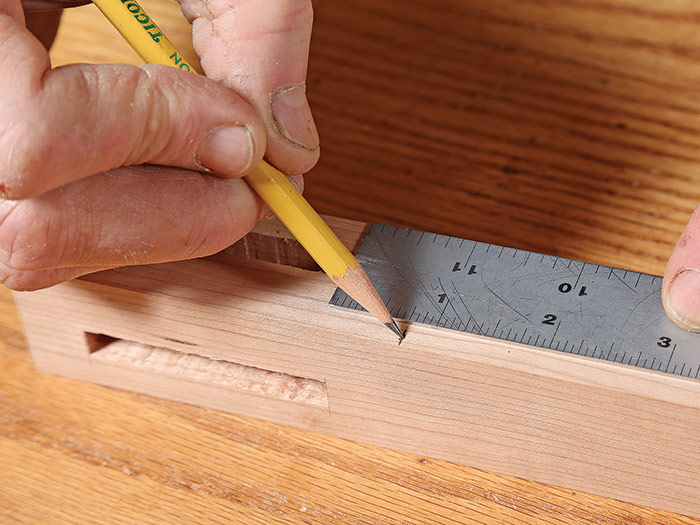
    To build the jig, start with a leg blank squared to its largest finished dimension, cut to length, and with its joinery cut. Then, on the end grain at the foot of the leg, lay out the end points of the tapers. Make your marks slightly outside the final dimensions. You’ll set up the jig to cut to these points and be left with a comfortable margin for handwork when you clean up and refine the taper.

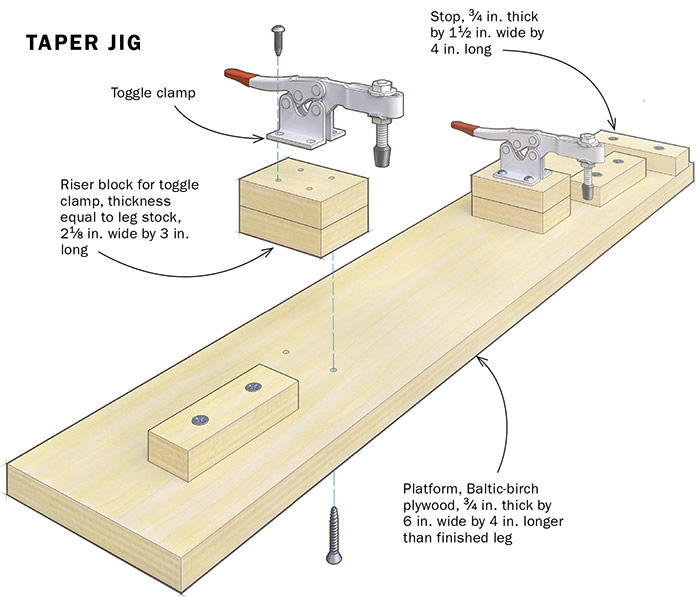
    For the sled’s platform, use 1⁄2-in.- to 3⁄4-in.-thick Baltic-birch plywood or another stable material, approximately 6 in. wide and 4 in. longer than the finished leg.
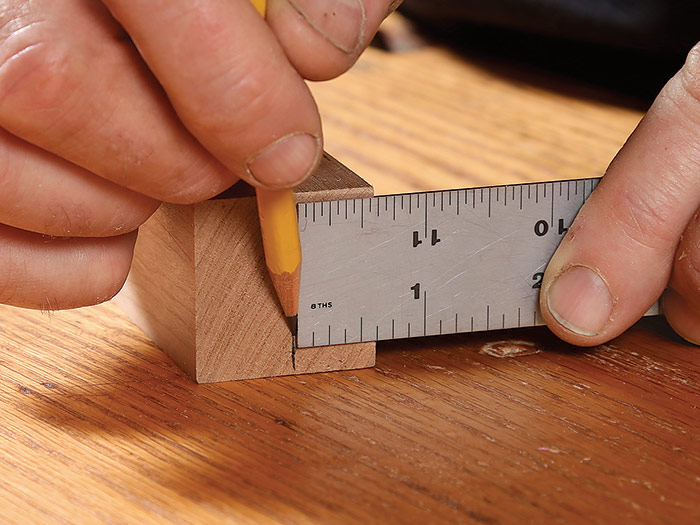
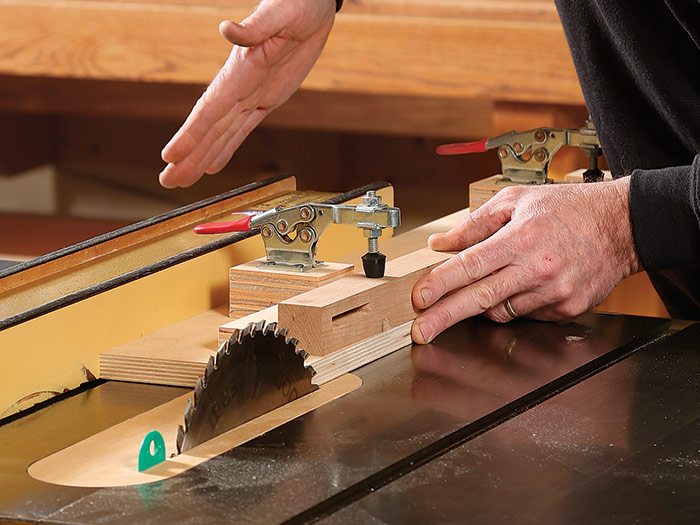
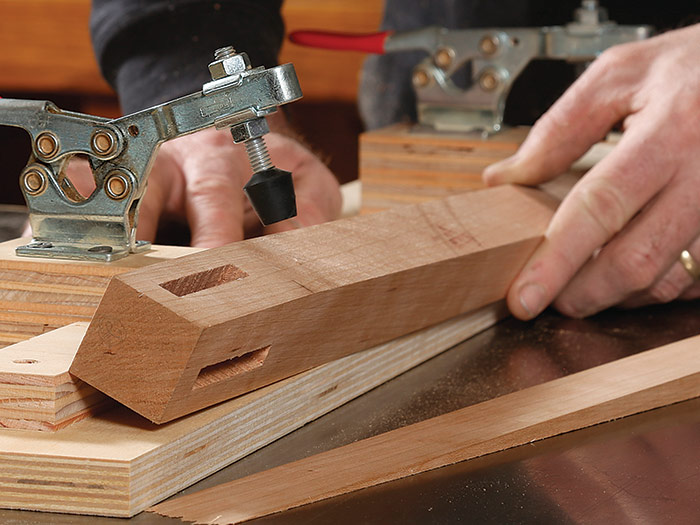
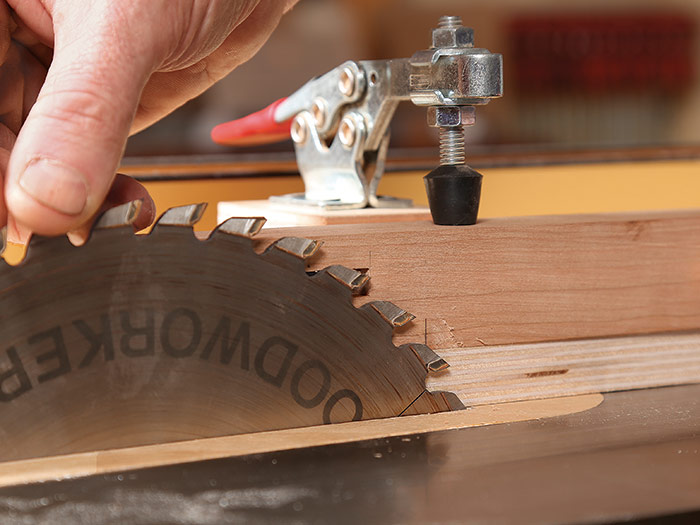
    Now clamp the leg blank to the sled platform, with the material to be removed overhanging the edge. Position the top and bottom of the leg approximately 2 in. from the platform’s ends, with the top of the leg leading the cut.

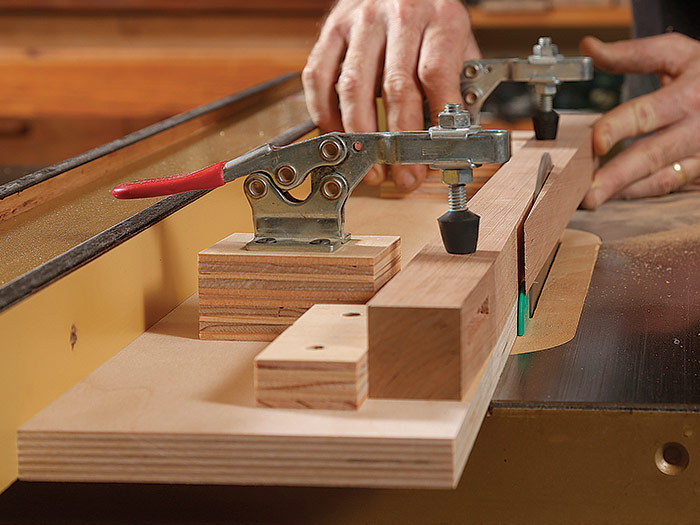
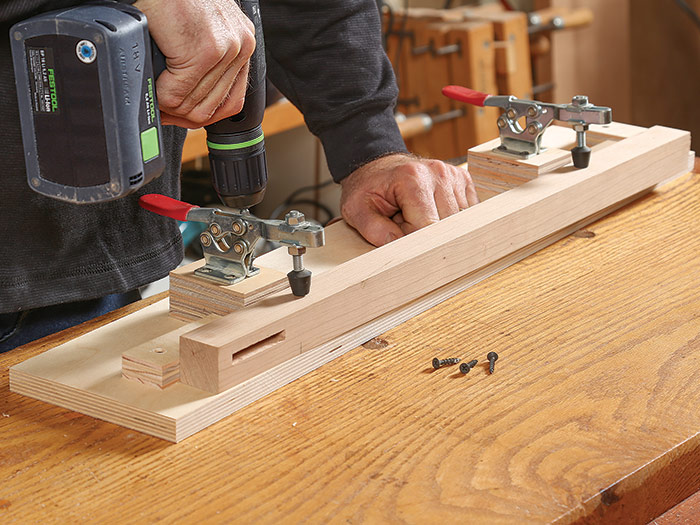
    With the leg clamped in place, add the three pre-drilled plywood stop blocks—approximately 3⁄4 in. thick by 1-1⁄2 in. wide by 4 in. long—that will ­ensure ­accurate repeatability. All three stops should be pressed up to the leg. Screw the stops in place. Now you can remove the clamps and leg from the platform.
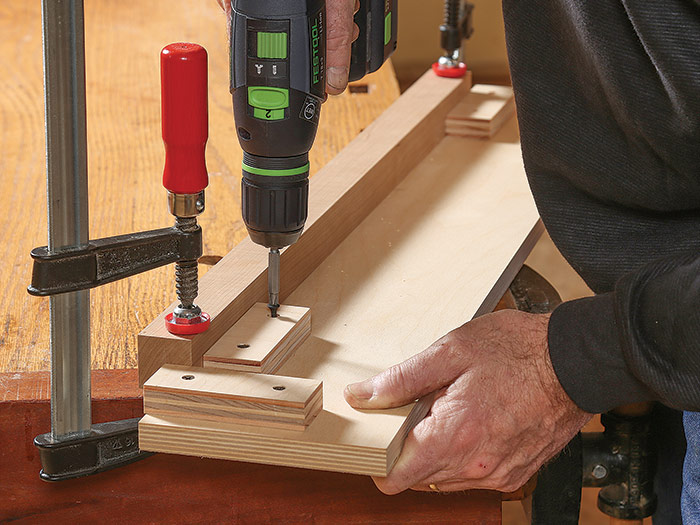
    At this point, the leg can be quickly nested and placed against the stop blocks, but it won’t be secure. For that, mount two toggle clamps to riser blocks roughly the height of the leg’s thickness and secure them to the sled near the ends of the leg.

    I prefer to use the sled on a tablesaw since it leaves the smoothest surface requiring the least cleanup, but you can also use it at a bandsaw. I recommend mortising the legs before tapering them. Not only does this spare you from cutting joinery on a non-square piece, but you also can use the mortises to confirm you’re tapering the correct faces.

    For the full article, download the PDF below.

    See how Tom cleans up his tapers to perfection in this video.
    More tapered leg goodness on FineWoodworking.com:

    • Three Federal Legs – Power tools speed the process, banding adds style
    • Splay-Legged Table – Straightforward design with a refined flair
    • Build a Harvest Table – A quick, satisfying project with simple lines and loose-tenon joinery
    • Perfect Tapers on the Tablesaw – Make tapered legs of all types, quickly and safely

    Sign up for eletters today and get the latest techniques and how-to from Fine Woodworking, plus special offers.

    Sign Up

    Get woodworking tips, expert advice and special offers in your inbox

    Sign Up
    ×
    View FREE Project

    when you enter your email address below.

    Plus, get Fine Woodworking emails filled with plans, how-to, and special offers.

    or Log In

    Read our Privacy Policy
    Questions? Contact Customer Service

    View PDF
    X
    X

    New Feature

    Fine Woodworking Forums

    Ask questions, offer advice, and share your work

    Get It All!

    UNLIMITED Membership is like taking a master class in woodworking for less than $10 a month.

    Start Your Free Trial

    Subscribe to Fine Woodworking

    Save up to 56%

    Subscribe

    Comments

    1. JoeHorn | Apr 22, 2018 02:00pm | #1

      For the second taper, I find that placing the cutoff under the first taper helps keep the top of the second taper square to the leg.

    Log in or create an account to post a comment.

    Sign up Log in

    Up Next

    Featured Workshop

    a diagram of a round Shaker stand and an image or a round Shaker stand

    Shaker candle stand with Christian Beckvoort

    He’s built dozens of round Shaker stands over four decades, so there is no one more qualified than Christian Becksvoort to demonstrate making this classic. In this seven-part video series,…

    Featured Projects & Plans

    Build a Contemporary Sideboard

    Chris Gochnour's sideboard combines usefulness, strength, and beauty in a contemporary case piece

    Related Stories

    • Milling Stock for a Dovetailed Box

    • Workshop Tip: Simple splitter for an old tablesaw

    • Make an Oval Bandsawn Box

    • So you just bought a tablesaw

    Discussion Forum

    Recent Posts and Replies

    • |
    • |
    • |
    • |
    • |
    • |
    View More Create Post

    Member Exclusives

    More Member Exclusives
    • bending wood

      How to bend wood to your will

      Use steam to create strong, curved parts with continuous grain.

    • Power-Tool Flattening

      Power-Tool Flattening

      Use your shop sanders to help take the tedium out of the process of sanding.

    • Tool test: Belt sanders for woodworkers

      Asa Christiana put 10 midsize belt sanders to work flat-sanding both panels and edges, sanding curves and tight corners, and using the tool as a stationary sander while clamped to a benchtop.

    • Ep 2: Adding curves and texture

      David gives his stool an elegant look with subtle curves and hand-carved texturing on the legs. Then he glues it all together with hot hide glue.

    Highlights

    • Shape Your Skills

      when you sign up for our emails

      Plus tips, advice, and special offers from Fine Woodworking.

      Sign Up
    • Shop Talk Live Podcast

      Shop Talk Live Podcast

      Our biweekly podcast allows editors, authors, and special guests to answer your woodworking questions and connect with the online woodworking community.

    • Woodpecker Sweepstakes

      Woodpeckers Shop Upgrade Giveaway

      Enter now for your chance to win more than $2,000 worth of woodworking equipment from Woodpeckers. Click for full details.

    • Staff Picks Blog

      Our favorite articles and videos

      We have created these special content collections organized to give you a deep dive into a range of topics that matter.

    Shaping

    View All
    • How to round over an edge with a block plane

    • Video: A textured and carved cutting board

    • Bending wood with hot water

    • Workshop Tip: Reverse your rubber sanding block for curves

    View All

    From the Store

    View More
    • Complete Illustrated Guide to Woodworking USB

      Buy Now
    • 2020 Fine Woodworking Archive

      Buy Now
    • 52 Boxes in 52 Weeks

      Buy Now
    • The Why & How of Woodworking

      Buy Now
    View More

    Get the latest from Fine Woodworking Magazine

    • #289-May/June 2021

      • Arts and Crafts coffee table with story-book charm
      • Links from Fine Woodworking issue #289
      • Seven tasks for a block plane
    • #288-Mar/Apr 2021

      • Phil Lowe: A craftsman and gentleman
      • Online Extras from FWW Issue #288
      • Phil Lowe: craftsman, teacher, friend
    • #287-Jan/Feb 2021

      • Simple, handsome 17th-century box
      • Online extras from FWW issue #287
      • Editor's letter: Finding sanctuary in the shop
    • #286-Tools & Shops 2021

      • Shoulder plane setup and use
      • Online extras from FWW issue #286
      • From the editor: A shop to call home
    • #285-Nov/Dec 2020

      • Make a dovetailed desktop organizer
      • Online Extras from FWW Issue #285
      • Announcing FWW ambassadors

    UNLIMITED membership - Get access to it all

    Start Free Trial Upgrade Membership

    Fine WoodWorking

    Follow

    Newsletter

    Get woodworking tips, expert advice and special offers in your inbox

    Sign Up

    Membership & Magazine

    • Members
    • Digital Libraries
    • Join Unlimited
    • Magazine Subscription
    • Magazine Renewal
    • Gift a Subscription
    • Customer Support
    • Manage Preferences

    Taunton Network

    • Fine Homebuilding
    • Green Building Advisor
    • Fine Gardening
    • Threads
    • About
    • Contact
    • Advertise
    • Privacy Policy
    • Careers
    • Copyright
    • Terms of Use
    • Accessibility
    • California Privacy Rights

    © 2021 The Taunton Press, Inc. All rights reserved.

    Get instant access to over 100 digital plans available only to UNLIMITED members. Start your 14-day FREE trial - and get building!

      Main Menu

    • Projects and Plans
    • How-To
    • Shop Tips
    • Tools & Materials
    • Videos
    • Gallery
    • Magazine
    • Video Workshops
    • Members
    • Forum

      Popular Topics

    • Design
    • Small Projects
    • Beds
    • Chairs, Benches And Stools
    • Built-ins
    • Storage And Shelves
    • Cabinets
    • Carving
    • Casework
    • Desks
    • Tables
    • Shop Storage And Furniture
    • Woodturning Projects
    • Workbenches
    • Surface Prep

      More

    • TV
    • Forum
    • Blogs
    • Webinars
    • Podcasts
    • Customer Support

      Account

    • Log In
    • Join

      Magazine

    • Current Issue
    • Past Issues
    • Digital Libraries
    • Magazine Index
    • Subscribe

      Membership

    • Member Home
    • Start Free Trial
    • Gift Unlimited
    • Log In

      Shop the Store

    • Books
    • DVDs
    • Taunton Workshops

      Events

    • Fine Woodworking Live
    • Fine Woodworking HANDS ON

      Account

    • Log In
    • Sign Up

    Newsletter

    Get woodworking tips, offers, and expert advice in your inbox

    Sign Up

    Follow

    UNLIMITED

    Become an UNLIMITED member and get it all: searchable online archive of every issue, how-to videos, Complete Illustrated Guide to Woodworking digital series, print magazine, e-newsletter, and more.

    Start Your Free Trial

    Upgrade Membership