6 Essential Workbench Jigs
Planing stops and saw hooks add speed and accuracy to your handwork.

Synopsis: One of the secrets to hand-tool success is keeping the workpiece from moving as you work on it. While clamping a piece in a vise or to the benchtop can work, often it’s overkill. Not only that, but clamping and unclamping adds a lot of time to the process. A better method is to use a planing stop or saw hook, which take advantage of the cutting force of the tool to keep the workpiece in place.
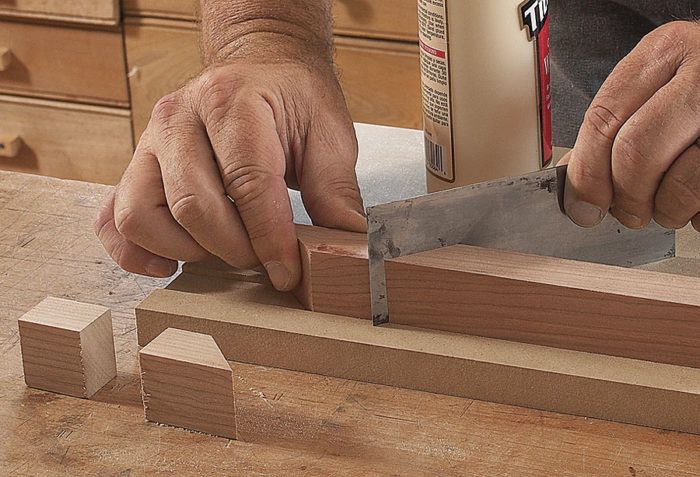
When starting out with hand tools, it doesn’t take long to realize that the cutting force of the tool tends to move the workpiece in the direction of the cut. One of the secrets to hand-tool success is stopping that movement. While clamping a piece in a vise or to the benchtop can work, often it’s overkill. Not only that, but clamping and unclamping adds a lot of time to the process. A better method is to use a planing stop or saw hook, which take advantage of the cutting force of the tool to keep the workpiece in place. When handplaning, the tool drives the workpiece forward. If you add a stop at the front edge of the board, you can plane all day without the piece moving. In addition, it’s fast and easy to flip the stock to surface the other faces without messing around with clamps or vises. A saw hook works the same way. Hold the workpiece against the saw hook’s fence, and you’ll get faster, more accurate cuts every time. Planing stops and saw hooks can take many forms. Some have a cleat that rests against the edge of the bench to keep the jig in place, while others are clamped in place. I use one of these bench jigs just about any time I pick up a handplane or saw. Here I’ll cover the ones I use most often.

Some take just minutes to make while others are a little more involved. Even so, you can knock all of them out in an afternoon, and then get back to serious work. The T-stop is the easiest to make and the one I use most often. In its simplest form, it consists of a thin fence screwed to a cleat that gets clamped in a vise. The fence can be as long as your bench is wide. The cleat should be thick enough to accept the screw. Anything 3⁄4 in. or more is fine. When attaching the fence, make sure that the screw head is recessed below the surface to avoid contact with the plane blade. To use the stop, clamp the cleat in a vise and then secure the opposite end—you can clamp it to the far side of the benchtop, or drill a dog hole opposite the vise and drop in a benchdog. The single screw allows the fence to pivot until it hits the benchdog, so the cleat placement in the vise doesn’t have to be right on. With the stop in place, you can tackle boards and panels as wide as your benchtop. You can also edge-plane stock up to 6 in. wide by standing it on edge against the stop.

From Fine Woodworking #258
To view the entire article, please click the View PDF button below.
Fine Woodworking Recommended Products

Estwing Dead-Blow Mallet

Jorgensen 6 inch Bar Clamp Set, 4 Pack

Compass


Comments
Mike - great fixtures! Have several of them in my shop. Will be building the rest later today to solve challenges described. Thanks , Stuart
Great job Mike! Great video and article. You seem to be among the last of a great group of men who once dominated the scene at Fine Woodworking. Hang in there! Stay the course!
Hey!
For the t-stop, what are the benefits of using a screw rather than a fixed joint to connect the 2 pieces of wood? Are there situations where you don't use thus set to 90 degrees?
I questioned the same thing until the other week when I had a part with an angle at the end and I was glad I could change the angle of the stop to match. Realistically though, they take two minutes to make, make an extra and see which one you use more often!
Thanks for the reply, Ben.
This looks like a very useful article, but the link to the pdf seems to be broken. Could someone please look into that. Thanks!
Seems to be working now. Maybe it was a server hiccup.
Very nice stuff. I've made a version of the Narrow Parts Stop that's wider. I use thin strips to vary the width of the base so that I'm not hanging over the bench too far when working on really narrow pieces. I also use it when plowing grooves in drawer sides, or rounding over an edge. I just add enough strips so the edge I'm working on is in line with the edge of the base.
Mike -- I'm making some of these jigs, and still am not seeing a good way to hold tenoned work-pieces to clean up the cheeks while finessing a fit. This of all tasks would be great to have a no clamp option. Any suggestions? Thanks.
A bench hook would be ideal for cleaning up a tenon with a should plane.
Jigs - beloved items of all American woodworkers. There often seems as many articles about jigs in FWW as there is about furniture!
But this article is entirely convincing of the utility of the bench jigs described. They support many of the basic operations on a bench and will surely become everyday users for those having them. .... Unlike some other jigs (often vast and complex) that could be mentioned. A lot of the latter seem to be fixes to tablesaws without sliding tables, for example. Why not just buy a proper Euro-saw, eh? :-)
For some of us, the problem is not so much the plethora of jigs but the space to store them. Many of the workshops shown in FWW and it's videos are the sort you could see from space - large; very large.
Just recently I moved house and had to sell four large machine tools as the the workspace at the new house is restricted. A lathe, big belt sander, drum sander and even the big bandsaw had to go. On the positive side this has prompted a further move towards more hand tool woodworking. (They're so much smaller). However, jig storage space is near non-existent.
Still, I must have them Peko-jigs. They really are well thought out. Perhaps I can evict the router table to make space .....?
Lataxe
Log in or create an account to post a comment.
Sign up Log in