A guide to building a window box with DIY corbels
Curvy corbels add a decorative twist to this simple home project.
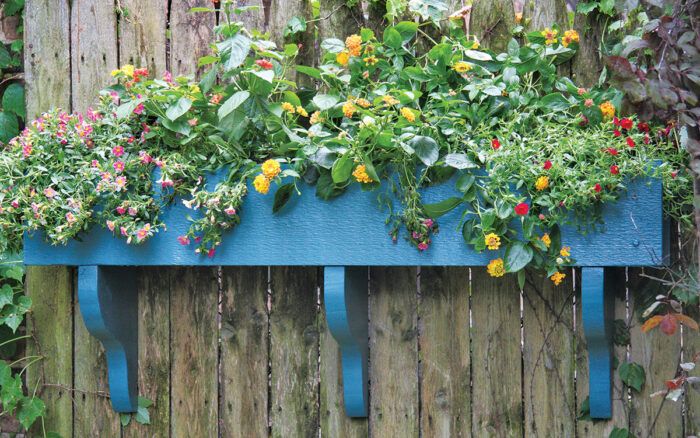
This project is a rough-hewn window box with a bit of cabin-like joinery on display. The material is cedar with one rough side, a material that is usually about 7/8 in. thick. For a more substantial result, you could use 2-by lumber instead.
To ensure against mistakes, make the box first, then cut the corbels to fit. The face and back overlap the sides by 1-1/2 in., in keeping with the style. The corbels in this installation are mostly decorative (though they do add a bit of support), but the box is actually attached at its back. If you need to attach via the corbels, use very long screws to attach the corbels to the wall.
Materials
|
Tools
|
1. Cut the cedar for the front and back pieces of the planter to the desired length (the example shown is 46 in. long), and cut the sides to 8 in. long. In the front and back pieces make dado grooves 1-1/2 in. away from the ends on the smooth side. Mark the dado grooves using a square and the piece that will fit in the groove; cut the lines with a circular saw set to a depth of half the board’s thickness, make a series of cuts inside the lines, and clean out with a chisel.
2. For the front and back pieces, cut a cleat to support the planter’s bottom. Rip a piece of 1-by cedar to 1-1/4 in. wide and cut it to span between the dadoes. Attach with nails or screws to the bottom of the planter.
3. Cut plugs to fill the screw holes. Drill counterbore holes in the front and back pieces, centered on the dado. Apply polyurethane construction adhesive to the dadoes, insert the sides into the dadoes, and then drive screws to attach. Finish by tapping in the plugs.
4. Once the planter is assembled, cut a piece of treated plywood to fit in the bottom. Drill a series of 3/8-in. holes for drainage and drop it in on top of the cleats.
5. To make a pattern for your corbels, experiment with plates or other round objects. In this example the large plate is used to make the lowest and the topmost curve; a smaller plate makes the middle curve.
Tip: The corbels should be the width of the planter minus 1/4 in., so their fronts are not quite flush with the front of the box, for a neater appearance.
6. Finish drawing the template by using a square to draw straight lines at the ends. Cut with a utility knife, and test to make sure it’s the right size by holding it in place. Place the template on a 2×10 and trace the pattern.
7. Cut the corbel pieces using a jigsaw for the curved lines. Practice on scrap pieces if you are not proficient with a jigsaw: Aim for smooth cuts, rather than micromanaging the cuts and making small corrections, which leads to jagged lines.
8. Use a belt sander or a hand sander with 60-grit sandpaper to smooth any uneven cut lines. If the corbel has a smooth side, run the sander across the grain to produce some roughness. You won’t match the texture of the rough cedar, but a slightly abraded surface will look more at home.
9. Attach the corbels by drilling pilot holes and then driving screws through the bottom of the planter.
10. Paint or stain and seal the box. (In this example, we applied watered-down paint, for a stained look.) Check for level, then attach the box by driving screws through its back. If that is difficult, use an angle bracket to attach it to the sill.
Fine Woodworking Recommended Products
Veritas Wheel Marking Gauge
Sawstop Miter Gauge
Veritas Micro-Adjust Wheel Marking Gauge


Log in or create an account to post a comment.
Sign up Log in