
Shooting Board
A shooting board has no equal for producing an accurately square end on a board—incrementally removing wood to make a piece fit just right.

Shooting has no equal for producing an accurate edge on a board.
Shooting has no equal for producing an accurately square (or angled) end on a board while incrementally removing minute thicknesses of wood to make a component fit just right. This shooting board has seen many years of use in my shop while meeting my preferences for jigs to be simple and adjustable for tolerance.
It is easily constructed using a 9″ x 26″ x 3/4″ piece of MDF for the base. Plane the working side of a dressed quartersawn mahogany board, 6″ x 3/4″, straight and square. Attach it to the MDF with screws, leaving a 3″ track on which the side of the plane will ride.
Tim Rousseau shows you how to become a shooting board master:Master the shooting board and take your woodworking skills to the next level. |
| In this article, Tim shows you how to make his simple shooting board. |
How my shooting board is made:
|
|
|
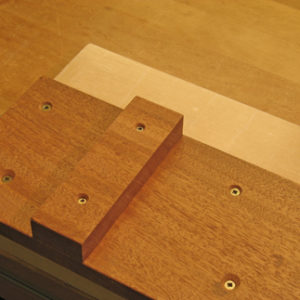

The track is covered with adhesive-backed 1/32″ thick UHMW slick plastic which makes the plane ride like a sled on ice. Screw a short grain fence, about 7/8″ thick, a few inches in from the end. To attach the fence, use slightly oversize clearance holes, adjust the squareness until you’re satisfied, then tighten the screws.
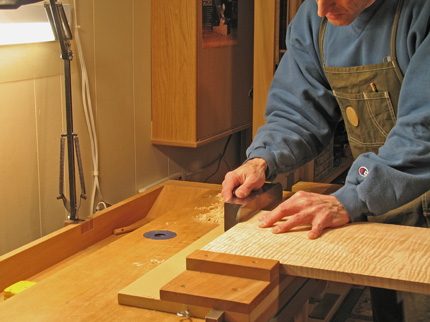
In use, don’t worry if the woodworking gremlins confound your attempts to produce a square end on a board even though the fence is “perfectly” set. Just use a piece of tape or a shaving judiciously placed on the face of the fence to produce the squareness you seek. The same goes for squareness across the end of the board – use shims logically placed on the shooting board surface to get the desired result. This is micro adjustability under your control! Break in the new jig by taking a few shavings off the side of the mahogany to create a minuscule rabbet. The outermost part of the plane’s sole will ride on the uncut straight edge while the tiny blade projection will nest in the rabbet.
A thicker fence can be attached for thicker workpieces or to stack workpieces to distribute blade wear. I seem never to use miters in my work but a fence could easily be attached at any angle in similar fashion as the square fence. The scale of this shooting board is more for drawer making but I have used it to shoot carcase boards by using an adjustable support alongside the workbench. Still, if I were to make a new one I would probably make the support piece about 2″ wider (8″).
My favorite plane for shooting
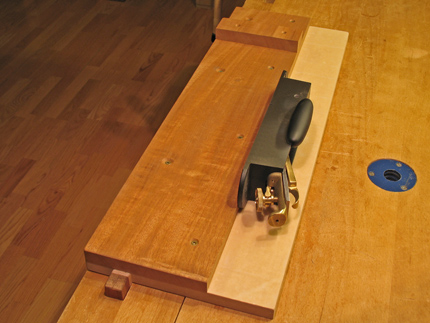
The shooting board also works well for long grain edges on small, thin pieces which can be difficult to joint by the usual method in which the board is clamped in the front vise while the top edge is worked.A low angle, bevel up plane is ideal for shooting. I like the compact mass of the Lie-Nielsen #9 “iron miter plane.” Don’t even think about shooting without a very sharp blade.
More on Shooting Boards from FineWoodworking.com:
- Shooting Boards 101
- Weekend Project: Build a Shooting Board
- Video: Shooting Board in Action
- A Shooting Board for Case Miters
- Choosing a Plane for a Shooting Board
- A Shooting Board that Handles 5 Jobs


Comments
Good job illustrating a shooting board. Keep up the good work!
A 1" wide register surface should be adequate. Move the shooting board to the end of the workbench - then holding the handplane would not be so traditionally awkward.
A shooting board, in my experience is longer and used for squaring the long grain edge. to square the ends of boards, I use a bench hook, which requires no clamping to the bench and is smaller - only about 14" square. On the bottom, I screw in a piece so that the device hooks on the bench. As all the pressure is away from you as you push the plane, the bench hook stays in place when in use. I teach woodshop to elementary students and they use these all the time for squaring boards. Of course, a sharp low angle block plane is essential.
Maybe I'm missing something... Why does the edge need to be square? I can see that the stop needs to be perpendicular/square to the shooting board edge, and the shooting board edge needs to be straight and the top surface parallel to the base, but after that, isn't the planed surface only depenent on the side of the plane being square to the base? Would appreciate experienced advice...
Couldn't follow your terminology or how the shootingboard was supposed to operate..
I recently made a shooting board and I can only restate what anyone who's ever used one says. They are indispensible when it comes to making accurate, tight fitting joints.
I took my design from an article written on 'www.whitemountdesign.com'. It is by far the most comprehensive article I've read on shooting boards and clearly illustrates how to build one.
I would add that rather than a block plane, although adequate enough would not be the 'ideal' plane to use on a shooting board. The larger planes are more stable and the weight makes the action smoother. How large? The bigger the better. Obviously a good quality plane with perfectly squared sides.
great tip and a good article!
Good job! keep up the great work
Log in or create an account to post a comment.
Sign up Log in