Antique Workbench Completion
 Sep 20, 2012

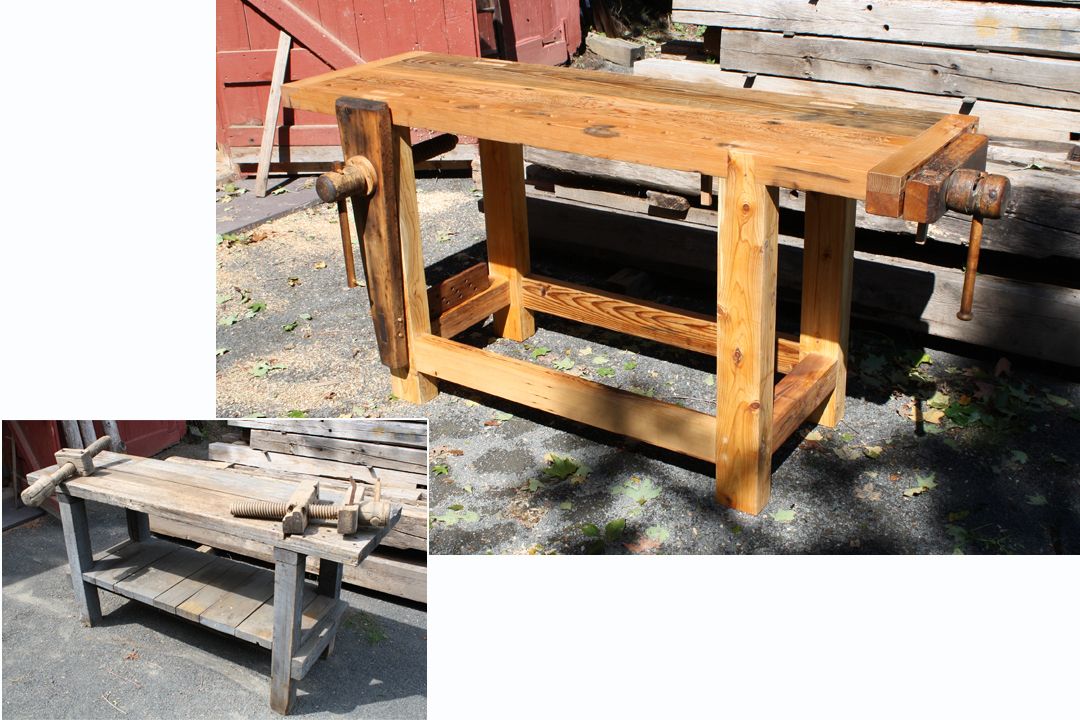
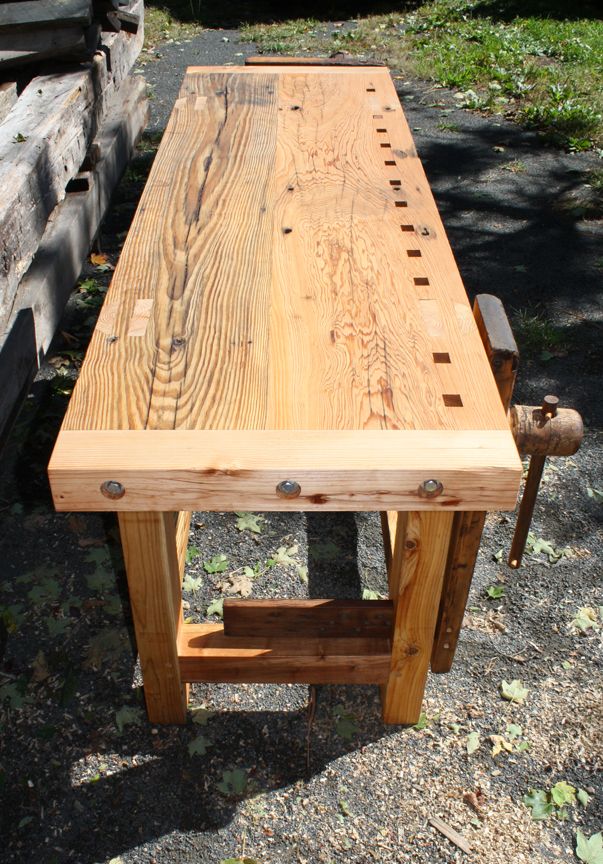
The before and after. One of the original top planks was re-used in the new top. The second original top plank was too rough, so it became the back stretcher, and strips that added thickness to the first plank. The original legs became the lower side rails and the end caps. The only added parts are the new legs to beef up the leg dimentions to 3in by 5in. and a second plank for the top.

I’ve always admired antique workbenches showing all those years of use. This “reclaimed” bench of sorts doesn’t show all the dings, dents and saw kerfs of the original top, but the vises still do. I have to say these wood screw vises are a joy to use. They look a little rough, but with a thin coat of wax on the threads, these guys operate as smooth as can be. I’ll just have to get to work using the bench to age the new top!
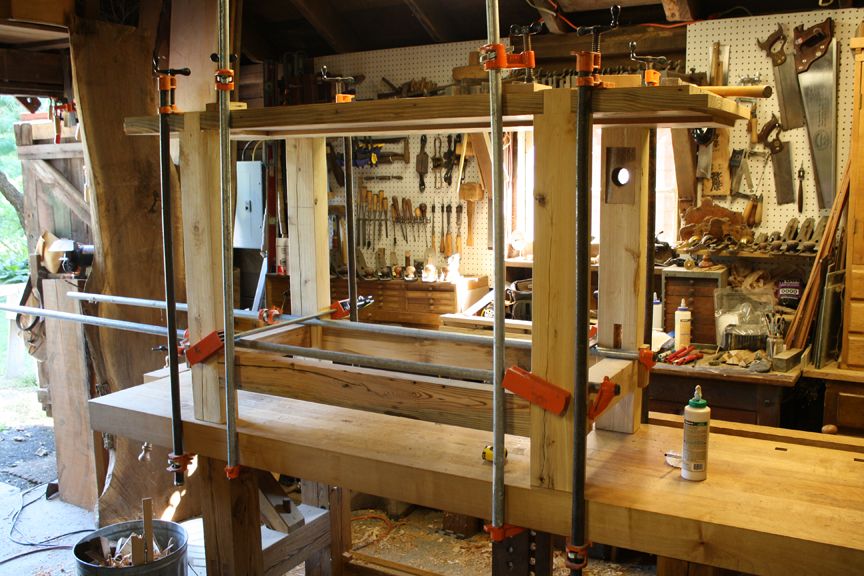
I should have tackled the glue up in stages. First glueing the leg assemblies separately, then glueing the stretchers in place before tapping the top down on the leg tenons. It was actually more like beating the top down onto the leg tenons, but they eventually were all seated down nice and tight using a scrap block of wood and a small mallet.
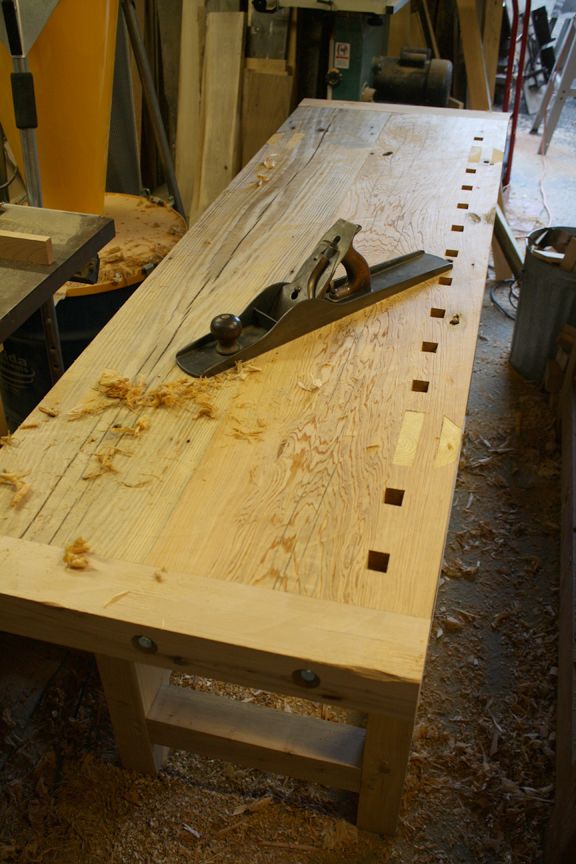
Since the top is yellow pine and cyprus, flattening was pure fun. After attaching the vises, all I had to do was fit a few bench dogs to the top and the tail vise. The tail vise still had the original forged dog with it, but I like wood dogs better. Actually, if the end blocks weren’t bolted in place, the only metal in the entire bench would be the six brass screws that lock the flange to the leg vise chop!
More on Workbenches
Hybrid Roubo Workbench ![]()
Monster Workbench ![]()
A Workbench Built for Power Tools
Build Your First Workbench
-
The before and after. One of the original top planks was re-used in the new top. The second original top plank was too rough, so it became the back stretcher, and strips that added thickness to the first plank. The original legs became the lower side rails and the end caps. The only added parts are the new legs to beef up the leg dimentions to 3in by 5in. and a second plank for the top.
-
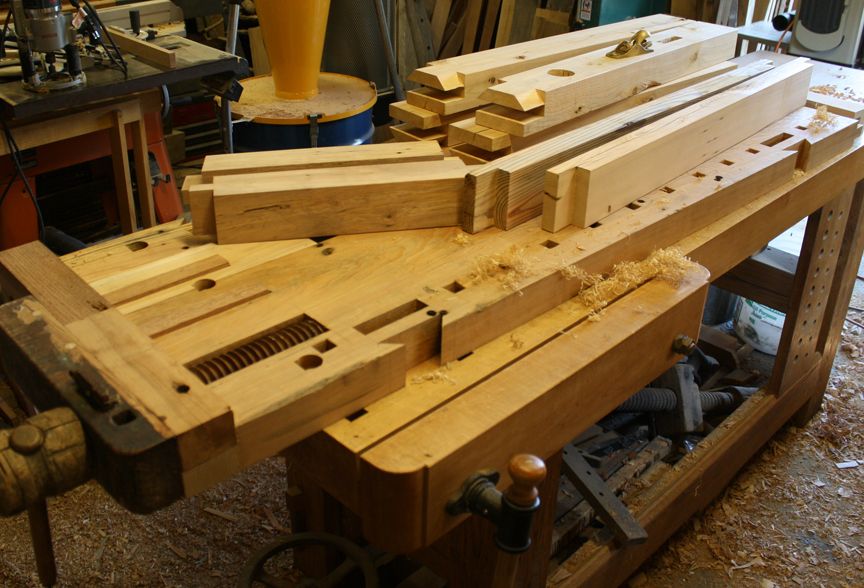
All the parts read for glue-up.
-
The big glue-up.
-
I added 1/2in. thick yellow pine strips to the bottom of the original top plank that was re-used. This brought the final thickness to 3in. so it would match the new plank.
-
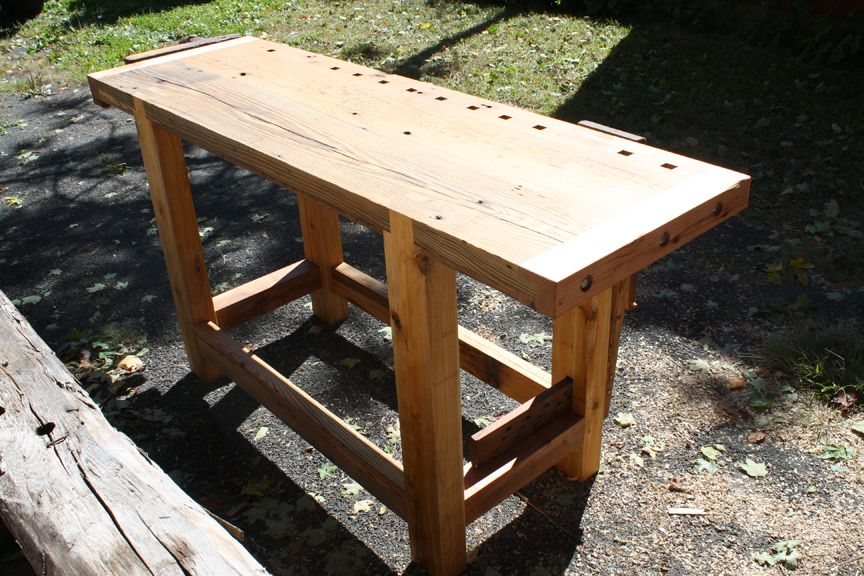
Flattening the top. Love the look of those leg tenons coming through the top.
-
And here's the bench with finish on it. Linseed oil thinned with turpentine.
-
The back of the bench.
-
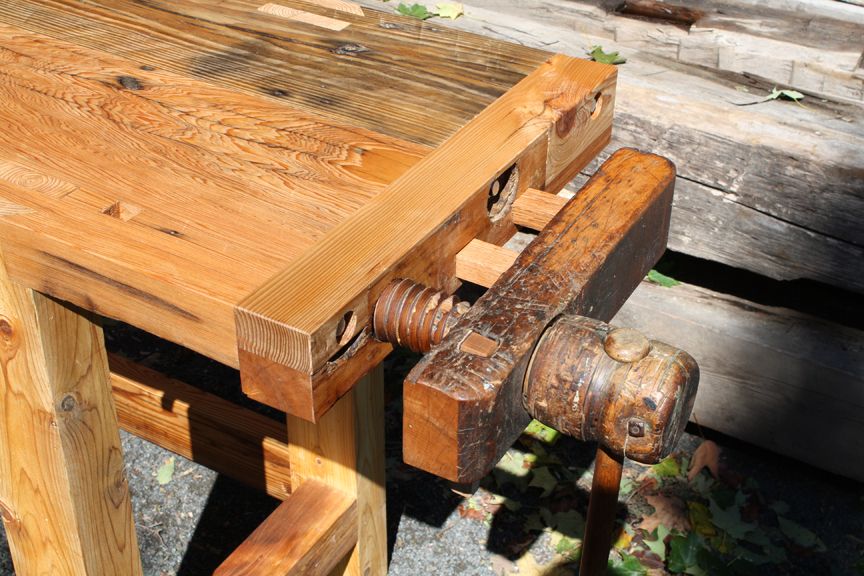
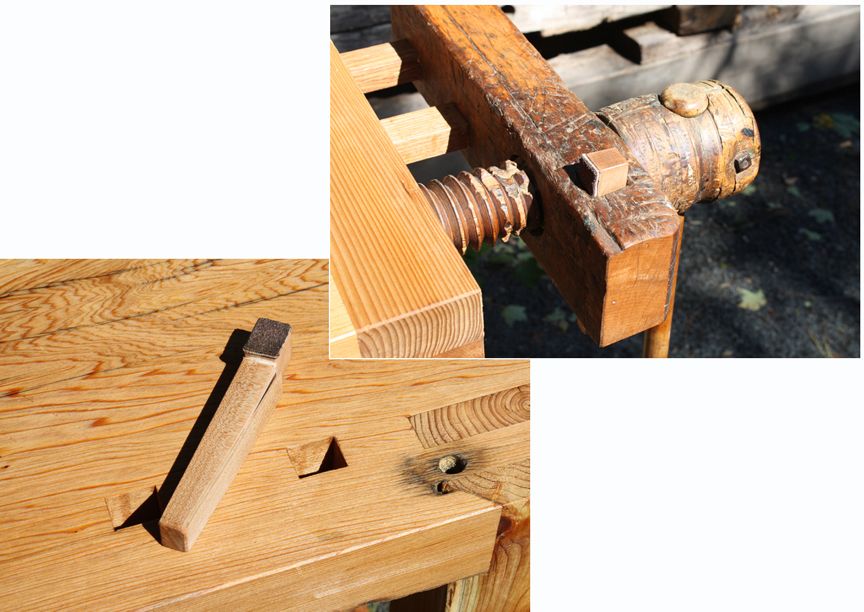
Leg vise detail.
-
Tail vise detail.
-
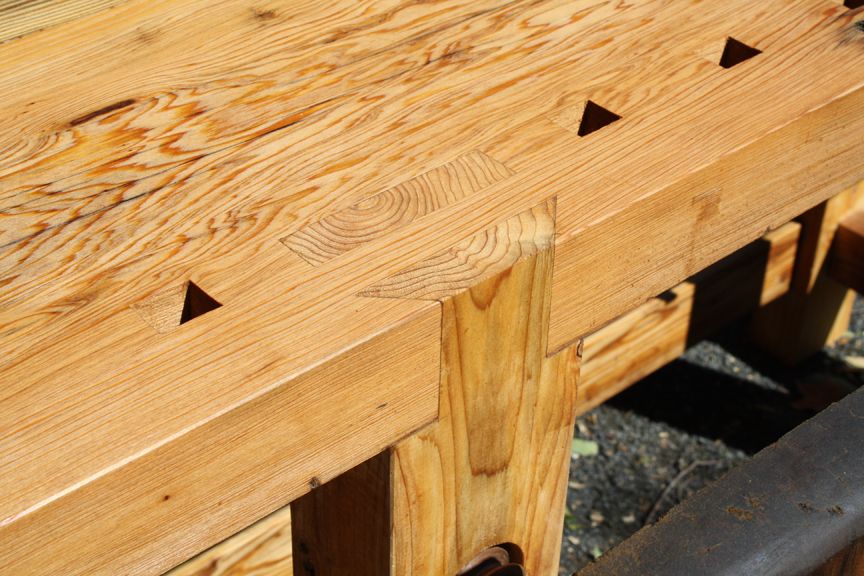
Leg tenon detail.
-
The metal flange was missing from the leg vise screw, so I made one out of wood. The toughest wood I could find in the shop was a small piece of straight-grained black locust. I added a bit of wax to the slot before screwing the flange to the chop.
-
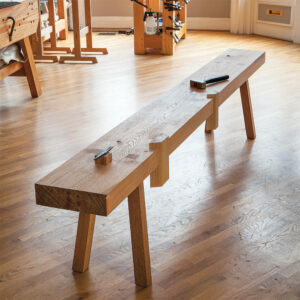
The final touch. Two maple bench dogs and the "new" antique bench is done!


Comments
John, does this mean that you are giving away your hybrid roubo? If so, I will email you my home address for shipping details. :-)
The new old bench came out great! What are your plans for it?
Agenttwitch,
I checked with Fedex, and they said the roubo bench was over the weight limit, so we'll have to organize a lift gate truck. :-)
Seriously though it would be hard to give up the hybrid roubo. I've found it to be exactly what I want every time I use it. The new old bench was a little side project, mostly because I like antiques and I always wanted to try a wood screw vise. The smaller size of this bench (22in. wide by 6 feet long) will make it more manageable to bring down to our local agricultural fair where I do a small woodworking demo. And for the rest of the year it will be nice to have a second bench in the shop for glue-ups or assembly, that is if I can squeeze it in my shop!
John
C'mon, John!
Cyprus wood?
You work for a woodworking magazine for Pete's sake.
Get someone to proof you work and know that it's CYPRESS wood.
Seeing typos like that on-line and in the Magazine is disconcerting.
Even so, you did great wok. Especially on the vise screws!
He did great "wok"???
Gee,you should get someone to proof your submissions...so disconcerting!!!
Editors do not correct the spelling of actual words as written by the author. At most they note with a comment that they know that the word is spelled incorrectly.
1). err--that's proof "your work" if you are going to start correcting others.
2). hmm--it looks like cypress is (not) too poplar!
3). I am a novice, but wouldn't it be easier to glue/use shorter pieces of wood for the row of dog holes and the mortise for the legs, to look like this:
______________
__ __ __ __ __
______________
That is all these guys can find to complain about? Missspellings. It appears that the geneleman's talent lies elsewhere not in perfection of his spelling. great job on redoing the bench. I have built seveal shop benches mainly for around the home repairs and auto repairs and am embarking on my first woodworking only bench. Just started woodworking as hobby when I recently retired from my second lifetime occupation. So far I still have all my fingers, hands, and eyes. I hope my first bench looks near as good as this restoration! Misspellings and all!!@
Fantastic job on salvaging the antique workbench. Don't be concerned about the misspellings. I kan't spell either.
John:
This is so timely. I am sitting here in my shop looking at my 100 year old workbench (which I am preparing to rebuild), checking my email, and low and behold there you are. My story is too long to relay (and would probably bore everyone), but my bench was destined to be chopped up for firewood, and if I wanted it, come get it. I have been collecting the materials and the tools to rebuild it now for over a year. Even the handtools are 100 years old, LOL. The project may be perfect for documenting. I've been a woodworker for 25+ years and this is my first real workbench. It has a wood screw front vise and tail vise that the split flange is missing from. Like you, I planned to take the piece of true lignum vitae I've been saving and make another. Your article was truly inspirational for me. As soon as my current orders are finished I'm going to start my "Half-and-Half Workbench Project" - meaning half old and half new. And before the Pot calls the Kettle black try reading things backwards-it's an old proof-reader's trick...
The guy makes a great bench and all you guys complain about is his spelling? For crying out loud, get a life! Or all you complainers jealous for not having woodworking skills? Enough with this foolishness. That's one heck of a bench. I wish I had the time to build one like that.
For all of those worried about speling, they should check out Mad Magazine's "Back to Colege Isue".
John, I think the work bench is beautiful. I have had a bench about that size sitting unused since finding it in the basement of the last house I lived in nearly 40 years ago. I have started doing more in my work shop and have been thinking about dragging it out of storage and putting it to work. I sure could have used the vises on it if it were serviceable, You have given me the shot in the arm i needed to get it down and work on it. Thanks for the great article and the accompanying pictures. It is always nice to see the work in progress.
Love to see anything wood recycled great job, ignore the readers moaning about the spelling, its about the woodwork.
To Woodnt,
You're right, it would be easier to deal with the dog holes as a separate strip - small pieces glued up or a template for a router works great. The cypress (not the country of cyprus of course, :-)) was soft enough for me to just go with chopping.
To WomenTurn2 and NoDeal,
I'd love to see photos of your workbench restoration projects. It's great to hear those old benches are going to be put back to work!
John
Thanks John for your interest in my project.
I should be starting on the build/rebuild in a few days. I have used this bench since I saved it from the wood pile. It is so rickety that I have 2 pipe clamps on the base to steady it up. But once I got used to not drawing blood walking around the clamps it has actually worked pretty good. and I love the vises. I should be able to shim them with lignum vitae to tighten them up a bit.
But here is my question - how do I post pictures of my project? I am quite new to the forum and am somehwat ignorant of the ins and outs so to speak. This is a question probably best posed to the "Regulars" to answer for me so I don't take up your (John's) precious time with mechanics. If anyone knows how to post pics or even short videos (other than UTube) here I would be much appreciative.
And John, I especially like your videos and projects. Whenever I see your name on something I watch it or read it.I have studied at great length your Roubo Workbench video, and plan to use the mortise and tenon joints you so eloquently teach there. You have a certain flair that is not often seen these days and quite enjoyable. I think it is a combination of your passion and youthful mastery of the craft. However you resaw it, it is wonderful. Thanks, Sandy Maguire
Sandy,
Thanks so much for the kind words! If you'd like to post photos of your bench restoration project you can go to the link below and add them in the gallery. You'll need to make a "profile" if you don't have one, but then you can upload images there. Also, maybe post a comment in this blog so anyone interested in restoration projects can click over to the gallery and check it out. Thanks again!
John
https://www.finewoodworking.com/Gallery/GalleryHome.aspx
Log in or create an account to post a comment.
Sign up Log in