On nails
Nails sometimes get a bad rap from modern woodworkers – Megan Fitzpatrick thinks that’s because most of the naysayers are using the wrong nails.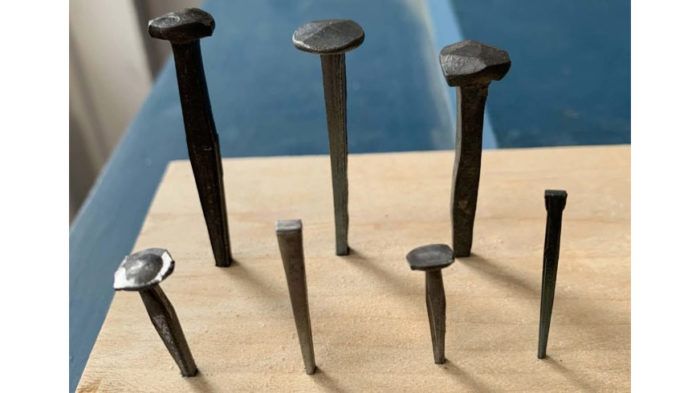
In the absence of classes (stupid pandemic), I realized it’s been since January that I’ve ordered any nails and that’s weird. I use them in almost every class I teach, so in normal times I’m placing a nail order about once a month. Yet nails sometimes get a bad rap from modern woodworkers; I think that’s because most of the naysayers are using the wrong nails. Nails have been used in furniture for thousands of years (Egyptians used them at least for tacking on upholstery, and Romans invented the forged four-sided nail). Sure, I like wood-on-wood joinery as much as the next girl, but sometimes a nail is the right choice.
In my classes, nails are typically used to reinforce glue joints (shelves housed in dadoes on, as examples, a Dutch tool chest or a boarded bookcase), and to nail on backboards and bottom boards. I like nails for these uses because they bend enough to accommodate wood movement, and because they can be pulled out if necessary to make repairs.
But not just any nail.
I like two kinds of nails (well, three, really … but there are only two I can regularly afford): diamond-head die-forged nails, and cut nails. (Blacksmith-forged nails are gorgeous and in my experience hold like nothing else, but at a minimum of $1.25 per, they’re out of my price range for all but the most special work.)
Die-forged nails look – at a glance – like a blacksmith-forged nail with four tapered sides, but they’re produced on a machine and have smooth faces, and all the heads look pretty much the same. They hold like the dickens thanks to all four sides wedging fibers down into the hole; that’s what makes them hard to pull out. (A blacksmith-forged nail has rough surfaces, which makes them hold even better.) The large head is noticeable, so if it’s on the side of a piece, it is not only a fastener but also a design feature. That head is not just decorative, though. It’s what helps to hold a bottom or backboard in place (more on that below).
I’m fairly certain that Rivierre, based in France, is the only mass producer of four-sided tapered nails; they’re available in the United States through both Lie-Nielsen Toolworks and Lee Valley Tools.
The other nails I use all the time are cut nails. I think that Tremont Nail (now owned by Acorn Manufacturing) is the only remaining maker of these once-ubiquitous woodworking fasteners. Cut nails are tapered on two sides, so there is significant wedging power on two faces. They’re not as strong as a four-sided nail, but are a heck of a lot stronger than round, wire nails, which have been around since the end of the 19th century and became standard sometime in the early 20th century. My house was built about 1900, after wire nails became available; all the studs and floors are installed with cut nails and the moldings are attached with wire nails. The moldings are easy to remove (a good thing, given the amount of removal for renovation then re-installation I’ve done); the floorboards and studs are darn near impossible to remove cleanly.
Note: Masonry nails look a lot like cut nails and can be found at hardware stores. Don’t be tempted. They are usually more tapered than cut nails and will split your work either right away or during seasonal movement. They’re hardened, so they don’t bend, and that ability to bend a little bit is one good reason to use nails in furniture!

Cut nails have a bewildering array of names and there are dozens of different varieties for the different crafts and professions that use them. I mostly stick with the ones meant for furniture making (though I sometimes need flooring nails). But, boatbuilders use copper nails, and those can look pretty cool on furniture, so sometimes it’s worth shopping for woodworking at a chandler. Below are the ones I keep on hand.
- Brads/“fine finish.” Basically just a nail with a small head, such as you might use when the head needs to be inconspicuous or punched below the surface. Because it is the shaft and not the head that holds things in place, this type isn’t good for holding backboards or bottoms in place. But they might be used on the sides of a boarded bookcase or Dutch tool chest if the maker doesn’t like the look of nails – in which case it’s best to “toenail” them (drive them at opposing angles) for extra strength.
- Clouts, Wroughts or Roseheads. These have a prominent head (which is good or bad, depending on your aesthetics), and thus a lot of holding power. They keep a cabinet back or chest bottom from being pulled off. These are also the nails you for want for “clenching” – driving an overlong nail through two (or more, I suppose) pieces, then bending the tip and driving it back into the bottom board. (That’s a strong joint. There are medieval doors in England still in use that used clenched nails to hold battens in place.)
- Headless Nails. Thin nails with tiny or no head. These are mostly used for attaching moldings, or perhaps when applying something like a dropped lip to a shelf board, to serve as a clamp while the glue dries (belt and suspenders).

Sizes of Nails
Not only can the array of cut nails be confusing, but they way their sizes are denoted also can cause some head scratching – the “pennyweight” or little italic “d” behind the number. The origins of the pennyweight system are like a fairy tale – there are lots of different versions, and likely none is real. But it doesn’t matter; understand how it works, and you’re golden. So here’s how.
When you nail things together, there’s a top board and a bottom board. The nail passes through the top board and into the bottom board. It’s the thickness of your top board that’s important here. Let’s say it’s 1/2 in. thick. Convert that fraction into eighths: 4/8. The numerator, 4, is the penny size you (probably) need: 4d.
About that (probably): In soft woods such as pine, increase the nail size by a penny (if you can; good luck finding 7d nails, though, so for 3/4-in. (i.e. 6/8-in.) pine, I use the 6d).
Here’s a handy cheat sheet for cut nails commonly needed for furniture, in pennyweight, length, and thickness of wood it fastens:
- 2d – 1 inch – 1/4 inch
- 3d – 1-1/4 inch –3/8 inch
- 4d – 1 -1/2 inch – 1/2 inch
- 5d – 1-3/4 inch – 5/8 inch
- 6d – 2 inch – 3/4 inch
- 7d – 2-1/4 inch – 7/8 inch
- 8d – 2-1/2 inch– 1 inch
The square-shanked nails are sold in millimeter lengths, so just choose the closest in length to the correct cut nail.
But don’t forget to use your noggin and experience. Is your wood species easily split (oak)? Maybe use a shorter nail. Do you need extra holding power? Use a longer nail.
Using the Nails
Unlike a round wire nail, both square nails and cut nails require pilot holes.
For cut nails, the “rule” is to start with a bit that matches the size of the nail at the tip. I’ve found this is successful only for softwood. So I usually match the thickness of the bit to the wide side of the nail’s shank at just below the midway point. For square-shanked nails, I match the size of the bit to just above the midway point – or use a tapered drill bit, which will reduce splitting. Drill through the two pieces of wood to a depth of about one-half to two-thirds the length of the nail. (Confession: Sometimes, no matter how careful I am, the top board wants to split, usually with the square-shanked nails. If that’s the case, I’ll drill a clearance hole through the top board, and drill the pilot only into the bottom board. Sure, I lose a little holding power, but with a headed, square nail there’s still plenty of grip.)

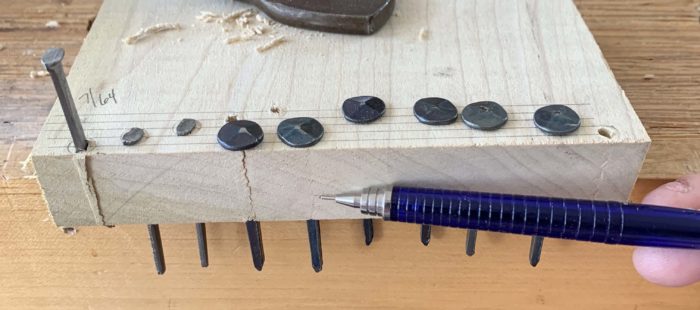
And no matter how much experience you have or how many nails you’ve sunk, it’s best to test your chosen nail in offcuts of the wood you’re using before you start pounding nails into your work. And I mean the exact wood you’re using, not just the same species from your offcut bin. Poplar (shown) almost always splits on the 1/8-in. and 1/4-in. lines, and sometimes on the 3/8-in. line with both of my chosen nail forms; here, only the 1/8-in. split with the cut nails, and the 1/8-in. and 1/4 in. with the square-shanked nail. So you never know what you can (and can’t) get away with.
After the pilot holes are drilled, you’re ready to start pounding. But there’s one more thing of which to be aware. Because a cut nail is a wedge (wider in one dimension than the other), if you insert it wrong, your wood will almost certainly split (and no matter how careful you are, you will probably do this at least once). The wider side gets inserted in the direction of the grain. On the square-shanked nails, how you insert them isn’t quite as critical, but I line up a square face in the direction of the grain, as I’ve found the pointy corner is slightly more likely to cause a split.

Now get the hammer, preferably one with a domed head. If you hit the head with the hammer’s center, you can sink the nail all the way without touching the wood around it, which the English call “Frenching.” (I can only assume the French call it “Englishing.”)
Yes, these “fancy” nails are a little more trouble than wire nails – but they’re worth it. They hold better and look better (and they’re more traditional) than wire nails. These days if I’m using a round nail, it’s almost certainly coming out of a framing nailer. And I’m not using it on furniture.
 |
|
 |
|
 |
Fine Woodworking Recommended Products

Starrett 4" Double Square

Veritas Precision Square
Pfiel Chip Carving Knife




Comments
A very useful blog that would make a good magazine piece - although we already have Andrew Hunter's article on the subject of nails:
https://www.finewoodworking.com/membership/pdf/234602/011263058.pdf
Personally I like the decorative as well as the constructional aspect of many old-fashioned or specialist nails. The author mentions copper nails, for example, such as those used to hold these bed post caps in place on a yew bed frame and those nailing some found-in-a-skip hooks to a hall mirror & coat hanger.
A complementary article about hammers is now needed. That French website Rivierre has some queer looking whakers.
Lataxe
Thanks. I have a good collection of cut nails at this point.
Where do you see screws fitting into woodworking? For my two toolchests, I used screws on the bottom. One screw on each side of the tongue and groove. Still get expansion capabilities. It doesn't help that growing up in the 1970s, my dad used to refer to nails as temporary fasteners.
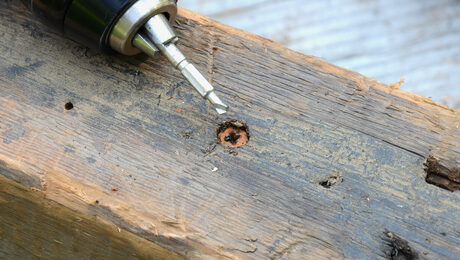
The article mentions the tenacious gripping power of old-fashioned nails. Not 'arf! Here are a couple of pics of nails often found in the reclaimed beams and other parts got out of demolished old wool and cotton mills in the north of England. They used a lot of old-growth pitch pine, with rafters and similar attached to beams or other parts with nails.
Getting them out means a serious butchering job. In fact, it's often best to leave them in. The tabletop pic is of the underside of a kitchen table made from reclaimed pitch pine full of nails. I've made a few of these, with some preferring the nails to be hidden underneath (as in the table top pictured) but others liking the nails on view, showing the "honest" source of their table's timber.
Lataxe
Can someone explain something to my mis-firing brain? How does it work that a 1" nail holds a 1/4 board unless you also account for the thickness of the board behind it? For example, if I'm nailing a 1/4" board onto a 1/2" board, I should be using a 2d but it will poke through, right? So is there also a nail length component I'm missing?
Brooklyn Tool and Craft is another source for cut nails.
https://toolsforworkingwood.com/store/dept/CNL
Informative. I suppose historically nails were driven into unseasoned, or less seasoned wood which is more resistant to splitting.
Log in or create an account to post a comment.
Sign up Log in