Stylish Details Enliven a Low Dresser
Frame-and-panel design keeps the look light and the construction manageable
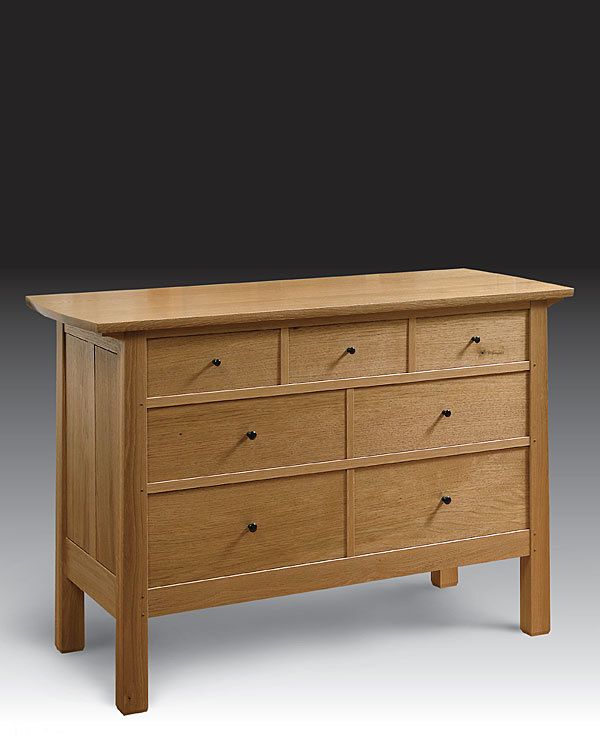
Synopsis: The design of Michael Pekovich’s low chest of drawers manages to avoid the “boxy” look that dressers tend to get. The frame-and-panel construction allowed legs to be added to the piece, lifting it off the floor. The drawers are arranged side by side, which adds to the horizontal lines. Both of these elements can make the project more complex, but because most of the parts and joinery use consistent dimensions and construction is broken down into bite-size pieces, it’s not difficult.
A dresser is really just a big box stuffed with smaller boxes. Because of that, dressers tend to look, well, boxy. when I set out to build a chest of drawers for the magazine, I really wanted to get away from the stale, boxy look that is typical. My first strategy was to go with a frame-and-panel design. This allowed me to add legs to the case, lifting it off the floor. Second, instead of stacking the drawers in a tall case, I arranged them side by side to create a wide, low case. This keeps the dresser from looking too tall and dominating the room. Both elements, while creating a nice design, also add to the complexity of the project. The good news is that none of the joinery is particularly challenging. By breaking down the construction into bite-size pieces, you can simplify the build and reduce headaches.
I chose white oak for the legs, frame, and top, and butternut for the drawer fronts, side panels, and back panels to provide subtle contrast. The overall design is simple, but a few playful details give the case personality. There is a subtly curved taper to the outside faces of the legs, and the top rails are coved at the ends and overlap the legs. The top is curved on the ends and has a slight underbevel. Finally, pegged joinery and ebony pulls add a little pop.
There are a lot of parts to mill and joints to cut in this project, so I’ve simplified construction by using consistent dimensions for parts and joinery where possible. This minimizes machine setups, speeds milling and joinery, and ensures accuracy.
Rock-solid frame means a long life
The double tenons that connect the rails to the legs provide plenty of glue surface and are all 1 in. long, so you can cut them all efficiently with a single setup. The bottom rails are wide, thick beams that help prevent sagging, and the vertical dividers are also connected with strong double tenons. I decided to attach the top rails to the legs with a bridle joint. The overhanging ends of the rails are coved to create small corbels below the overhanging top, a small detail that adds a lot of personality to the dresser.
To simplify the machine setups for the joinery, all of the face-frame parts are ripped to match the legs. After the joinery is complete, the parts are ripped to final thickness, creating the offsets between the components.
All of the case components tie into the legs, so that’s a good place to start. You’ll need to cut double mortises for the bottom rails and front rails, single mortises for the side rails and back rails, and grooves for the side panels and back slats. The legs are also notched on top for the top rails. once the joinery is complete, you’ll finish the legs by tapering the outside faces.
For the full article, download the PDF below:
Fine Woodworking Recommended Products

Stanley Powerlock 16-ft. tape measure

Drafting Tools

Sketchup Class


Comments
This is an extremely well thought out design. I’m currently in the middle of building basically the same thing, just modified the size and am designating it as an office dresser for my wife and I.
From the photo above its hard to tell that it’s made from two different species of wood. And since buttternut is nowhere to be found in my area I’m considering just using all white oak.
I purchased a set of plans for this project. I found that there are some discrepancies between the cut list on the full sized plans and the picture of the exploded view in the glossy supplement that comes with it. Many of the interior parts are called a different name from the cut list and the exploded view as well as different lengths. The plans call for making 6 outer runners but I believe that you need to make 2 sets of 3 with the tenon different on each set. Maybe whoever reads this will correct me.
Shouldn't Mike have left some expansion space for the back panel to move. With the size of the back panel it will need to move a lot and if there is no place for it to go....well look out. He doesn't show any in the plans. Maybe this is a given but would be nice to have it addressed in the plans.
I am considering purchasing these plans. Have the issues mentioned in the previous comments by Randy LeeEvans been addressed in the plans?
Waiting for a response to Strombley’s question.
I purchased these plans and am attempting to figure out the discrepancies. I will post what I figure out since nobody at Fine woodworking is going to respond to our inquiries.
what did you discover. I am about to start this project. I can see several inconsistencies in the write up and cut list versus exploded view. photo of double mortise in rails is also a mystery. I see double mortise in leg components, but few elsewhere. requires a carefully thought out step by step process of cutting mortises and then tenons to fit!!
I cut the inner and outer kickers to the 16” dimensions listed in the drawing. They worked fine. It was a fun build my daughter loves the dresser.
The Plans have been taken down. Are you going to repost them after corrections?
“[Deleted]”
Log in or create an account to post a comment.
Sign up Log in