Knockdown armoire
Skeleton-and-skin construction is adaptable to a range of styles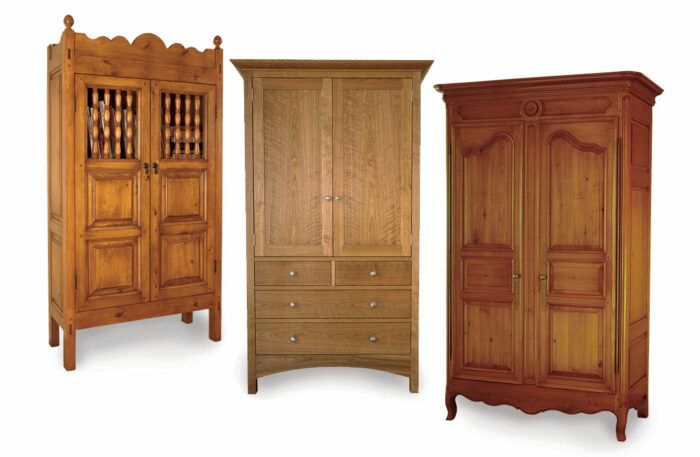
Synopsis: Three skins, one skeleton. The author’s armoires in an array of styles all use
a centuries-old cabinet structure originally borrowed from post-and-beam houses. The post-and-beam structure makes a cabinet that is strong and handsome and perfectly accommodates wood movement. If the major joints are pegged instead of glued, the cabinet can also be knocked down for transport or repair. In the photo at right, the skeleton of a country French armoire in knotty alder stands dry-assembled with all its parts and panels leaning against it.
The trouble with most armoires is that if they’re big enough to fit all your clothes—or electronic gear, board games or books—they’re too big to fit through the door. This was brought home to me forcefully on several occasions when I received distress calls from people who, knowing I was a furniture maker, thought I might have a trick for shrinking the armoire they just bought to get it through their doorway. I soon found myself amputating a foot here, prying off a glued-on crown molding there… When I decided to build an armoire myself, I discovered that a fine solution to this doorway dilemma has been around for centuries: the post-and-beam cabinet with pegged mortise-and-tenon joints.
Dutch and German kasts, Spanish trasteros, French armoires and Chinese gui all were large storage cabinets designed around a straightforward post-and-beam structure, a system sturdy enough to have been employed as well to construct the very houses these cabinets resided in. Post-and-beam cabinet construction—vertical posts and horizontal beams connected by large mortise-and-tenon joints—creates a framework that, once secured with drawbore pegs, is very rigid and durable. Yet it can be easily disassembled into small, maneuverable components.
I particularly admire the beauty and grand scale of antique French armoires, and I’ve made several of them. But I ‘ve also built armoires in the Southwest style and the Arts-and-Crafts style, and I have found that the post-and-beam structure is adaptable to a range of styles.

Inside-out design
Designing a post-and-beam cabinet begins with its primary skeletal structure: four corner
posts connected by wide rails top and bottom. The strength of the cabinet is derived mainly from these members and the joinery that connects them. For maximum stability in my large country French armoire—90 in. high, 57 1/2 in. wide and 24 in. deep—I used posts a beefy 5/8 in. sq. with rails ranging from 4 in. to 8 in. wide. Posts this big can accommodate large mortises without being unduly weakened; rails this wide have room for substantial shoulders along with wide tenons. On the widest rails, I used two tenons and left a bridge between them because a single large mortise would eliminate too much material and compromise the strength of the post.
After the basic skeleton is designed, I subdivide the cabinet sides and back using rails and muntins. The subdivision creates smaller, more manageable panel sizes, has a strong visual effect and contributes to the overall strength of the cabinet.
Embellishing the framework is the final step in the design process. Because the primary skeletal structure doesn’t differ much from piece to piece, it is largely the details that distinguish one post-and-beam cabinet from another. These can include decorative panels, doors, crown and other moldings, turnings and carvings.


Layout is the linchpin
Laying out the joinery on the posts is the most complex and critical aspect of building a post-and-beam cabinet, because it is here that all of the components come together. On just one post there will be as many as eight mortises, 14 peg holes, two panel grooves, two notches for the top and bottom, and a dozen or more half-round notches for shelf supports. To make sense of this blizzard of joinery, I use a different colored pencil for each operation-one for mortises, another for peg holes and so on. I lay out the joinery in this order:
- mortises for the rails
- notches for the cabinet top and cabinet bottom
- holes for the pegs
- rounded notches for adjustable shelf supports
- grooves for the panels
And then I set about machining all the joinery, following the same sequence.

To view the entire article, please click the View PDF button below.
Fine Woodworking Recommended Products

Jorgensen 6 inch Bar Clamp Set, 4 Pack

Starrett 12-in. combination square
Dubuque Clamp Works Bar Clamps - 4 pack





Comments
Are the panels just in grooves and would be added in before the sides and back are assembled? Or are the removable after the frame is assembled? My assumption is if the sides are glued up the panels would be trapped, but wonder if I’m missing something about the construction.
Log in or create an account to post a comment.
Sign up Log in