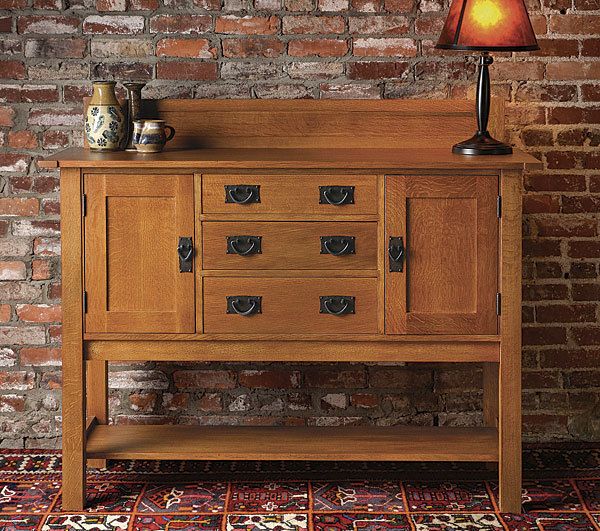
Arts and Crafts Sideboard
Traditional joinery and modern fasteners team up to simplify construction
Synopsis: This Arts and Crafts sideboard by Gregory Paolini is a scaled-down version of the venerable pieces that inspired it, so it will fit into the tighter spaces of today’s homes. However, it retains their muscular design and, like its predecessors, relies on the mortise-and-tenon joint for strength. Because the piece is made almost entirely with frame-and-panel construction, Paolini broke it down into subassemblies that can be built one at a time and joined together with screws: the outer frame, the case bottom and the drawer-divider assembly, the subtop frame, the top, and the doors and drawers. Taken this way, it makes for an easier build.
A sideboard is a welcome piece in the dining room, where its drawers are perfect for linens and silverware, its cupboards accommodate serving trays, and its top is a staging area for the dishes to be served. It’s no surprise, then, that sideboards were common in Arts and Crafts dining rooms. The version I make here is scaled down from the original pieces that inspired it, so it will fit into tighter spaces (not everyone has a large, formal dining room these days). However, it retains their muscular design and is made from quartersawn white oak, just like the originals.
When it comes to joinery, Arts and Crafts furniture relies heavily on the strength of the mortise-and-tenon. It’s the primary joint in this sideboard, too, which is made almost entirely with frame-and-panel construction.
It’s not difficult to cut a bunch of mortise-and-tenon joints, but taken together, those joints can create serious headaches while assembling a piece of furniture with as many parts as this sideboard. To avoid problems, I broke the sideboard down into subassemblies that can be added one at a time. I also joined these subassemblies with screws, which makes the glue-up much easier.
Cut all of the casework joinery first
I begin by cutting all of the mortises. I use a router and a 1 ⁄4-in.-dia. spiral upcut bit, with an edge guide to keep the bit cutting in a straight line. There is nothing new about my technique. Plunge to the full depth at each end of the mortise, and then use a series of passes to gradually rout the waste in between.
The legs have stopped grooves for the panels. rout these after the mortises. don’t change the edge guide location, because the panel grooves are in line with the mortises. Cut to their final depth in multiple passes. Now rout the stopped grooves that hold the shelf. The remaining grooves are through-grooves, cut at the tablesaw using a standard-kerf blade. You can cut the full 1⁄4-in. width of the groove with a single fence setup by flipping the workpiece so that the opposite face is against the rip fence for the second cut.
I cut the tenons at the tablesaw using a miter gauge and a dado set. Then I cut all of the panels and back slats to their final dimension. Now you’re ready for assembly.
Purchase woodworking plans for Paolini’s sideboard.
Photo: Keith Wright
For the full article, download the PDF below:
Fine Woodworking Recommended Products

Dividers

Drafting Tools

Drafting Tools


Comments
Great project unfortunately got to the build and found the shelf one inch too short! There is an incorrect dimension in the plans.
Plan gives overall dimension of the shelf as 481/2 inches. Actual should be 491/2 inches.
Thanks! Thinking of building this.
What is the color of the stain used for the final finish in these pictures?
Log in or create an account to post a comment.
Sign up Log in