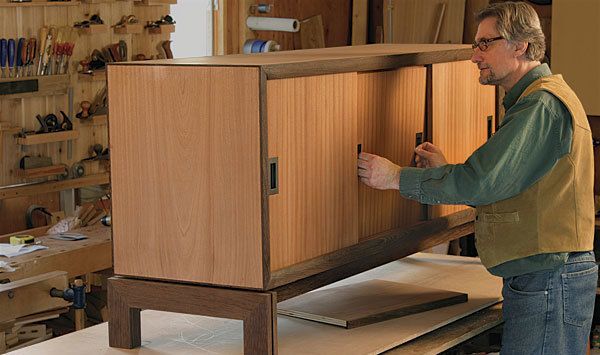
Sleek Console Built for Today’s TVs
Low enough to fit under a flat screen, big enough to store piles of components and media
Synopsis: This sleek entertainment credenza has clean, crisp lines. It offers plenty of storage, with easy access to electronic components from both the front and rear, and the design can easily be modified for individual needs. This version is built from 3/4-in.-thick sapele plywood and solid sapele and wenge, all available from most lumber suppliers. The plywood sections are joined with slip tenons. A beefy framework in the back keeps the case square. Inside, the credenza has three compartments hidden by three sliding doors.
I was the last man on my block, maybe in the entire country, to buy a widescreen digital television. Like many people, I used to hide my television in an entertainment armoire, but the latest flat-screen televisions have a modern look that I find attractive. Also, it takes a pretty huge cabinet to contain them. So instead of hiding the TV, I hung it on the wall and decided to build a sleek entertainment credenza to go under it.
Made of 3⁄4-in.-thick sapele plywood and solid sapele and wenge, the piece fits into the modernist style—with its clean, crisp lines, no exposed joinery, no frame-and-panel doors, just long expanses of beautiful sapele grain framed by darker wenge.
Style, however, does not trump function. This credenza offers plenty of storage. Inside are three compartments hidden by three sliding doors. The center section holds the electronics: DVD player, receiver, cable box, and a laptop. The outer sections have banks of drawers to store CDs, DVDs, and other accessories, like headphones and cables. If you don’t own a lot of CDs and DVDs, you could easily eliminate the drawers and use that space to hold game consoles or other electronic gear or even change the overall dimensions. The design is quite versatile.
Start with the carcase joinery
Rough-cut the plywood to manageable pieces using a circular saw and an edge guide. Make the final cuts using the tablesaw and a sled. You’ll need to cut the top and bottom 1⁄2 in. longer than shown in the drawing. I did this to make the joinery simpler to cut. These two pieces will be trimmed 1⁄4 in. on each end after cutting the mortises. Use a block plane to clean up any sawmarks on the edges.
Next, use a dado set to rabbet the back of all four carcase parts. glue blocks on the inside corners strengthen the case and provide a stable platform when routing the mortises in the sides. Mill up the blocks and glue them flush to the top and bottom edges, and 1⁄2-in. back from the front edge to allow for the face frame.
Cut mortises for the slip tenons—A fence-equipped router works fine to cut the mortises for this project, but I splurged last year and bought a Festool Domino joiner (to get the lowdown on this machine, see Tools & Materials in FWW #190), which makes really fast work of mortise-and-tenon joinery. The tool cuts a deep mortise in one plunge, like a biscuit joiner.
From Fine Woodworking #214
Watch Anatole Burkin’s How to Build an Entertainment Center video series.
For the full article, download the PDF below:
Fine Woodworking Recommended Products

Jorgensen 6 inch Bar Clamp Set, 4 Pack

Festool DF 500 Q-Set Domino Joiner

Estwing Dead-Blow Mallet

Get the Plan
Digital plans, a cutlist, and a SketchUp drawing for this project are available in the Fine Woodworking store.


Log in or create an account to post a comment.
Sign up Log in