Jig for Drilling Cabinet Shelf Holes
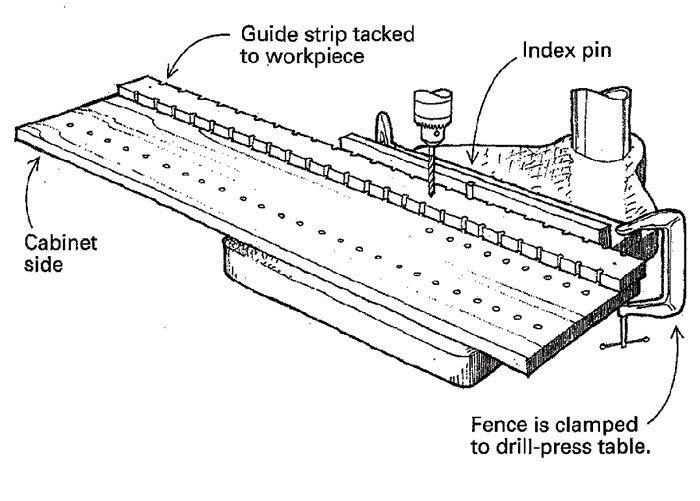
Here’s a method for drilling the holes in cabinet sides for adjustable shelves. The jig consists of two parts: a guide strip temporarily tacked to the workpiece and an index pin in a fence clamped to the drill-press table. To make the guide strip, start with a length of 3/4-in. plywood about 3-1/2 in. wide. Drill two parallel rows of 1/4-in. holes about 1-1/4 in. apart and spaced at the desired shelf-adjustment intervals. Take care at this stage to align and space these pilot holes accurately because they will determine the accuracy of the final shelf holes in the cabinet. Rip the guide strip through the holes so that half the holes remain on each side. The two outer rips are scrap.
To make the index-pin fence, attach a length of 2-in.-wide plywood to a base that can be clamped to the drill-press table. Now drill a half-hole in the face of the fence by temporarily clamping a scrap piece to the front of the fence and drilling a hole that’s half in the scrap and half in the fence. Remove the scrap, and glue a short piece of 1/4-in. dowel in the half-hole to produce an index pin.
To use, clamp the fence at the appropriate distance from the bit, and set the bit depth stop. Tack the guide strip to the workpiece with the top of the strip flush with the end of a cabinet side. The guide strip should overhang the side of the cabinet slightly more than one-half the diameter of the hole. This setup will allow the half-holes in the guide strip to mate with the index pin and position the workpiece correctly for each hole. One hand operates the drill press and the other alternately holds and then advances the workpiece. When you establish a rhythm, you can drill a hole about every two seconds.
Robert A. Loos, Medford, N.J.
Fine Woodworking Magazine, June 1997 No. 124

Fine Woodworking Recommended Products
Woodriver Circle Cutting Jig
Incra Miter 1000HD
Double Sided Tape




Log in or create an account to post a comment.
Sign up Log in