Use a notched driver to protect faceted pins
Square pins with shaped tops are a great feature of Craftsman furniture, but driving the pins without damaging the top is tricky. This wood driver helps.
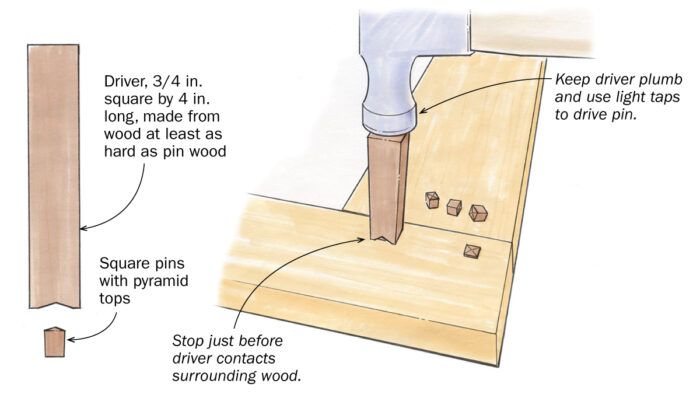
Square pins with a pyramid-shaped top are a beautiful feature of Craftsman furniture. These can be short decorative plugs or long functional pins that cinch the joint, and there are a variety of ways to make each. To create the holes for them, I use a square-hole punch from Lee Valley (which offers instructions for its use). But my tip addresses the last part of the procedure: driving the pins without damaging their faceted tops. My solution is a wood driver with an angled notch that matches the angles on the pins. The dimensions of the driver are not important, as long as the notch is slightly wider than the plug, say 5/16 in. wide for 1/4-in. pins.
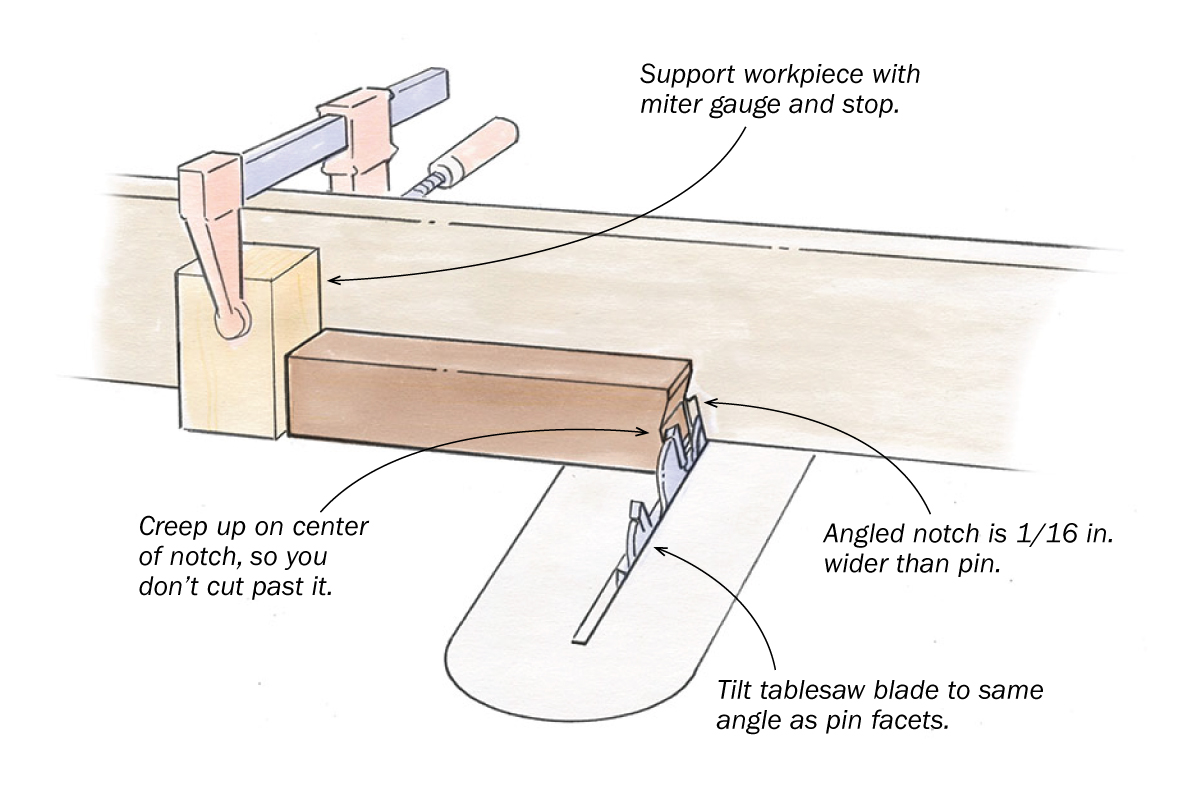
The notch has two sides, which contact two of the facets on the pin. This makes the notch easy to cut on the table saw, by tilting the blade to the same angle as the pin facets (I cut those on the table saw also) and making two passes. Raise the blade just shy of the center of the driver, and support the workpiece with a miter gauge, using a stop to position it. It’s important that you don’t cut past the center, so raise the blade incrementally after the first two cuts, making more passes until the nib in the center just disappears.
For durability, the material used for the driver should be at least as hard as the plug. I used the same walnut driver to drive 800 walnut plugs before it began to show signs of wear, at which point I simply recut its tip.
The end of the driver should have small flats on both sides of the notch. Don’t be tempted to use those as a stop when driving pins, or you will damage the surrounding wood. Instead, stop driving just before those flats touch down, leaving the plug proud by 1/32 in. or so. Also, be careful to keep the driver plumb, and use light taps as opposed to heavy strikes. Last, if your plugs are tapered, you’ll find them a little prone to chipping, especially on the sides of the hole with end grain, so orient the driver to support the facets on those sides.
—KEITH SHARP, Pagosa Springs, Colo.
Illustrations by Dan Thornton
From Fine Woodworking issue #304
Fine Woodworking Recommended Products

Veritas Precision Square

Olfa Knife

Dividers


Comments
Instead of scooching the tablesaw blade up bit by bit until the two cuts meet at the center, I wonder if it would be easier just to handsaw a kerf down the center of the driver. Then you could just set the tablesaw blade to go past the center a bit into the kerf, and no harm is done. The kerf could be just a bit deeper than the angled faces, to prevent splitting. It would also ensure that the very tip of the pins aren't flattened at all.
Log in or create an account to post a comment.
Sign up Log in