Throwback: Knockdown Tabletops Using Dovetails
How to avoid screws for tables with aprons or pedestals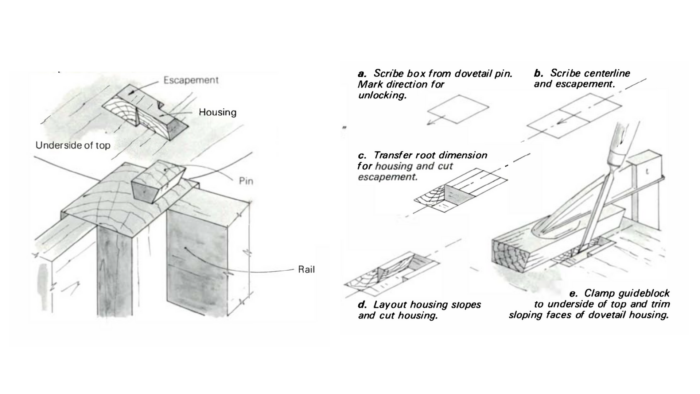
Originally published in Fine Woodworking #20
For storage or shipment it is often advantageous for a tabletop to be quickly removable, while in daily service the top should be fastened securely enough for one person to be able to shift the table within a room. Here’s a pair of construction methods that require no hardware—one for tables with apron frames, a variation for pedestal frames.
Apron frame
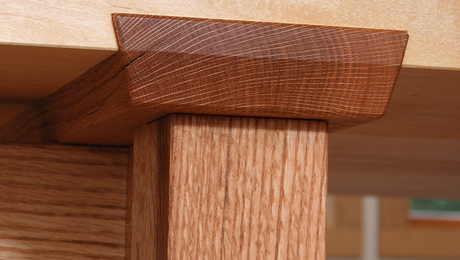
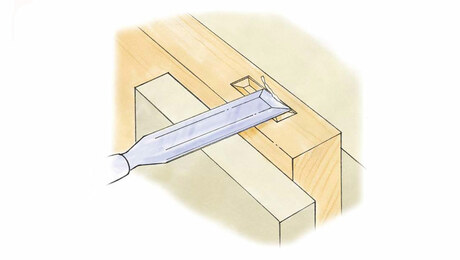
This method uses dovetail pins cut at the tops of the legs and dovetail housings with escapements chopped across the grain of the underside of the top. To assemble, drop the top over the pins and push it across the frame to lock the pins in their housings. To disassemble, push the top from the opposite side until the pins register in their escapements, and lift the top away. Properly dimensioned, the system is invisible when locked up.

When sawing the legs, leave extra length at the top end equal to about half the thickness of the tabletop, and when laying out the rail mortises, do not omit the customary allowance above the top of the mortise—about 3/4 in. for a 4-1/2-in. rail. Square up the top of each leg and take all measurements from there. Build the frame and assemble dry, leaving the rails strong to be trimmed later. Sketch plans and elevations of the leg tops, bearing in mind that all four pins must be offset in the same direction, and that if the system is to be concealed the pin length must be a bit less than half the leg thickness, an allowance being made for seasonal change in the width of the top. Later in the construction, when the frame has been fitted to the housings, the escapements will be lengthened as well to accommodate this variation. For frames of ordinary size, about 30 in. across, divide the leg top into two pin lengths plus 1/8 in. at each end, then lay out the pins using a mortise gauge for the side and end lines, and a small adjustable bevel, set to a beveled guide block (about 78°), for the slopes.

Gauge the shoulder lines from the end. Make the four cuts outlining the pins, then saw the shoulders. Trim with a sharp chisel, testing the work with the guide block. Finish all work on the frame except polishing.
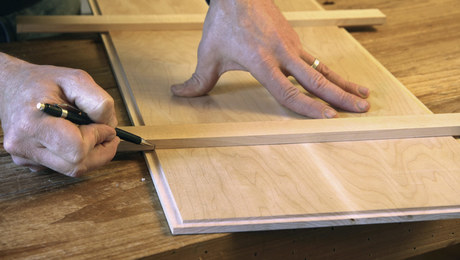
Build the top and trim it sufficiently to center the frame. Scribe the outline of the pins on the underside of the top to mark their position when locked up, but note that the outline is of the crown of the pin rather than its root, which is actually wanted in this space.
Mark near each outline the direction the frame will travel when unlocking. Pencil in a benchmark on one leg and nearby on the underside of the top to register the location, and remove the frame.
Lay out the escapements by extending the scribed sidelines in the proper direction a distance equal to the pin length, and connect the new lines with an end line. Find the centerline along the length of this double box. Measure the width at the root of each dovetail pin and transfer it to the layout of the housing, employing the centerline. If the measurements vary from pin to pin, transfer one at a time. Cut the escapements, first boring out with a Forstner or other short-pointed bit, then chopping square. There is no advantage and some danger in going any more than a trifle deeper than the height of the pin. Test the frame in the escapements to be sure that the shoulders of the legs lie flush with the underside of the top. Level as necessary. Now remove the frame and lay out the slopes of the housings, using the adjustable bevel set to the guide block. Bore out, then with a dovetail saw rough out the slope, keeping a little strong of the line. Chop out the waste, again keeping away from the line. Clamp the guide block at the line and trim with a narrow paring chisel, the final cuts to be taken with the chisel right against the block.

Lay the frame in the escapements and see that the pins are likely to enter the housings. Then remove the frame and chamfer the leading corners of the pins. Replace and push (or pull). Considerable force may be necessary the first few times; waxing the pins is helpful. However, a driving fit means too much interference. Usually one joint will cause the trouble, or two that are not in parallel across the frame. There will be enough flex in the frame so that tapping at each joint will tell which one is binding. If you trim away too much during adjustments, a piece of veneer or cedar cigar wrapper (.009 in. thick) can be glued into the housing. When all is well, remove the frame and stamp a benchmark into the top of one pin and inside the corresponding escapement. At this point consider the probable shrinkage and expansion of the tabletop, and lengthen the escapements accordingly. Round off all the points and corners of the pins and the entry corners of the housings, as in service the top drops down over the pins, somewhat by feel. Then the near pair of legs can be gripped and the top pushed home with chest or waist.
Pedestal frame

As the arms of a pedestal frame do not offer the appropriate grain for cutting pins, separate pins must be fashioned and joined to the arms. Make pin blanks of rectangular section, but with one sloping face in the length, then mortise in with a shim to drive the blank against a correspondingly undercut end of the mortise. Saw the slopes once the blank is glued and trimmed. A blank could be fitted through the underside of the arm and then wedged below, but shrinkage in the depth of the arm would leave the pin standing proud and the joint loose. The best orientation is for one set of arms to be perpendicular to the grain of the top, the other parallel, with room left in the housings perpendicular to the grain for tabletop expansion and contraction. If you orient the arms at 45° to the grain of the top, the system works but the housings won’t be as strong.

Fine Woodworking Recommended Products
Leigh Super 18 Jig

Marking knife: Hock Double-Bevel Violin Knife, 3/4 in.

Festool DF 500 Q-Set Domino Joiner


Log in or create an account to post a comment.
Sign up Log in