Throwback: Shop-made table saw guards
Sandor Nagyszalanczy creates Plexiglass guards for four different table saw sleds.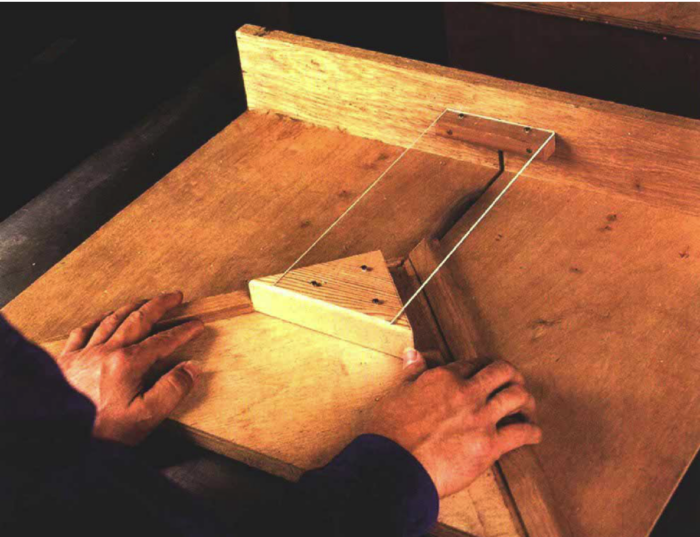
From Fine Woodworking #104:
“Blade guard removed for photo clarity.” How many times have you been watching a home-improvement show or woodworking video and seen those words appear across the bottom of the television screen? Well, I want to know: what blade guard? In almost all the cases I’ve seen, a stock table saw guard wouldn’t have worked in the applications shown.
What’s a woodworker to do? Must we continually expose ourselves to unreasonable risks when we perform operations that require removal of the table saw’s standard blade guard—jobs like sawing tenons, cutting box joints, and cove cutting? I suppose we can hope our luck holds out, or we can wait for some kind of sensational all-purpose saw guard to hit the market. But I advocate another alternative: to design safer table saw jigs and setups by adding guards and safety devices that prevent accidental contact with the saw blade. I think any woodworker bright enough to design innovative jigs for complicated woodworking tasks could make those same jigs a lot safer without investing too much extra time or material. After all, how much is a finger worth?
In this article, I’ll show you some of my solutions for making common table saw jigs and setups much safer. One thing I aim for in modifying my jigs is to reduce the degree to which safety relies on judgment. It’s a given that, as you work, especially at repetitive tasks, there will be times when your attention flags or is diverted. A safe jig protects you during these lapses. The very best safety feature is one that eliminates the possibility of contacting the blade with anything but the stock. I try to get as close as possible to this ideal in all my jigs.
In many cases, I’ve retrofitted existing jigs with guards to show that you don’t have to build all new devices to add safety to your woodworking. Because jigs are, by definition, custom-made, the safety measures you take will also have to be individualized. So I haven’t tried to cover all the bases here, only to share a few specific solutions and underscore the general idea that safety and guarding features ought to be built into every jig you make.
Clear guards for sliding jigs
Carriages that slide in the table saw’s miter slots almost always require that the stock guard be removed. Whether you want to use a sliding crosscutting box or a jig for cutting tenons, dovetails or box joints, you can easily retrofit clear blade guards that allow you to see what’s going on but keep you from getting cut.

Box-joint-jig guard – I made the guard for my box-joint jig shown in the top photo in about a half-hour from a few scraps of wood and a Plexiglas cutoff purchased from a local plastics store. (Glass shops and hardware stores often carry clear plastic sheet goods.) The guard is a low box with wood sides and a Plexiglas top that mounts directly over the box-joint jig and provides protection ahead of and after the cut. As an added bonus, I’ve noticed that it deflects chips and makes dust-collection more efficient. I made the guard’s frame 21 in. wide by 10 in. long, which is wide enough to handle 10-in. drawer sides. I drilled holes in the 1/8-in.-thick Plexiglas sheet so that it could be screwed to the top of the frame (leave the protective paper on the Plexiglas during cutting and drilling to protect it from scratches). When attaching the plastic, I left it about an inch shy of the face of the jig, creating a slot for the work piece. The 2-in.-high sides provide plenty of clearance between the plastic and the blade. I chamfered and waxed the lower edges of the sides to keep them gliding smoothly. Then I attached the guard to the back side of the box-joint jig with screws through the rear frame member.
To provide blade protection behind the jig, I added a second guard made from a block of wood and a 3-in. by 4-in. piece of Plexiglas, screwed to the underside of the rear frame member (see the bottom photo on the facing page). Even if you don’t want to make the entire guard frame, adding a rear guard is an excellent idea. It protects you after the jig has been pushed through the cut when you’re reaching over the saw table and are probably the most vulnerable to blade contact. This type of exit guard is a good addition to any sliding jig. And you can make using it even safer by clamping a stop block to the rip fence or right to the table that will limit the forward travel of the jig—allowing a complete cut through the work piece but stopping the blade short of the exit guard’s rear block.
Tenoning jig guard – Protecting my hands from the blade involved the addition of three components to my sliding tenoning jig: a clear plastic shield ahead of the cut, an exit block to cover the blade behind the cut and a hand rest to prevent my left hand, which holds the work piece against the jig, from sliding down into harm’s way, as shown in the photo below.

The clear shield is nothing more than a 10-in.-long, 2-1/2-in.-wide piece of 1/8-in.-thick Plexiglas screwed to the edge of a wood strip. This strip mounts to the face of the tenoning jig via slotted holes I made using a straight bit in the plunge router. The slotted holes allow me to shift the shield in or out depending on the width of the workpiece. I glued and screwed a 2-1/2 x 2 x 1-1/2 wood exit block to the back of the jig. I used a brass screw just in case it’s accidentally hit by one of the two saw-blades used during tenoning. A larger block would provide more protection, but as long as you use the jig in conjunction with a stop block, this size is fine. The final component, the hand rest, is a 4 x 2 x 1 block glued to the edge of the tenoning jig’s fence. You could position this block higher, if you find it more comfortable.
Crosscut-box guard—A shop made sliding crosscut box that rides in the table saw’s miter slots is great for trimming and crosscutting long boards or moldings. And adding a guard is the perfect way to make this sliding jig safer to use. The guard that I made for my crosscut box, as shown in the photo above, is basically an inverted U-shaped channel that rests on top of the stock over the line of cut, preventing hands from reaching into the blade.

I started building the guard by cutting two 2-1/4 in.-wide, 3-in.-thick wood sides and a 3-1/2 in.-wide, 1/8-in.-thick Plexiglas top, all slightly shorter than the front-to-back dimension inside my crosscut box. I then nailed sides and top together with #16 brass escutcheon pins through holes drilled in the plastic. Because the guard was retrofitted to my crosscut box, I couldn’t cut grooves for the ends of the guard to slide in. But for a smaller (12-in. capacity) box like mine, two narrow guide strips tacked on the inside of the box’s front support are adequate to keep the guard in place and let it ride up and down.
Chamfering and rounding the ends and edges of the wood sides makes the guard slide up and down easily. To shield the blade where it exits the crosscut box, I added a rear guard that is a variation on the one for the box-joint jig described previously. In this case, I simply glued and screwed on a wood block to sheathe the blade.
Sliding miter-carriage guard—Many woodworkers like to cut miters on the ends of moldings, picture frames and other trim using a carriage with twin 45° fences, which slides in the table saw’s miter-gauge slots. When you use this type of jig, you hold the work piece against the fence during the cut, and your fingers often come close to the blade. And as you finish the cut, the blade exits between the fences, not far from where your thumbs are wrapped over the top of the fences. It’s an operation that begs for a guard. To add protection to my sliding miter jig shown in the photo below, I cut a triangular block from some scrap 2×4 I had around the shop and glued and screwed it to the jig’s base plate just behind the intersection of the fences. This block acts as an exit guard and a mounting surface for a clear blade guard. The back end of this blade guard, a 5-in. by 12-in. piece of 1/8-in. Plexiglass is screwed to the top of the block, and the front end is screwed to a wood strip nailed to the miter jig’s front cross support. To complete the safety treatment, I clamp a stop block to the saw table to prevent the blade from cutting through the exit block.

Fine Woodworking Recommended Products
Grout float
Rockler Dust Right 650 CFM
Shop Fox W1826




Comments
Whatever happened to Sandor?
Log in or create an account to post a comment.
Sign up Log in