A Benchtop Bench
For routing and handwork, this minibench raises the action to a comfortable height
Synopsis: Woodworking benches are designed to place the workpiece at a height that’s ideal for handplaning. But that height is often too low for routing and handwork. Furniture maker Jeff Miller built a mini-bench that elevates workpieces to a more comfortable height.
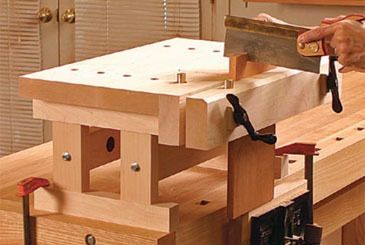
Extraction woodworking benches are designed to place a workpiece at a height that’s ideal for handplaning. But the perfect height for planing often is too low for other common bench tasks. For example, when routing, carving, cutting dovetails, or doing layout, I frequently have found myself bent over at an uncomfortable angle so that I could see clearly and work effectively. When performing these tasks, I like to have a workpiece positioned 6 in. to 10 in. above my waist level.
To bring a workpiece to my ideal height range, I made a small workbench that mounts quickly to my regular bench. When extra height is needed, the minibench effectively raises the work-surface to my comfort zone. The bench is easy to move, stores nicely under my bigger bench, and includes a vise that provides plenty of holding force. I made the bench out of maple, but any hard, dense wood will work. I wanted the benchtop bench to be as sturdy as my regular bench. I settled on a trestle-table design, which ensured a solid bench and simplified construction. Begin by making the top. It can be sized to suit individual needs, but as a general rule, keep the top small enough to be moved without back strain. Joint and edge-glue the stock, then use a handplane and scraper to level and smooth the surfaces. Cut the piece to width and length. Next, mill the stock for the trestle base. I chose a mortise-and-tenon joint to connect the legs to the aprons and feet, but half-lap joints would work well, too. Cut mortises in the aprons and feet for the legs, then cut shallow mortises centered on the inside faces of the legs to locate and solidify the bolted joints with the stretchers. Cut and fit the tenons on the legs and the stretchers. The stretcher tenons will not be glued, so it’s especially important that they fit without any slop. Now is a good time to drill the 3⁄8-in.-dia. bolt holes centered on the legs. The trestle base is screwed to the top through three countersunk holes in the bottom of each apron. Elongate the center and rear holes to allow for the expansion and contraction of the top.
For the full article, download the PDF below:
Fine Woodworking Recommended Products

Olfa Knife

Jorgensen 6 inch Bar Clamp Set, 4 Pack

Incra Miter 1000HD


Comments
The magazine issue on the web article is incorrect. Correct issue is #176-April 2005.
Log in or create an account to post a comment.
Sign up Log in