Two-Fence Router Mortising
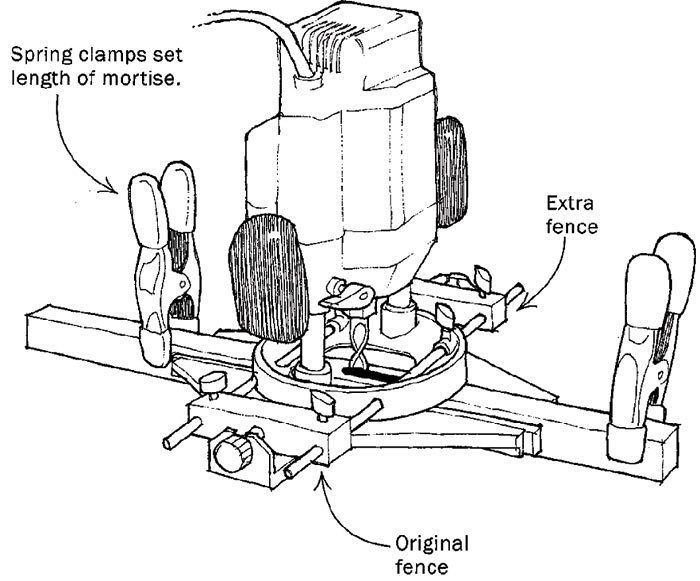
By adding an extra fence to your router, you can cut mortises quickly and accurately, and you virtually eliminate the risks of the router wandering or tipping into the cut. Start with a router that has a substantial fence equipped with a threaded micro-adjustment mechanism. Buy a second fence and attach it to the rails, extended through the router base so that it faces the original fence. Sandwich the workpiece snugly between the two fences, and make the necessary micro-adjustments to align the bit with the desired mortise location. Trial cuts on a scrap piece can best confirm the correct alignment. Attach spring clamps to the workpiece to limit the router’s travel, and set the length of the mortise.
To cut the mortise, raise the bit from the work, turn on the router and move it back and forth in the plunge cut until you reach the desired depth. I prefer a spiral up-shear bit for mortising because it clears the chips better than a straight bit does.
This dual-fence arrangement works well when I have to make a series of in-line mortises for Shaker or Mission-style furniture. When mortising close to the end of a workpiece, such as the top of a leg, clamp two legs together in the vise end-to-end to provide more support for the router.
Mandy Kotzman, LaPorte, Colo.
Fine Woodworking Magazine, October 2000 No. 144
Fine Woodworking Recommended Products

Festool DF 500 Q-Set Domino Joiner
Double Sided Tape

Veritas Precision Square






Log in or create an account to post a comment.
Sign up Log in