Synopsis: A lot of folks object to having to tune up new tools, writes David Sawyer, but he finds that this is a great way to learn all about the tools and make them truly your own. He describes how a couple of sets differ and explains how they cut and how to tinker with them to adjust the tang or true up bits. He talks about what value the reamer has and how to modify it to your purposes, and how to make a chair using just the spoon bits. Side information by John D. Alexander covers the “incredible” duckbill spoon-bit joint.
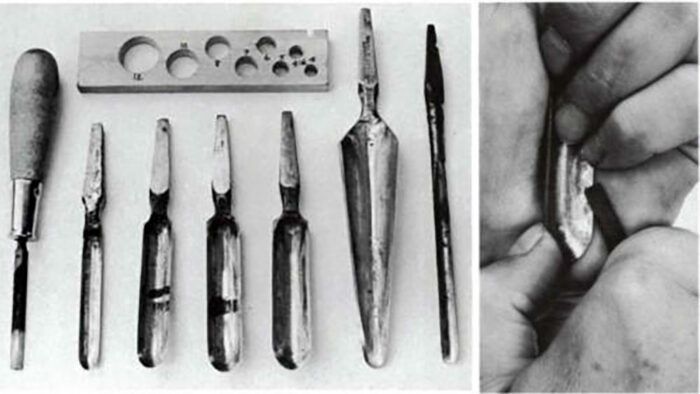
For the last couple of years, Conover Tools has been selling a set of eight spoon bits and a tapered reamer in a neat canvas roll. They are copies, made in Taiwan, of a fine old set in Michael Dunbar’s Windsor chairmaking toolkit. The bit sizes are six, seven, eight, nine, ten, eleven, twelve and sixteen sixteenths, with spoons about in. long. The reamer tapers a hole at a 10° included angle, quite useful for chair leg-toseat joints—although I’d prefer 8°, since 10° barely “sticks.”
As bought, these spoons are straight-sided doweling bits, which were a mainstay for many craftsmen, such as coopers and brushmakers. Chairmakers either used the bits straight, as in Dunbar’s set, or modified them into duckbill bits for boring the large-bottomed mortises found in so many old green-wood chairs. John Alexander, author of Make a Chair from a Tree (Taunton Press), explains the advantages of this joint on p. 72. Old-timers also used open-end spoon bits, called shell bits, which look almost like “ladyfinger” gouges. They are easier to sharpen than spoons, and cut nearly as well, even in dry hardwood chair backs. This is fortunate, since a used-up spoon bit will become a shell bit.
When you first unroll Conover’s bits, they’re beautiful. Upon closer inspection, they’re kind of lumpy and bumpy, apparently finished in a hurry with a belt sander. Fear not— with a little tinkering and sharpening, they will work just fine. A lot of folks object to having to tune up new tools, but I find that this is a great way to learn all about the tools and make them truly your own.
How a spoon bit cuts— The spoon bit cuts on only one side of its semicircular lip. No other part needs sharpening. The cylindrical portion guides on its outside, clears chips on its inside, and must not have a diameter greater than the cutting edge, to avoid binding or reaming a tapered hole.
Any cutting edge must have some relief on its underside. What I call the “lead” of a cutting tool would be the progress per revolution in a drill or a reamer, or the thickness of the shaving a plane takes. For a plane, lead is regulated by how far the blade projects beneath the sole; for an auger bit, it is regulated by the leadscrew. A machinists’ twist drill is like a spoon bit with a straight cutting edge, and if you can visualize how it cuts and how it is sharpened, this will help you understand the spoon. Try to imagine the spiraling development of the hole and the bit following it.
From Fine Woodworking #43
For the full article, download the PDF below:
Fine Woodworking Recommended Products

Veritas Wheel Marking Gauge

Festool Rotex FEQ-Plus Random Orbital Sander

Compass


Log in or create an account to post a comment.
Sign up Log in