Synopsis: Ian J. Kirby says that once a tool has been properly ground, sharpening it takes only about a minute. His detailed article covers the goals of sharpening, what sort of stone is best, and how to do it, which he breaks into lots of questions and answers: how much pressure to use, what angle to hold the tool, how long a stroke to take, when to stop, how to know when the blade is sharp. He talks about tools that are challenging to sharpen and how to do it, and how to sharpen carving chisels and gouges.
Putting the cutting edge on a chisel or plane iron causes confusion, doubt and fear in many beginning woodworkers. Yet once the tool’s edge has been ground (to the appropriate angle and square to its long edges), sharpening takes only about one minute. A sharp tool is the difference between despair and delight—you need to sharpen often and without any fuss. After sharpening, a plane not only feels different as it cuts, it also sounds different—when it’s blunt it cuts with a dull and heavy tone, but when it’s sharp it sings.
What is it we have to do by sharpening? The diagram below shows a magnified section through a blade. The rounded edge at A is blunt; B, with the surfaces meeting at a straight line, is sharp. If we remove metal in the shaded area (C), we will have a sharp edge. But if we first grind the tool to a 25° angle and then sharpen to a 35° angle, we can accomplish the same thing more efficiently by removing a very tiny amount of metal (D). The grind can be hollow or flat; it matters little. What does matter is the 35° sharpening angle. The amount of metal we have to remove is measured in angstroms—at most, few thousandths of an inch. In order to sharpen the blade, there is really very little work to do.
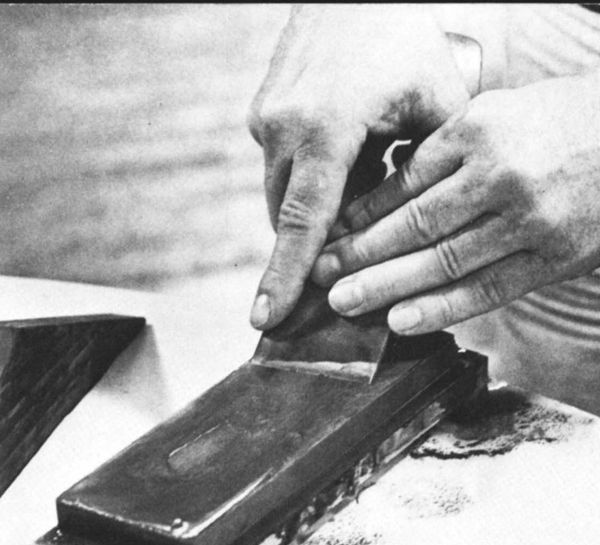
The important considerations in learning how to sharpen are how to hold the tool, how and where to stand, and how to use your body to move the tool over the stone. The photos at right give these answers. One of the things we have to achieve is controlled pressure across the cutting edge; the other necessary control is maintaining the constant angle between blade and stone. The grip shown in the photos provides both of these controls. With either chisel or plane iron, the index fingers of both hands are on top of the tool. Pressure can be exerted uniformly, or on one side of the blade or on the other side— whatever the tool requires. Angular control also comes from this two-hand grip, from the wrists, and subsequently from the shoulders, but the key to it is the thumb of the left hand. It acts as a fulcrum or back rest, and with the hand spread this way it is easy to keep the left thumb solidly locked in position. You find the angle in the first place by feeling for the grinding bevel, or by checking against a block of wood cut to 35°. Then, the left hand becomes a very sensitive jig.
What kind of stone is best? The type of stone you use is a matter of preference.
From Fine Woodworking #29
For the full article, download the PDF below:
Fine Woodworking Recommended Products

Suizan Japanese Pull Saw

Veritas Micro-Adjust Wheel Marking Gauge

Lie-Nielsen No. 102 Low Angle Block Plane


Log in or create an account to post a comment.
Sign up Log in