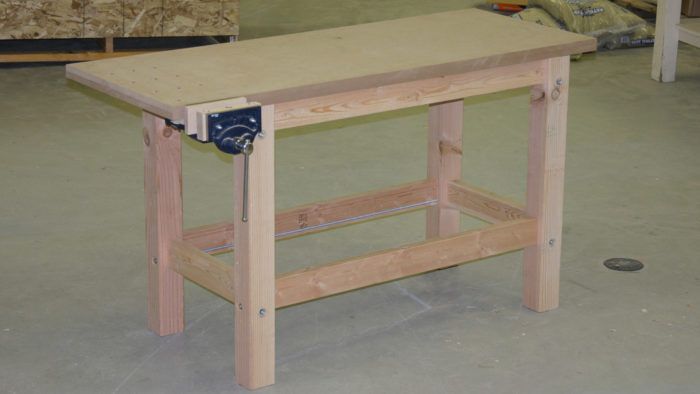
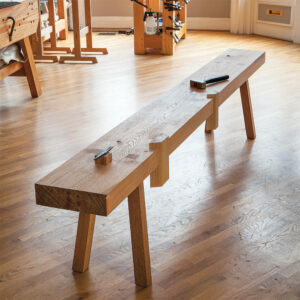
Still Don’t Have a Workbench? This Plan is Easy
You'll only need a circular saw and a cordless drill to make this simple but rock-solid workbench, complete with a vise. Sep 16, 2009
When I got interested in woodworking, I thought it was all about the tools and started collecting them quickly. But I quickly realized it was a struggle to get anything done on sawhorses and wobbly shop tables without a woodworking workbench. And I’ve seen friends go years without a good way to hold workpieces.
A woodworker won’t get far without a solid workbench of some kind, with a vise made for woodworking. But most workbench plans are so complicated you need a workbench to build them! That’s not to mention the expensive hardwood and the large arsenal of tools and skills they require.
| More workbench projects on FineWoodworking.com |
That’s why we created this workbench, which uses common lumberyard supplies, like 2x4s and a single sheet of MDF, and requires just a drill and a circular saw. I know you’ve all got those! So if you’ve been thinking about getting started, or if you’ve been struggling without a real bench, you don’t have any excuses anymore.
Download the PDF below.


Comments
That's really quite nice... now if I just had space to put a bench.
True... it takes up a bit of space. For more on woodworking in small (odd) spaces, check out these links:
https://www.finewoodworking.com/item/5097/woodworking-in-a-new-york-city-apartment
https://www.finewoodworking.com/item/14479/wood-shop-al-fresco
http://blogs.taunton.com/n/blogs/blog.aspx?nav=main&webtag=gluetube&entry=11
https://www.finewoodworking.com/item/5097/woodworking-in-a-new-york-city-apartment
I built it and it is great. In a word very sturdy. In my area I couldn't find 4 x 4's untreated so I used the treated work out fine. The other day when at my favorite lumber company, what do I find untreated 4 x 4's, go figure. The nice thing about this bench if it gets a little loose just tighten it up.
I just added another 144 square feet to my workshop to spread out a bit, was getting a little cramped with a 12 x 16, so now it up to 12 x 28 should be nicer.
Very solid bench and stable due to the weight of the MDF top. Works great for the outfeed of my table saw.
I built this as my primary shop table and have been very pleased with it. It is heavy and doesn't wobble when using hand tools. If you use waterstones to sharpen your tools, be sure and put down something to block the water or use another bench. If the MDF top gets wet it will swell and make your top not flat anymore. My only complaint is that evertime I go to use the bench it's covered in tools.
I'm in the middle of making this myself. I'm planning to make the top of the bench just a hair below the outfeed of my planer. Just order my first vise today and it should be at my door before the weekend. Hope to find the time to finish it then!
Thanks for the info FWW!
I built this bench a little while ago, I couldn't find untreated 4x4's so I glued 2x4's together and planed them down a little, then adjusted the stretcher lengths to suit. I love the bench - my only complaint is that now I don't have any excuses not to finish the looooong list of stuff to make my wife and I came up with over summer - Thanks Asa!
Great job, guys. May I suggest the addition of leveling feet. In my experience, concrete floors are rarely flat. In keeping with the simple and straightforward methods employed, 4 pilot holes and 4 lag screws will eliminate any wobble. T-nuts and rubber- footed inserts even better.
I built this workbench keeping a printed plan handy and watching the videos many times. I also had trouble finding untreated 4x4 but eventually found them. My bench is a little longer and a little wider. I used a Groz 9" vise instead of 7" so added the appropriate length. I now know MDF comes in larger sizes than 48"x96". When I sawed my MDF in half I just kept the extra width. I drilled all my holes on the drill press after measuring and measuring and measuring again. They came out fine. I rounded the bottom edges of the legs with a router so they wouldn't tear out sliding it around the shop. I painted the bottom 6" of the legs with clear satin paint to protect them from liquids that might get to them, the shop is also a garage. I used plywood for the bottom shelf and just let the weight of the shelf and anything stored on it to hold it on place. The bench is a perfect height to work on and does make a great outfeed table. Thanks for a terrific plan.
Great design! Functional and easy to build as advertised.
Clinton66's concern about liquid spills bulging the top are well founded, and I'd recommend either a couple coats of clear waterproof finish, or better yet, plan in an extra 1/4 of top thickness for a sacrificial piece of hardboard on top of the MDF.
I tack this down with a finish nailer which sets the nail heads below the surface (no glue) and coat it with varathane, spar varnish or whatever happens to be handy.
After it's suffered the inevitable damage that a bench top will, or after rebuild your greasy motorcycle engine on top of it, you can pry it up, pull the nails and attach a new one.
Well that's fine and I expect it work well, but I saw more than just the three tools you started the video with.
Forstner bit, brad point bit, I suppose a hacksaw to cut the allthread to length, socket and ratchet, dowel center, ... anyone count more than these?
I wonder how well the base holds up to loads that tend to push it out of square? There are no diagonals to resist these forces. I would be tempted to use a sheet of 1/8" ply (door skin is only $7 at Home Depot) on one of the long faces of the base to keep things square.
Now if only i had space to put such a bench...
This is a simple and effective bench. To go one better, go to Habitat for Humanity ReStore in your area and get one of those solid wood office doors. They are very soild and are usually covered in hard formica which is an excellent surface for the bench, because glue, paint and anything else won't stick to it. You can beat on it all day long and it still bounces back. It probably will only cost a few bucks and it is for a great cause.
With a few modications I made this workbench a couple of months ago--it is great!! Solid as a rock and easy to put together.
Have put it to a lot of hard use.
I'm so glad to seee that people are happy with this bench. Tell your friends about it. I think a lot of woodworkers struggle for years without a real bench.
A few notes on the suggestions. I think a thicker finish would be great, but like someone said, when the MDF top gets beat up, you can always make another. Maybe that's a good reason not to glue the two MDF layers together but just use the screws we showed.
The leveling feet seem like a good idea, but they might make the bench skitter across the floor when you handplane on it, for example. Maybe some kind of leveling feet with rubber on the bottom of them?
And don't worry about the bench racking sideways. No diagonal stabilizers are needed when you have those long bolts and nuts all tightened down. You could chuck that base off the roof of your garage and it would be fine. Wait, hold on, I can just see the YouTube video now.
Fast forward 13 years...I just built a sturdy bench base that looks quite similar to this one but is admittedly and very loosely based on Chris
Gochnour's design. Turns out, it's more like yours, but yours didn't show up in my original search. Anyhow, I used beefy tenons and bigger lower stretchers to minimize racking, and also to simply hone my tenoning skills. I'm struggling with what to place on top; a beefy (that is, expensive) 3" one, or MDF/melamine. Your comment helped. I can always replace it the top when lumber prices come down.
I also added Ronlap workbench castors, which easily allow me to move the workbench around. I did not install the top front stretcher to ease installation of the front vise, figuring the top would hold things steady. The idea of offsetting the vise has me rethinking that part.
In this world of over-complicating everything, your simplistic approach is gratifying.
I wonder if there would be a problem using pocket screws to attach the top and the shelf?
Looks like a great workbench. However, some of us with limited garage / shop space might have to take a different approach.
I recycled the really ugly old 3' solid-core exterior door from my front entrance into a new work bench. The three hinges are screwed into a ledger board on the garage wall allowing it to fold down flat against the wall when not in use. A pair of folding 2x4 legs hold it upright when in use and swing away out of sight when it's folded down. With the hinge side securely anchored to an exterior wall the bench is surprisingly stable even with the two folding legs.
My lovely wife can still park in her garage (most of the time!)and there's a strong incentive to clean up at the end of the day.
fshanno--
No problem using pocket screws to attch the top and shelf. Good idea.
--Asa
I'm planning on making this workbench. I’ve never owned or used one, so I'm wondering if there's a particular reason/benefit why the table overhang is located in the front of the table on the same side as the vise. I’d like to keep the vise at the same position but move the overhang towards the back. Is there a reason for me to keep it in the front as per the plan?
I would like to make it movable buy put locking wheels on the table. If I account for height considerations, can you think of a compelling reason not to do it?
I laminated the top as instructed with 3/4" MDF, letting the MDF acclimate to my shop for 2 weeks before gluing and screwing. Both pieces were dead flat.
Several hours after laminating, I returned to find the MDF had warped apart and left a 1/8" gap at each end. I didn't bother to clamp the sheets together with all those screws - but the 1-1/4" wallboard screws had just pulled out!
Do I dare try again, this time with clamps, or should I just bite the bullet and laminate wood strips together the way the more expensive benches are made?
Or, on second thought, maybe I should try the MDF again, but simply screw without the glue... I can't imagine the pieces slipping with all those screws.
I built something similar to this about 10 years ago, but I laminated spruce for the top. I used inexpensive 2x6 lumber, cut it into 2" thick strips, smoothed them on a thickness planer and glued them up. Total cost for the top was about $25 and it has served me well over the years.
Has anyone made this bench top with two pieces of half inch sanded plywood. Would the MDF be much better? Don't like the idea of spilling water or more importantly a beer on the MDF and it warping. Getting ready to build, need feedback. Thanks
Does anyone have any ideas on how to make this workbench in a "knock-down" version? I dont have the space to leave it erected permanently, I do have the need for a solid bench. Any ides on the modification of the legs to make them so they retract and I can put it away when not in use?
If you just want to eliminate wobble on an uneven floor, all you really need is one leveling screw, as long as you can raise or lower the screw foot in relation to the other legs.
I built the bench per the plan with the only deviation being a 9" vise from Rockler. A week later the bottom piece of MDF started to split. I don't know the difference in weight between the vise I purchased and the 7" Groz prescribed but the MDF was a bad choice in retrospect. Is there another plywood anyone would recommend for more strength and longevity? Shop time is precious and I don't want to spend the time required for a hard wood glue up - thus the choice to make this bench in the first place.
It looks like a great inexpensive bench to get started with. The only problem I have with it is where is the second video? I've looked high and low and can't find it. Is this a technical opps or am I just not smart enough to find it.
Hope to see it soon Thx.
Ok forget my last comment. I finally did find the second half of the workbench video. It was near the end of the Season 1 videos. If I may be so bold as to suggest it goes first so you can watch the first video and then follow the link to the beginner section and it will be right there and easy to find. Just a thought Thx.
I just built this bench last weekend, with some modifications. I used 3/4" cabinet grade plywood for the top, instead of MDF. I think it wears better than MDF and the lag bolts seat strongly. Two sheets fastened with drywall screws form a flat, sturdy top. I also attached the top using pocket hole screws (easier & faster than routing the groove and using the table top fasteners...IMHO). I put a 9" Rocker vise on the face and a 13" Rockler vise at the far end, with dog holes over the entire top. I also put a 1/4" sheet of hard board on the top (over the plywood) and fastened this with 18 guage brad nails. This makes the surface very smooth, and if/when the top gets beat up, you can simply replace the hardboard (hardboard also hides the brad nail holes nicely). I also mounted the workbench on locking wheels (about 4" high) that I found at Harbor Freight. My two car garage is still a 2-car garage, but I can get the bench up and running in a hurry.
One question...what are good hardwoods for the bench vises. This is my first experience with these vises, so I'm looking for suggestions (maple + ?).
I had a terrible time putting the holes and counterholes in the right place. But that's more likely my own challenge in reading the plans.
The circular saw straight edge jig is genius. I have used mine for every cut I've made since. Thank you for the intorduction to such a simple but effective tool.
I haven't finished the project yet, but the closer it gets the more I can see this is going to be a solid bench.
Hey there, Asa. I just finished my bench (almost exactly to your plans) and put up my pics on this site. ( https://www.finewoodworking.com/item/26650/my-gsiw-workbench )
Just wanted to say thanks and I look forward to a Season 3???
Brent Prigge, Austin TX
I have watched this video several times and can't seem to see the end of it. It leaves off after the frame is build and doesn' show the finsh. can't figure what the top router grove is for. please tell me how to get the whole video or plan.
Thank you
I can't find part 2. The video used to have 2 parts, but pa
rt2 no longer is played. How about re- installing part 2?
Thanks,
Charlie Tucker, [email protected],
plastic1, chunky
I have modeled this bench in Google Sketchup 7. It is a complete to-scale model with each individual piece formed as a component. I think it might be nice for others to be able to use the model. How can I get you the model so you can upload it to the article?
Cheers!
I'm confused... The drawn plans state 4x4's used in construction, though the sketch shows 3.5"x3.5" legs, and the video doesn't really seem to bridge the gap. Do I need to chop off some of the 4x4?
Asa,
Love the bench! Will you tell us how far down you drilled the hole for the dowel stock support?
Thanks,
Matt Lewis
am about finished with this bench, my first woodworking project. plans are great, I had some 1/2 plywood and laminated 3 for the top. I plan to make another one and put them side by side for more work room, found a neat jig for cutting plywood,which most of you probably know http://blogs.popularwoodworking.com/editorsblog/Shop+Projects+Part+6+Cutting+Plywood+Without+A+Table+Saw.aspx but for us new to woodworking, was helpful.
Hi,
Thank you for your videos. They are very informative and well made.
I have a peeve about this one though. It is NOT easy to make without reasonable tools and a workbench.
You guys indicate that this is good to help out people with no workbench who want one, but don't have a bench to make it on.
- First, you need a good vice attached to - a workbench - to cut the metal rods to size with a hacksaw. This is so difficult to do without a vice, I'm still not able to get around to doing it.
- A router is not a common piece of equipment. I had to buy one for this. I like the equipment and will use it again so I don't have any regrets, but without a router one would have needed a table saw - not a very common beginners tool either - to make the grooves to accept the rod.
A mortis and tennon jointing system would have been much more beginner friendly and easy to make.
This has given me too much trouble for a first project.
Not able to download the PDG file.
Correction to my previous comment, I meant to say I am unable to download the PDF file.
Hoi Asa,
Do you have a plane off this workbench in a dutch language?
Its all in inches.
very nice
HELP! This looks almost perfect for me. I would like to add a vise on the far right end. I am not astute enough to know what modifications I would need to make in order to do so. Any ideas? Pictures from under (if you have done this)?
Can't wait to build this over the weekend!
DESIGN ISSUES! Ok, so how come only ONE person sited the fact that the diagram uses 3.5 inch supports while the Parts list says 4x4?
ALSO - why doesn't the parts list show the 4 - 24" 3/8 screws needed for the small supports?
Am I wrong? If not, is there anything else that any of you have found missing?
For a beginner bench I'm surprised! Luckily I was cautious enough to watch the videos several times and compare them to the diagram.
For those considering this remember to buy the screws I site PLUS, remember your small supports will have to be 1 inch shorter (16 inches).
OK - feeling sheepish. When buying the 4x4's I asked the BIG BOX checkout girl what the usable width was. She said "our 4x4's are always cut to exactly 4x4" with such authority that I believed her. Also cut the threaded rods to length.
:-)
The plans are right on and the desk is as solid as could be. No wiggle at all.
It is darn near impossible, or maybe just really relly uncomfortable, to do this without some sort of bench or table. Therefore I put the top together first, then threw it (upside down) onto some saw horses - voila! a bench to build on.
FINISHING: I used a dark Danish Oil throughout (thanks to FWW members) and put a Howard’s Bees Wax conditioner on the top to make clean up of glue and the like easy. Now that the wax is on, it is a little moist for my liking. I am concerned it might rub off on hardwoods, we'll see. (Johnson's paste wax is not readily available in Montana and I was too impatient to order it). I mounted a Jorgensen 9" Rapid release front vise. I Drilled 4 rows of 3 dog holes off of this. I attached a sheet of ¼” ply under the top to keep things from falling onto the screw through the dog holes. I also extended the Top to 68" so that I could add an end vise (ETA TBD). Being 68” worked perfect as dog holes spaced every 6” lined up perfectly with the Face holes.
Thanks FWW for a great plan that is easy and solid.
parden if this has been answered. in construction lumber the 4x4 is what is called the nominal dimension the actural lumber is milled to 3 1/2"x 3 1/2" finished dimension, so a 2X4 is acturaly 1 1/2"x 3 1/2". So the plans are correct.
Hope this helps.
So what happened to the finewoodworking coffee mug? I want one!
Thank you!!!!!!!
I am not a fine woodworker or cabinetmaker, but for years I have been frustrated by perceived budget constraints that kept me from getting my tools out of rubbermaid totes in the basement and setting up my garage space as a usable shop with a proper bench that can handle anything from planter boxes and rustic adirondack furniture to bicycle and lawnmower mechanics.
By using your well engineered design dimensions and fantastic economy of material, I was able to cut back farther by substituting OSB for MDF and by utilizing 2 x 4 construction with overlapping but joints I could eliminate the 4 x 4s and truss rods. In one Sunday afternoon I now have everything I could ask for in a bench - custom fit to my 6.5' height, extra heavy benchtop, storage shelf, and a dedicated place for a proper vise when the right sale comes along. Total cost including glue, screws, taxes and having the lumberyard make the ply cuts for me - CAD $33.63!!!! The best part is that they were out of OSB and substituted good-one-side spruce ply for no extra charge!
Thanks again...you made my Father's Day.
Here is the workbench I just finished:
https://www.finewoodworking.com/item/48231/basic-workbench-by-klaus-larsen
cheers
klaus
Greetings,
I just finished the legs on this bench. It actually came together, which is a minor miracle after all the mistakes I made!
2 questions....
Do you recommend the listed vice - the 7" Shop Fox G9850? And assuming so the one I saw on the Grizzly site looks different then the one in the magazine, and costs less: http://www.grizzly.com/products/Quick-Release-Vise-7-Jaw/G9850. Is that the right one?
And to confirm, do I need to flush the edge of the top with the stretchers/legs on a couple sides like (I think) the plans show? I would think I should have an overhang for clamping, eg. Thoughts?
Thanks!
Eric
Where can I find threaded rod and tabletop brackets?
Thanks, HK
Just a heads up. Do not build this bench with MDF if you need the top to remain flat. I screwed and glued my MDF top, and added a 5/8 birch ply on top of that, and it still sagged 1/8" to 1/4" on the ends over the course of 6 months. I use hand tools for everything but rough dimensioning and you cannot plan panels flat because of the bow in the top. And it makes assembly of projects more frustrating than they need to be.
Having said that, the base of this bench is bulletproof. It is a great design, super solid, and fairly easy to make. I added a "Heavy Duty Lifting Leveler" kit from Rockler to my base and the bench is super sturdy, does not slide around, and is easy to level on my uneven concrete floor in my basement. I love the design of the base.
I am going to laminate some 2 x 4's together for a new top, since I need a flat surface (or buy one of those premade laminiated maple bencg tops), and reuse my existing base. I love the base!
This is my first project so please excuse any ignorance or stupid questions. I made the base by the plans I downloaded. I thought I followed the directions and measurements but the stretchers on the top all have about 1/8" gap between the top of the stretchers and the top when it's on top.
My question is should I just go ahead and attach the top with that small gap all around (it seems solid) or should I plane/sand the tops of the legs down until it's all flush?
Any thoughts/advice would be greatly appreciated!!
Thanks!
Great video! I noticed that the threaded rods seem to slip pretty easily through your drill holes, whereas I literally have to hammer mine through; are those holes 3/8", or slightly larger?
Great plans and instructional video's. Have made bench (just bench dog holes to complete). The frame is very sturdy and top seems like it will be a good surface to work on although suspect it will get easily stained / marked.
As I am in UK needed to convert everything to metric and could not source the table top fasteners so I made some 'buttons' instead which work well.
Will post some pictures and give a bit more info for anyone else building in the UK.
Would anyone happen to know where to get these S-clip-type tabletop fasteners? I just went to two hardware stores and neither had them in stock.
Being totally new to this the one problem I see is that routing a 3/8 inch groove is not big enough for the lower shelf to fit in the grooves as it is 3/4..... Or is 3/4 ply or MDF really 3/8 thick?.....
Second question....how long to cut the threaded rods?
I have the same question as Damon and was hoping Asa or someone else from the team might answer. I followed the plans and measurements perfectly but the 4x4 legs are about an 1/8 taller than the stretchers creating a slight gap with the table top on. Is this by design? I haven't secured with the s-clips yet (you can order them from Amazon by the way) so I can't yet say whether or not that gap is to accommodate the design of the s-clip and any seasonal movement in the wood. It seems like the top will be stout enough just being supported by the 4x4s but I have to think it would be better with the support of the 4 top stretchers too.
Damon did you leave the gap or level the 4x4s off? I hate to dismantle the whole thing just to take the legs over to the miter saw and trim off an 1/8 inch but it seems like using the sander might take a while to remove that much material and I don't have a better way to do it unless someone has a suggestion.
FWIW, That Swedish, big box, flat-pack furniture and accessories store have solid oak counter tops 74 x 25 5/8 x 1 1/8 for CAD $265. I don't know whether they're flat or will stay flat, but they're worth a look.
I can't find the video! I have the PDF, but as a beginner, I like to have backup resources. can anyone post the link for me? Thanks!
Log in or create an account to post a comment.
Sign up Log in