Bandsawn Bridle Joints
Brian Boggs argues that his bandsawn bridle joints are simpler and more efficient than tablesawn bridle joints—and they can be cut entirely without layout.
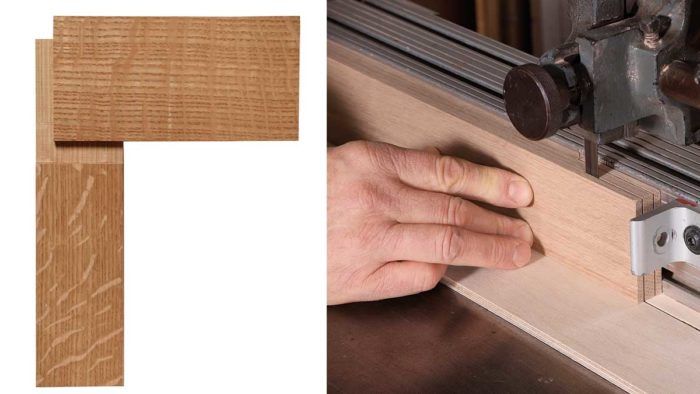
Synopsis: Making bridle joints? Brian Boggs would like you to kindly step away from the tablesaw and try his bandsawn bridle joint technique. He argues that the setup is simpler, the process is more efficient, and the joint can be cut entirely without layout. Also, with a bandsaw, long parts are not a problem.
Most woodworkers cut bridle joints at the tablesaw, which works very well for the task. So why bother using a bandsaw for this dependable joint? Because with the technique I show here, the setup is simpler, the process is more efficient, and both halves of the joint can be cut entirely without layout. A well-tuned bandsaw, which is easily precise enough for joinery, is both quieter and safer than a tablesaw. And the bandsaw comfortably handles long parts that pose a problem when you try to cut them vertically on a tablesaw. Give bandsawn bridles a try.
Start with the tenon cheeks
When you use the bridle joint method I’m explaining here, it doesn’t really matter whether you cut the tenons or the mortises first, but I’ll start with the tenons. What does matter is that all your stock is dimensioned accurately. Because to cut the tenon cheeks you’ll use just one fence setting, flipping the workpiece between cuts and using both faces as reference surfaces. You’ll take the same approach when you cut the mortise cheeks.
I like my bridle-joint tenons to be about half the thickness of the stock. So for 3⁄4-in. stock, I’ll cut tenons about 3⁄8 in. thick. I don’t bother measuring, I just set the fence by eye and make shallow cuts into the end of a test piece. If the spacing looks good, I’ll cut my tenons. Be sure to set the fence so the blade cuts the cheek of the tenon that’s farthest from the fence; this doesn’t really matter now, but as you’ll see, it will help later when you’re cutting the mortises and need to clean out between the kerfs.
When you have the fence where you want it, set two backup blocks carefully against the back side of the fence and clamp them to the table. They’ll keep the fence from deflecting as you cut and later they will play a critical role in setting the fence for the mortises. Next, to control the length of the cheek cut, ensuring that it ends right at the shoulder, clamp a stop block to the table or to the fence.
Now cut all the tenon cheeks with this setup, making cuts from both faces of the workpiece. Once all the cheeks are cut, trim off a bit of the waste on both faces of the workpiece. I trim them this way for three reasons: so I don’t confuse them with the mortised workpieces, which would otherwise look nearly identical at a certain point; because with the waste removed I’ll get more consistent alignment later when I cut the shoulders; and because it gives me a way to test the size of the mortises.
Move on to the mortises
To cut the mortises, you’ll need to move the fence toward the blade by exactly the width of the saw’s kerf. A quick way to do this is to fill a test kerf with a stack of playing cards or thin card stock until the fit is just snug. You don’t want it overtight or too loose. Use pieces of paper if need be to microadjust the fit. Then, leaving the backup blocks clamped down, loosen the fence and place the stack of shims between the back of the fence and one of the backup blocks. Press the fence tight to the shims to hold them in place and insert a second batch of shims between the fence and the other backup block. Then lock down the fence. That’s your setup for the mortises. Leave the stop block in place and use it for the mortises as well. Cut a test mortise and check the fit. It’s likely to be perfect or tight. If it is tight, subtract from the shims; if it happens to be loose, add to the shims.
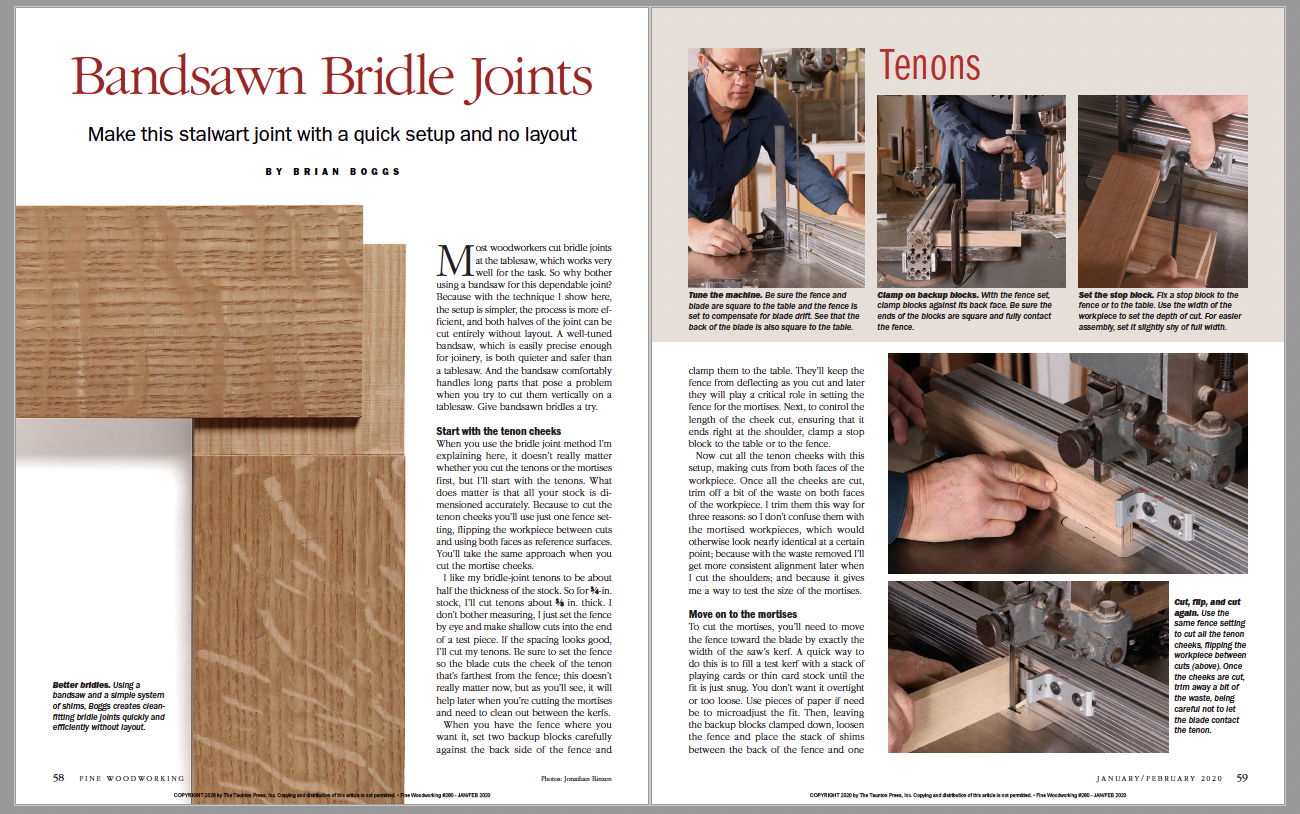
Once the mortise cheeks are cut, remove the waste between the kerfs. To do so, leave the fence in place and cut away most of the waste freehand, making diagonal cuts and being careful to avoid hitting the cheeks. Once nearly all the waste is gone, you can clean up the shoulder of the mortise by pressing the end of the workpiece gently against the stop block and then sliding the workpiece sideways, cutting with the side of the teeth. You can only cut about 1⁄32 in. of material this way, but it leaves a clean surface that should not need any hand truing. At this point the mortises are done.
From Fine Woodworking #280
To view the entire article, please click the View PDF button below.
 |
|
 |
|
 |
Fine Woodworking Recommended Products
Pfiel Chip Carving Knife
Olfa Knife

Veritas Precision Square


Log in or create an account to post a comment.
Sign up Log in