All-in-One Workstation for Dovetails
Mike Pekovich's simple stand holds the work for every step of the dovetailing process.

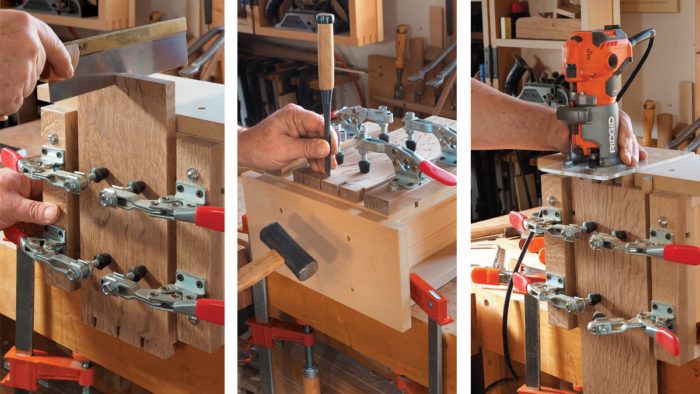
Synopsis: Mike Pekovich streamlines his dovetail technique by using a router to remove the waste between pins. This simple shopmade stand supports the work vertically and provides a horizontal surface for the router to rest on. It handles a number of other dovetailing tasks as well, such as holding the work for sawing and chopping. You don’t need a workbench and vise to cut dovetails. All you need is a sturdy table, this workstation, and some clamps.
My work tends to require a lot of dovetailing, in white oak no less, which can be a chore. Because of that, one technique I’ve adopted to speed the process and save some wear on my chisels is to rout out the waste between the pins. To help with that, I made a simple stand to support the work vertically and provide a flat horizontal surface for the router to rest on. While this use alone makes it worth building, the stand can handle a number of other dovetailing jobs as well. In fact, if you don’t own a bench with a vise, this stand can assist you through the entire process. If you have a sturdy work table and a couple of clamps, you can be cutting dovetails.
Unexpected benefits of a smaller stand
The router stand in this article is a smaller version of a design I’ve been using for years. When I began traveling frequently to teach, the original stand proved too heavy and bulky to bring along. So I set about making a smaller, lighter version inspired in part by a travel stand of Bob Van Dyke’s, so credit goes to Bob as well. It performs the basic routing tasks just as well as the larger version, but its small size and lighter weight make it easy to reposition on the bench, and that in turn makes it easy to perform a number of additional tasks. If you flip the stand on its back, the stock can be secured parallel to the benchtop. That allows it to serve as a workstation not just for routing, but also for scribing, sawing, and chopping.
The structure is simple
Made from home center materials, and requiring only a couple of rabbets and dadoes, the stand goes together quickly. The joinery is there to help keep the parts aligned during assembly and you can skip it altogether if you wish. I used MDF for most of the stand because of its flatness and stability, but I went with pine for some parts because of its nail- and screw-holding ability. You’ll also need some toggle clamps and T-nuts, which secure the bars the clamps are attached to.
This stand can handle parts up to 6 in. wide between the clamp bars, and you can accommodate up to 10-in.-wide boards by removing one or both bars and using regular clamps to secure the work instead. If you regularly work with wider stock, you may want to make a wider stand. If you do make a wider stand, I would recommend additional rows of T-nuts on the face to allow repositioning of the clamp bars to handle narrow stock as well.
Building a basic box
All of the joinery is cut into the inside faces of the front and rear panels. I use a dado blade to cut the dadoes for the vertical supports as well as the rabbets along the top and bottom edges for the sub-top and bottom. To cut the rabbets, attach a sacrificial fence to the rip fence and set it so the blade just skims it. The front panel is drilled and counterbored for T-nuts to attach the clamp bars.
Glue and nail or screw the base together. I use an 18-gauge brad nailer for the job. After the glue is dry, screw the top in place. Skip glue here in case you need to replace it at some point. Also make sure to drive the screws into the sub-top at the vertical support locations. The top is wider than the base to offer more support for the router when you are dovetailing wide pieces. The extra length also makes it easy to clamp the alignment plate in place when positioning the pin stock for routing. The alignment plate is a piece of MDF the same size as the top. I glue a 1⁄16-in.-thick strip of wood to the underside at the front edge, and that allows me to offset the workpiece 1⁄16 in. lower than the top when I need to.
From Fine Woodworking #282
To view the entire article, please click the View PDF button below.
 |
Video Workshop: Fitting the dovetails and routing to the baselineIn this episode, Mike Pekovich continues on the case dovetails cleaning up the baseline with a router, and paring the pins to a perfect fit. |
 |
Two DIY Woodworking Viseswith Ben Strano |
 |
Fine Woodworking Recommended Products

Freud Super Dado Saw Blade Set 8" x 5/8" Bore

Marking knife: Hock Double-Bevel Violin Knife, 3/4 in.

Veritas Standard Wheel Marking Gauge


Comments
Would be awesome to see the updated version of this jig in a future article. there is a glimpse of it in pekovich's hanging wall cabinet video workshop, but I am curious if this jig has evolved a step further. as a listener of STL I know many of his jigs do.
I could be wrong, but this is the updated version that came after the one in the video.
oh gotcha, thank you for the response (in all honesty I just noticed the sliding fence in the video workshop, and made the assumption) either way its an awesome JIG.
Thanks,
-JS
Log in or create an account to post a comment.
Sign up Log in