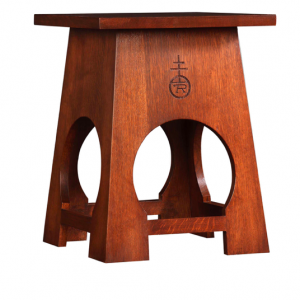
I’m a rank amateur. I wanted to make the tabouret below because it looked easy.
HA!
It’s a sloping mitered corner! What was I thinking?
I don’t have a clue as to how to glue the sides together once I’ve got them made. I’d like to do it the way it was done by the Roycroft folks, but I don’t know how they did it. And I’d rather not invent my own method, since what little experience I have has taught that that’s nearly always disastrous.
Help? Anybody? Anybody?
Brian


Replies
2 ideas come to mind. The first is to use band clamps. The second is to glue on temporary clamp blocks with the correct angles to get you 90 degree clamping. Then saw/chisel/sand off the blocks. Good luck
Thanks. Oddly enough, I'd never heard of the temporary clamp block idea until two days ago when I saw it in a YouTube video. What concerns me about it is the potential for damaging the workpiece when removing the blocks. Could I saw or chisel them off as close to the workpiece surface as possible and remove the rest with a plane?
My first vote would be for the band clamps. However, the slope is not great. So, probably angled blocks would have enough friction to not need gluing. Some double sided tape would make it easier though just to hold them in place while positioning the clamps.
A proper set of plans should have the true angle that the sides make with each other. ie. When one sights down the corner of each leg (seeing it as a point), the true angle between the faces would be shown. Check your drawings. You'd then be able to cut corner blocks for clamping that would be the correct angle.
I'm an engineer and taught this stuff at the college. It's called Descriptive Geometry. One of those things that is easier to do through a drawing than through mathematics. "Why do we need to know this stuff sir?" "So that you can make a proper set of drawings for the shop."
I agree with mrrosk.
Gluing clamp blocks on to make it square is best then saw and plane to finish.
You could try with a little test piece of your timber first, but I have done this a few times and find it takes only a fine shaving to get rid of any marks.
Alternatively, you could make a perfectly square frame with the internal edges at the same angle as the legs then just push it down until it jams in place over the joints. Much easier to glue blocks on....
I'd just use blue tape. I've done this many times with great results. Check out:
https://www.finewoodworking.com/2009/05/01/tape-unsung-hero-of-the-shop
The elegant solution is to model it with Sketchup and then rotate it so that you can see the angle...
..but an easier way is to simply put it together with tape and measure the angle with a sliding bevel or some such tool and then you can cut yourself some clamping blocks.
I suppose I wasn't clear enough... Use the blue tape INSTEAD of clamps to glue the mitered legs together. The link I gave above shows the author gluing up a mitered box with tape alone.
I have glued many mitered corner sections together using tape alone. The blue tape has enough stretch to squeeze out excess glue and get a nice tight fit. The tape running along the seam perfectly aligns the miter and eliminates squeezout to the exterior. Tape is easier than clamps for a long mitered edge.
This forum post is now archived. Commenting has been disabled