The lessons of my first plywood cabinet commission
After a decade in woodworking, Larissa Huff finally builds a piece of fine furniture out of plywood. Here, she shares what she's learned.
I have been a furniture maker for over a decade, so I am well-versed in how to use tools, execute joinery, and install hardware. I have used plywood to build shop storage and have used it for drawer bottoms or back panels in furniture pieces, but I don’t use it very often. I had little experience making high-end cabinetry from plywood … until last month. What I learned may be common knowledge to some, but here it is:
Pre-veneered plywood is a lifesaver
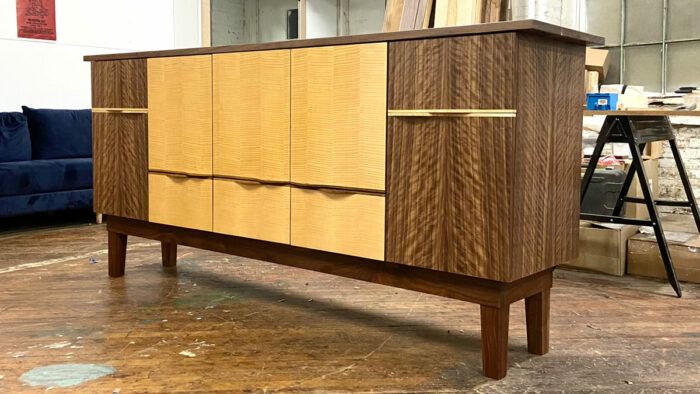
I invested in a sheet of walnut plywood and, although the price point was high, it ended up saving me a ton of time and work. I did buy a few sheets of figured walnut veneer to press and add a touch of fanciness to the doors and drawers, but the quality of the commercial walnut plywood I used for the rest of the cabinet was so impressive I’d consider skipping that extra effort next time around. Which brings me to my next point …
Seaming and pressing book-matched veneer is incredibly satisfying
I was excited to get to this point in the process because it is a technique I have done before when making captured panels in furniture pieces. I breathed a sigh of relief doing something familiar after days of applying new skills on the fly. I banded around the plywood with 1/4-in. walnut strips so the edges were solid. Then, I book-matched the veneer sheets in sequence, used two pieces of MDF to sandwich them, and broke out the router with a pattern bit to joint the edges square and smooth. I bought a roll of gummed veneer tape to join them together and, after an hour in the vacuum bag, I had some fancy overlay doors and drawer fronts.

Biscuits are awesome
I have used biscuits to aid in alignment when gluing up solid-wood tabletops and to reinforce miters, but wow if they aren’t great for making quick work of assembling cabinet cases. The top, bottom, and stationary shelves all came together with ease. Cabinetmakers will say “duh,” but I was excited to be able to assemble the carcase in what felt like minutes with an affordable power tool.

There are all kinds of fun gadgets to make things easier
There are SO MANY commercially manufactured jigs and templates to help make cabinets quick and easy. I looked into things to help install cabinet hardware and drawer slides, drill shelf pin holes, clamp corners square, and apply edge banding. In the end, I invested $20 in a small shelf-pin hole-drilling guide and it was worth every penny. I drilled 100 evenly spaced holes in 15 minutes. I guess this means I’ll have to buy the template for installing the drawer slides, right?

Pre-finish the inside components of the cabinet
I was just about to glue up the first section of the case when I paused and thought, “This is going to be tough to finish when it is assembled.” In my shop, I don’t have the means to spray finish so it’s all brush or wipe-on finishes. That said, I decided to pre-finish the inside faces while I could still lay them flat (no drips!) and air could help it dry evenly. Bonus: It also makes it easy to remove any glue squeeze-out.

Fine Woodworking Recommended Products

Blum Drawer Front Adjuster Marking Template

Ridgid R4331 Planer

DeWalt 735X Planer


Comments
Beautiful work, Larissa! I’m sort of in the same boat, except my woodworking has been as a hobby for over thirty years. I’ve made plenty of small / medium sized shaker pieces, jewelry boxes, a table, a bed, finish carpentry, just no plywood cabinets … yet. Think I have to at least make some plywood cabinets for the shop now!
Log in or create an account to post a comment.
Sign up Log in