Arts and Crafts Finger Joinery

Q:
I just finished reading your book Greene & Greene: Design Elements for the Workshop and I was wondering how you create the large finger joints found on this style of Arts and Crafts furniture?
DogwoodDesign, via Ask The Experts, None
A:
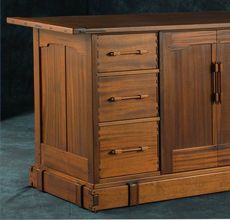
When making large finger joints like those on the base molding of the cabinet in the photo to the right, I complete the entire process with a few simple router operations. If the finger joint includes more than three fingers, as with the joinery on the drawers of this cabinet, I’ll use a router template.
In the first example I only have three fingers to cut — one large finger on the side molding and two fingers on the front molding.
I start by forming the two outside fingers of the front molding on a router table. I register one side of the workpiece against the fence and rout away just enough material to form the first finger. I then turn the piece over and follow the same process to form a matching finger on the other edge. Once the two outside fingers are established, I waste away the material in between.
To make the mating joint, begin by marking the location of the center finger, using the already cut piece for reference. Then set the router-table fence so that the router cuts one shoulder of the center finger. Flip the workpiece over, and rout the other shoulder with the same fence setting. Then clean up the waste on both sides to complete the joint.
When I do finger joinery with more than three fingers I follow a similar strategy, except for this operation I use a router template to cut matching fingers on both edges. Depending on the size of the piece, I rout two or three fingers on one edge of the workpiece, and then turn the piece over to rout the same two or three fingers on the other edge.
When making Greene and Greene-style drawers, I’m not concerned with the width of the center finger. With this method I am able to make fingers on any size drawers and do not have to worry about making the drawer a particular height to match the number of evenly spaced fingers. The middle finger is larger than the rest, and can grow as the drawers get larger.
This technique could also be done with a dado head on the tablesaw.
Find more articles by Darrell Peart or learn more about his book Greene & Greene: Design Elements for the Workshop at his Web site www.furnituremaker.com.
Fine Woodworking Recommended Products

Festool DF 500 Q-Set Domino Joiner

Starrett 4" Double Square

Olfa Knife


Log in or create an account to post a comment.
Sign up Log in