Use Test Cuts for Accurate Machine Setups
Check with an accurate square first, but confirm your results with test cuts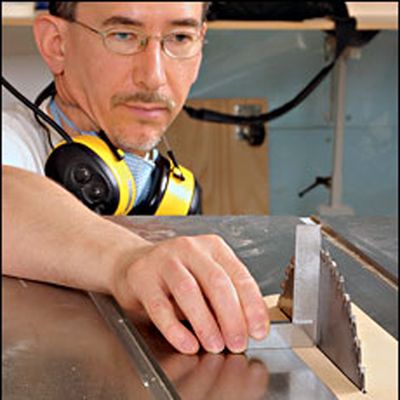
Synopsis: David Hyatt offers setups for checking your machine setups, including checking a tablesaw blade for an accurate 90° angle, squareing a tablesaw crosscut sled, setting up a tablesaw for accurate miters, and checking a jointer fence.
Building furniture or other projects with strong, square-fitting joints requires woodworking machines that are set up to make accurate 90° cuts. Checking with an accurate square might seem like all that’s needed, but it’s really just a starting place.
A square won’t register some factors such as variations in the flatness of a tabletop. Some squares aren’t as square as they should be. And, using a square alone, very small errors can be hard to see. The following test cuts can finish the job that the square started, making errors more visible by multiplying them.
Tablesaw: Square the blade and miter gauge
A very reliable way to check a tablesaw blade for an accurate 90° angle is to cut two test strips and then check the squareness of the cut by placing them end to end.
Raise the blade to maximum height. Use two strips of sheet goods (I prefer 1⁄2-in.-thick melamine) that are slightly narrower than the height of the blade and 18 in. to 20 in. long. Hold the two strips together on edge and trim one end of them using a miter gauge. Open the two strips in a book-match (like opening a book) and place them on a known flat surface. Any deviation from 90° will show up as a tapered gap between the ends as they touch. Once the blade has been adjusted to 90°, the 90° stop can be set and locked in place. Lay the same two strips flat, trim, and mate the ends again to check the 90° stop on the miter gauge. If the miter gauge is set at exactly 90°, there will be no gap between the ends of the test strips as they meet.
Tablesaw: Square your crosscut sled
Larger pieces such as panels are usually crosscut on the tablesaw with a shopmade crosscut sled. The accuracy of these cuts can be checked with a large square, but a better and more accurate method is to use the “five-sided” test cut.
Begin with a piece of sheet goods that is roughly 18 in. to 24 in. square. Number the edges 1 to 4, going counterclockwise. Place edge 1 against the fence of the sled and trim edge 2. Then place edge 2 against the fence and trim edge 3. Continue around until you have trimmed edge 1. Then place edge 1 against the fence and trim a ½-in. strip from edge 2. Label one end of the strip “A” and the other end “B.” Snap the strip in half and place A and B side by side on a flat surface. If the sled is set square to the blade, then the strip will be exactly the same thickness at A and B. Even very small deviations from 90° will show up using this method.
If the sled does not produce 90° cuts, then you should adjust the fence on the sled until it cuts accurately.
From Fine Woodworking #181
For the full article, download the PDF below:
Fine Woodworking Recommended Products
Ridgid EB4424 Oscillating Spindle/Belt Sander
Festool Cleantec CT 26 E HEPA Dust Extractor
Makita SP6000J1 Track Saw





Log in or create an account to post a comment.
Sign up Log in