Two-Sided Miter Jig

I’d like to thank Ken Wall, whose single-sided vertical miter jig (Fine Woodworking #80, p. 16) inspired this double-sided version. The two-sided jig is even better because its accuracy is permanently established by the slanted platforms mounted 90¡ from each other, not by the angle between the blade and the jig, which could change. If you cut one of the mitered pieces on the left side of the jig and the other on the right, they’re sure to form a 90¡ angle. The jig has proved excellent for small boxes, frames and most trim work.
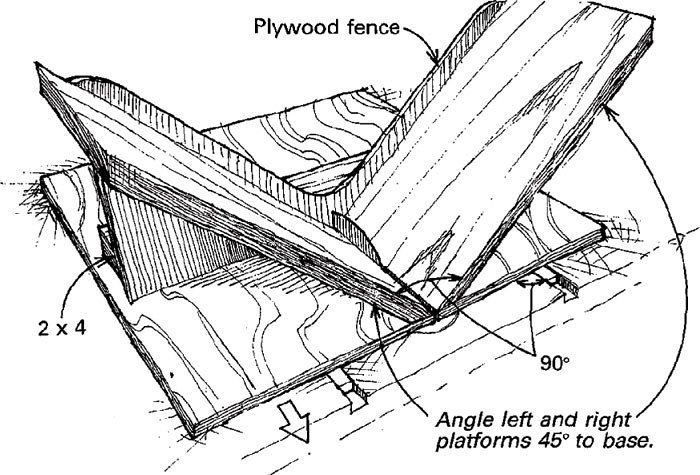
To make the jig, start with a 20-in.-sq. plywood base. Attach hardwood runners to the underside to slide in the miter-gauge slots on either side of the blade. Mount the left platform to the base at a 45¡ angle. Then mount the right platform using a large framing square and shims to place it at a perfect 90¡ to the left platform. Install fences to the back of both platforms. The fences, along with the extra support of the long platforms (10 in. minimum), provide plenty of stability without having to use quick-action clamps. To keep the jig from being cut in two, leave plenty of room at the back of the base and install a 2×4 behind the fence. The 2×4 not only adds strength but also protects your thumbs from the blade. Make sure the front of the jig is square to the table’s miter groove, so you can make 90¡ cuts against the jig. Using the jig’s base like a miter gauge saves a lot of cranking the blade over and back.
Dave Heffler, Lakeview, N.S., Canada
Fine Woodworking Magazine, December 1992 No. 97

Fine Woodworking Recommended Products

Olfa Knife

Marking knife: Hock Double-Bevel Violin Knife, 3/4 in.

Leigh D4R Pro


Log in or create an account to post a comment.
Sign up Log in