Small-Shop Solution for Cutting Sheet Goods

I work with sheet goods frequently and finally came to realize I needed a panel saw to make that work easier. There simply was not room for such a tool in my small basement shop, so I designed a fixture that makes cutting sheet goods quite simple and efficient. An added benefit is that I’ve since discovered other uses for the fixture as well.
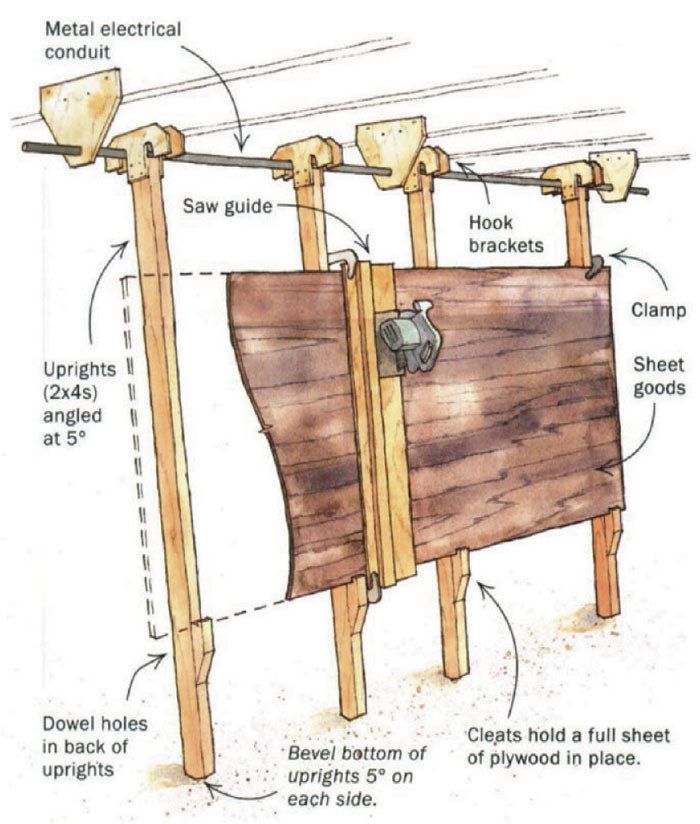
I needed something that would be lightweight, easy to set up and easy to store. It couldn’t be freestanding or mounted to the wall because I didn’t have the room. So I came up with a design of four 2×4 uprights that hang from the ceiling.
To make it, I mounted a 10-ft. piece of 3/4-in.-dia. metal electrical conduit spaced 4 in. from the ceiling, using plywood brackets. After some experimentation, I decided that the uprights should lean at an angle of 5¡, so I cut the bottoms at this angle from both sides to make a foot beveled toward the center. By tilting slightly, the uprights can better support a full sheet of plywood without the sheet tipping over. Then I cut the uprights to length and mounted two plywood hook brackets to the top of each upright that slip over the conduit. Note that the hook brackets are two-sided and allow tile uprights to be reversed. Finally I added a 2×2 cleat with a plywood lip about 24 in. up from the bottom of each upright. These cleats easily support the weight of a full sheet of plywood.
To use the fixture, I slip the hook bracket of each upright over the conduit and then rest the lower end on the floor. When crosscutting I space the uprights so that two are near the ends of the panel and two straddle the saw-cut location. I lift the plywood onto the cleats and clamp it to the uprights. Then I mark the sheet and clamp my saw guide on the cut line. I use a simple saw guide made from a strip of 1/4-in.-thick plywood with a 3/4-in. runner fastened to it. The first cut trims the guide to the right width, so that from then on it is easy to align it with a cut line marked on a workpiece. I can also use the fixture to rip panels. To do so I clamp the top of the panel securely to the uprights and set the sawblade to barely cut through the sheet goods.
Now for some extra benefits. By reversing the uprights, drilling 3/4-in.-dia. holes every 10 in. and filling the holes with 12-in.-long dowels, I get a great drying rack. And by adding a shower curtain suspended from the conduit with curtain rings and a piece of plastic to protect the floor, I can spray or stain right on the fixture.
Richard W. Beebe II, Hamden, Conn.
Fine Woodworking Magazine, January 2002 No. 153

Fine Woodworking Recommended Products

AnchorSeal Log and Lumber End-Grain Sealer

Woodriver Rechargeable Desiccant Bag

Ridgid R4331 Planer


Log in or create an account to post a comment.
Sign up Log in