Radial-Arm Saw Picture-Frame Miters

Anyone who has attempted to make picture frames with a radialarm saw knows how difficult and frustrating it is to set the arm to a perfect 45¡ angle. I developed a technique that allows you to produce perfect miters by canceling out error in the saw-arm setting.
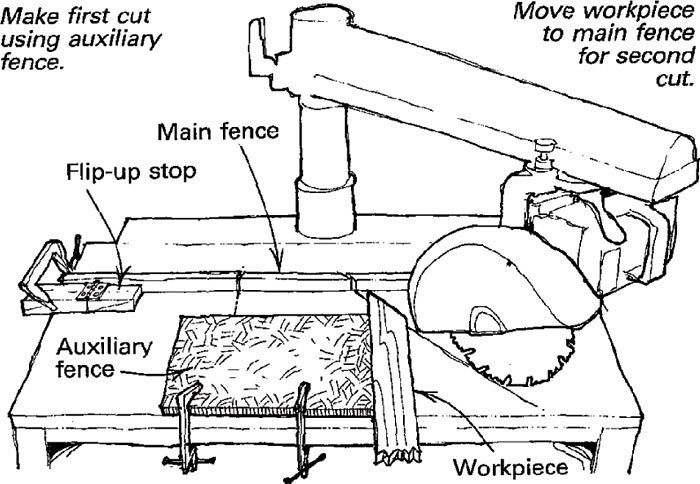
Start by swinging the arm to 45¡, as determined by the built-in stop, and locking the arm in place. Now clamp an auxiliary fence to the table at a right angle to the main fence, as shown in the sketch. I use a Masonite scrap with a straight factory edge for the auxiliary fence and align it with a large framing square.
Working with a long piece of molding stock, start the framecutting sequence by holding the outer edge of the molding against the auxiliary fence and trimming its end to a 45¡ angle. Next, hold the molding’s inside edge against the saw’s main fence and cut the first frame section to length. Now repeat this sequence; first trim the molding to 45¡ on the auxiliary fence and then move it to the main fence for the second 45¡ cut. The auxiliary fence is used only for trim cuts on the end of the workpiece, but the main fence is always used for cutting the frame sections to length. The saw arm never moves. By cutting in this sequence, each miter cut on the auxiliary fence will complement the adjacent miter cut on the main fence, producing four perfect 90¡ joints.
To ensure precise, reproducible lengths, I made an adjustable stop by screwing two boards to a hinge. The length of the flip-up board is the difference between the long and short sides of the frame. When clamped to the main fence, I can flip the stop up or down to gauge the length of a long or a short side.
Stephen R. Springston, Upton, N.Y.
Fine Woodworking Magazine, February 1991 No. 86

Fine Woodworking Recommended Products

Leigh Super 18 Jig

Suizan Japanese Pull Saw

Festool DF 500 Q-Set Domino Joiner


Log in or create an account to post a comment.
Sign up Log in