Mitering Frames on the Tablesaw
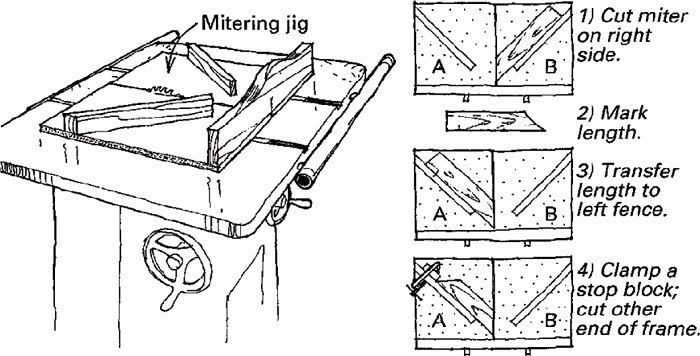
Much of the furniture I make is based on mitered frames, which require corners that have to meet perfectly. To make these frames, I use a sliding table jig on my tablesaw. The jig is simple to build, ideal to clamp work to and easily allows mitered workpiece corners to be marked for length.
Start with a piece of 1/2-in. plywood fitted with two rails on the bottom to fit in the tablesaw’s miter-gauge slots and a fence at the back tall enough so it won’t get sawed through. Place the fixture on the saw, and saw a kerf from front to back using the blade you will use for mitering. Now attach the left fence (fence A) to the base using a 45¡ triangle registered against the sawkerf to establish the angle. Attach the right fence (fence B) using a framing square set against fence A. Leave enough space between the tall fence and the angled fences for a typical frame workpiece. Also, for safety, make the throat between the fences wide.
To make a frame, first miter one end of all four pieces of the frame using fence B. Mark the required length on one of the workpieces, place the workpiece against fence A and transfer the measurement from the workpiece to the fence. Clamp a stop block at this location on fence A. Now miter the other end of all the pieces. When assembling the frame pieces, be sure to join A’s to B’s. Any slight error in the fences is negated by the 90¡ included angle, which ensures that each frame corner is perfectly square.
David A. Saunders, Manchester, Conn.
Fine Woodworking Magazine, May 1993 No. 100
Fine Woodworking Recommended Products
3M Blue Tape

Estwing Dead-Blow Mallet
Milescraft 4007 6in Bench Clamp




Log in or create an account to post a comment.
Sign up Log in