Mitered Box Jig

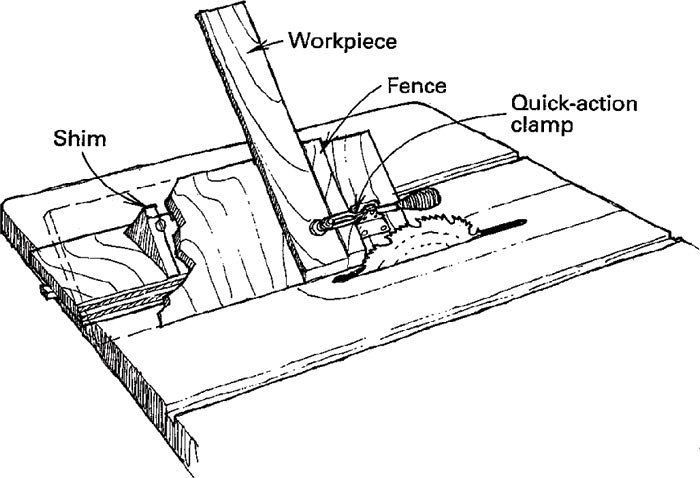
When making small boxes with mitered corners, I find it very time-consuming to set the tablesaw to the required dead-accurate 45¡ cut. Hence, I made this little jig, and with it, I can cut the miters quickly, accurately and, most of all, safely and with the blade set at 90¡.
Make the base and slanted platform from seven-ply birch plywood. Cut the two inside supports as close as possible to 45¡ on the tablesaw. Fasten these two supports to the base with screws and glue. Then, attach the slanted platform to the supports, but do not glue them and use only one screw. This will allow you to shim the slanted platform to fine-tune the angle later if needed. Screw a vertical fence onto the slanted platform, square to the platform’s long edge, and a guide rail to the bottom of the base to run in the saw’s miter gauge slot. Finish the jig with two or three coats of polyurethane to repel moisture. Finally, screw an adjustable, quick-action clamp to the jig to hold the material firmly during the cut. This clamp is essential. For safety’s sake, do not attempt to use the jig without it.
To calibrate the jig, make a trial cut with scrap lumber and check it with a 45¡ square. Adjust the platform with shims between the supports and the slanted platform until the cut is exact. For even finer tuning, cut four identical pieces and miter all their ends. Assemble the four pieces to ensure all four corners are dead on. If not, shim the platform again, this time with thin paper. Tighten both screws the same amount each time.
Now you’re ready to make boxes. I use masking tape to roll the box together, both for trying the fit and also for holding the corners while the glue sets.
Ken Wall, Sand Springs, Okla.
Fine Woodworking Magazine, February 1990 No. 80

Fine Woodworking Recommended Products

Suizan Japanese Pull Saw

Olfa Knife

Pfiel Chip Carving Knife


Log in or create an account to post a comment.
Sign up Log in