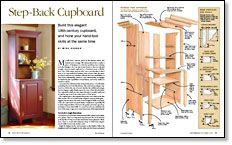
Step-Back Cupboard
Build this elegant, 18th-century cupboard, and hone your hand-tool skills at the same time
Synopsis: Michael Dunbar used hand tools to build this narrow cupboard, which is based on an antique design. Though you can use machines to replicate the joinery and construction processes detailed in this article, the hand-tool techniques described here are not particularly complicated, and using these traditional methods offer the opportunity to hone hand-tool skills, as well as end up with a handsome piece of furniture. Detailed project plans are included, along with step-by-step instructions for building hand-cut frame-and-panel doors and a dovetail case. Also included are definitions for a variety of classic edge profiles.
From Fine Woodworking #165
My wife had a narrow space in the kitchen where she wanted more storage. She had pestered me to make a piece of furniture to solve her problem, but I always had other things to do. One day I came home to discover she had bought a factory-made cupboard at a furniture store to fill the spot. One of the major reasons why I am a woodworker is that I want to be surrounded by furniture that is better than the mass-produced stuff. Factory furniture offends all of my sensibilities: It often lacks individuality, character, and craftsmanship; its designs are limited by the capabilities of machinery; and every surface is sanded to death.
I promised my wife that if she returned the piece, I would make something that we both liked better. She selected an antique cupboard on which this one is based. Besides the additional storage, she was happy to gain display space for some of her favorite items. The cupboard’s small size also makes the piece versatile, and it can be used in any room if she redecorates or if we move.
The original piece that inspired this project was made in the late 18th century. The wood used in the original—eastern white pine—suggests that the piece was made in New England. While very handsome, the cupboard is not particularly complicated, especially if it is made using machines. However, the project presents a good opportunity to hone hand skills. So, even if you do use machines for most of the steps, I urge you to try at least some of the steps by hand.
I purchased 4/4 stock that I dimensioned with a jointer and a thickness planer. This is an important step because the stock must be perfectly flat. If I buy wood that already has been planed to thickness, I have to work with whatever warp or wind it has experienced while it was in the dealer’s rack.
Begin by laying out the various parts on the lumber. Select the straightest and best lengths for the sides and the frame-and-panel door. You don’t want any warp or twist in these most visible sections of the cabinet. Cut out the various parts to oversize dimensions. You will cut them to their final dimensions later. Finally, joint one surface of each board and plane them all to thickness.
For the full article, download the PDF below.
Fine Woodworking Recommended Products

Stanley Powerlock 16-ft. tape measure

Festool DF 500 Q-Set Domino Joiner

Circle Guide


Log in or create an account to post a comment.
Sign up Log in