Federal-Style Oval Inlays
For efficiency and accuracy where it counts, take advantage of two marquetry methods: stack cutting and bevel cutting
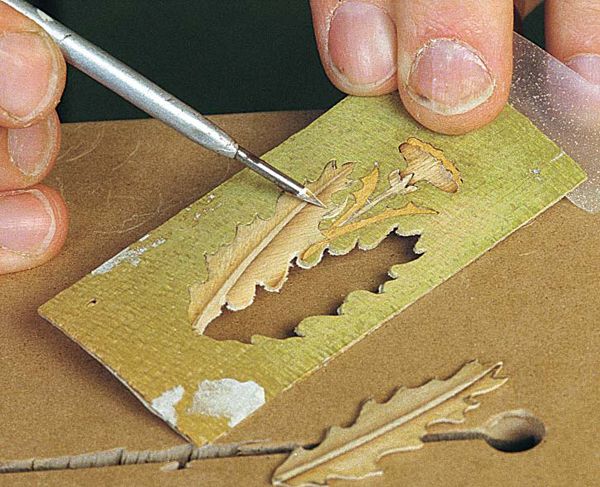
Synopsis: Steve Latta loves to cut inlays, and he shares his enthusiasm here as he shows how to cut a leaf-and-thistle oval inlay. Patterns of classic ovals may be hard to find, but veneers are readily available. You can use two methods to cut this type of oval – stack cutting, which is fast but leaves gaps; and bevel cutting, which is more difficult but cleaner. He shares a slightly different way of mounting the oval and explains the detail work necessary when finishing. Latta summarizes the steps involved with a close-up of both the inlay and the finished piece. Side information addresses the materials and techniques needed for sand-shading veneers.
Woodworkers who specialize in 18th-century reproductions tend to be an obsessive bunch. Whether they’re turners, carvers or upholsterers, they find a niche and focus—I mean really focus—on it. For me, it’s inlay and marquetry. I could cut all day and every day and still not get enough.
Federal-style furniture originating from the Chesapeake Bay area is full of wonderful details. Late 18th-century Baltimore card tables are a particular favorite of mine. I love their graceful lines, rich bandings and intricate oval inlays.
Oval inlays tell a lot about a piece of furniture. Just as the styling of ball-and-claw feet suggests a city of origin, inlay patterns also provide clues to a piece’s history. The leaf-and-thistle oval shown on the facing page is from a card table made in Baltimore in the early 1800s. Although I’ve seen this oval on some pieces from Charleston, S.C., only Baltimore cabinetmakers used the style of lower banding around the legs and aprons of this table. This oval appears on numerous tables from the region. I’ve also seen it adorning the top of a Baltimore sofa, too.
Most cabinetmakers in the 19th century did not make their own ovals. They were purchased from local “stringing” shops or imported from England. Rural shops, without access to manufactured inlays, made their own. These ovals were usually a little more crude in their styling and execution, but they lent their own personality to a piece as well.
The leaf-and-thistle oval pictured here was copied from a card table containing four ovals in all. One of the ovals was exceptional in design and execution while the other three were comparatively crude. In the context of the whole table, however, they look great. When making ovals, don’t fret over every little gap, broken curve, irregularity and chip. Ovals are accents to a piece, not the primary focus.
Patterns may be hard to find, but veneers are readily available
Finding accurate patterns of classic ovals can be difficult. One of my favorite source books for photos is Southern Furniture: 1680 – 1830, Colonial Williamsburg Collection by Ronald Hurst and Jonathan Prown. I also have a friend in the restoration business, and I check with him regularly to see whether something particularly stunning has come through his shop.
Holly and satinwood are the traditional veneers used in ovals, and they are readily much easier to control when bevel cutting, and that makes for a more dynamic oval. In this oval, for example, the grain of the large leaves is oriented 45° to the straight grained, skinny center stems. On the downside, however, bevel cutting doesn’t lend itself to mass production. Ovals are made one at a time.
From Fine Woodworking #138
For the full article, download the PDF below:
Fine Woodworking Recommended Products

Stanley Powerlock 16-ft. tape measure

Blackwing Pencils

Whiteside 9500 Solid Brass Router Inlay Router Bit Set


Log in or create an account to post a comment.
Sign up Log in