Building An Arts and Crafts Sideboard, Part II
Adding drawers and doors to a basic carcase
Synopsis: In this, the second of three articles on how to build an Arts-and-Crafts sideboard, Gary Rogowski covers drawers and doors. Building and fitting these parts carefully is every bit as important to a piece of furniture as making a sturdy case. He explains how to add web frames, or drawer dividers, to support the three drawers and then how to build and install the drawers and doors. He talks about how to glue in dividers, the top rail, and kickers, prefinishing along the way. Detailed project plans show the dimensions and parts. Rogowski also offers tips on how to prevent tearout, how to fit the drawers, how to keep door panels flat, and how to set the reveal on the doors. Side photos and explanations show the way to install bullet catches.
I’ve seen many a piece of furniture that looked great from across a room but fell short on closer inspection. Often, it’s something as simple as a drawer binding in its opening or a pair of doors that aren’t aligned properly. That’s why building and fitting these parts carefully is every bit as important to a piece of furniture as making a sturdy case.
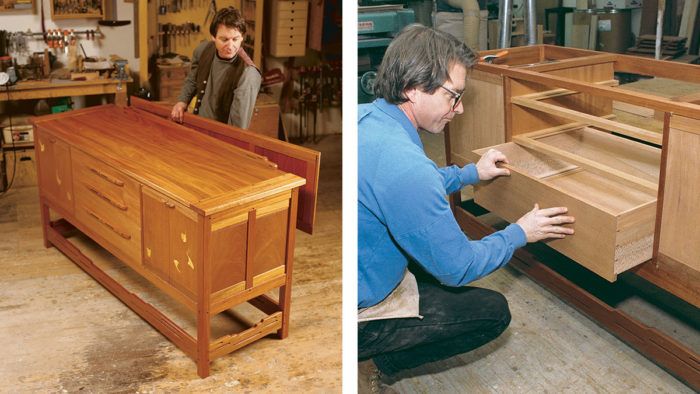
The previous issue of Fine Woodworking covered carcase construction for the Artsand-Crafts style sideboard in the photo at right. That article ends with the mahogany case pieces made and mostly glued up. Now it’s time for those all important details: adding web frames to support the three drawers and then building and installing both drawers and doors.
Building web frames for the drawers
On many case pieces, the front rail of a web frame—also called a drawer divideris visible on the outside of the case. On this sideboard, however, I kept the dividers hidden behind the drawer fronts to act as drawer stops. One other benefit of keeping the dividers hidden is that the front of the sideboard has a cleaner, less cluttered look.
All three web frames are made of western maple. The side rails of the upper two frames have tongues that are glued into stopped grooves in the plywood dividers.
The side rails are joined to the front webframe rails with stub tenons in. thick and in. long. The front rails are joined to the plywood dividers with stub tenons of the same size. Web-frame joinery was done on the tablesaw and router table (see the top photo at right). No matter how you do it, make sure the shoulder-to-shoulder lengths of the front rails are all exactly the same. Otherwise, the plywood dividers won’t be straight when the rails are in place, altering the size of the drawer openings and making drawer fitting much more difficult.
The bottom drawer also needs a web frame, but I was concerned that if I used the same joinery as I had for the upper two web frames, the grooves would be too close to the spline joints connecting the dividers and divider rails. Grooves located this close to each other would have compromised both joints.
My solution was to use 1.5-in.-wide stock for the front and side rails of the bottom web frame (this increased the glue surface area), biscuit the side rails to the divider rails and rabbet the front web-frame rail over the front rail of the carcase (see the drawing on p. 81). The side rails, or runners, were simply butted to the backs of the front rails. After all the web-frame rails were fitted, I planed their tops and bottoms flush to one another and cut grooves for the dust panels.
From Fine Woodworking #126
For the full article, download the PDF below:
Fine Woodworking Recommended Products

Circle Guide

Stanley Powerlock 16-ft. tape measure

Blackwing Pencils


Log in or create an account to post a comment.
Sign up Log in