Upholstering a Slip Seat
A traditional approach with horse-hair padding
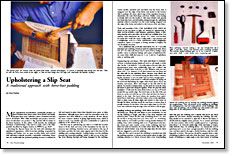
Synopsis: With a little knowledge and practice, most woodworkers can produce a slip seat that will do justice to the finest furniture, according to Don Taylor. Recessing the slip-seat frame into the chair rails minimizes the upholstered appearance, while horse-hair padding, suspended by webbing and burlap over an open wooden frame and covered with upholstery material, provides comfortable cushioning. Taylor also explains how to use high-density foam, in place of horse hair, on a plywood form. He talks about tools and materials, how to build the seat frame, install the webbing and padding, make the edge roll, and install the cotton muslin.
Most experienced woodworkers consistently produce refined furniture that draws praise from friends and family. But give those some craftsmen a piece of material and they turn to all thumbs. With a little knowledge and practice, however, most woodworkers can produce a slip seat that will do justice to the finest furniture. In this article, I will describe the traditional technique of upholstering a slip seat for a chair, such as the Chipendale described by Eugene Landon in FWW #73, pp. 84-87.
Recessing the slip-seat frame into the chair rails minimizes the upholstered appearance, while horse-hair padding, suspended by webbing and burlap over an open wooden frame and covered with upholstery material, provides comfortable cushioning. Horse hair was traditionally the preferred padding because it retained its loft and stayed in place better than Spanish moss, grass or other alternatives. Although horse hair is used for restoration work, it is expensive and often difficult to work; therefore, I’ll also discuss the more common method of gluing high-density foam, which is easier to work, very durable and more comfortable, to a plywood platform in the sidebar on p. 80.
The first step in upholstering any chair is to build the wooden frame to fit the chair and serve as the foundation for the seat. Interwoven jute webbing, stretched across and tacked to the top of the frame, provides the seat’s main support and is the base for the padding and covering materials. Tacking burlap over the webbing prevents the horse-hair padding, which is laid on top of the burlap, from filtering through and being damaged by the webbing. Cotton muslin, stretched and smoothed over the horse hair, is wrapped over the edge of the frame and tacked to the bottom. This is perhaps the most critical step of the operation because it determines the seat’s final shape and form. Finally, cotton batting is loosely laid over the muslin to add extra softness and prevent the horse hair from uncomfortably poking through the upholstery material, which is stretched over the cotton batting, wrapped over the edge of the frame and tacked to the bottom of the seat frame.
Tools and materials—Only a few specialized tools, which are shown in the top photo at right, are needed for upholstering. A basic tool kit includes a tack hammer, upholstery shears, a webbing stretcher and a tack lifter, all of which are available from Constantine (2050 Eastchester Rd., Bronx, N.Y. 10461; 212-792-1600) for under $50. You’ll also need a utility knife, a tape measure and a straightedge, such as a 54-in. upholsterer’s metal straightedge, carpenter’s square or T-square. A sewing machine is helpful, but not absolutely necessary.
For a traditional seat, you’ll also need about 8 ft. of -in.-wide red-stripe jute webbing, several pounds of curled horse hair, about 6 ft. of -in. welt cord, about 4 sq. ft. each of 10-oz. burlap, cotton muslin, cotton or polyester batting, and a piece of upholstery fabric, some white chalk and some no. 2, no. 3 and no. 8 upholstery tacks or webbing nails.
From Fine Woodworking #79
For the full article, download the PDF below:
Fine Woodworking Recommended Products

DeWalt 735X Planer

AnchorSeal Log and Lumber End-Grain Sealer

Ridgid R4331 Planer


Log in or create an account to post a comment.
Sign up Log in