How to Glue-Up Joints: Different Woods Need Different Clamping Pressure
 May 11, 2010

Wood type matters. See chart below with recommended clamping pressure for 5 different types of wood.
Many woodworkers are underclamping their joints during glue up. To help avoid this, professor Roman Rabiej developed some simple keys to clamping success. (Read the full article on the topic.) One of the keys is that you should apply the right amount of force for the type of wood you’re using since different species require different clamping pressure. Wood orientation (flatsawn or quartersawn) is also important.
Why correct clamping pressure matters
Optimum clamping pressure creates strong glueline joints in several ways. First, it overcomes the viscous resistance of the glue and forces it into a thin, continuous film in contact with the wood, which is necessary for a strong joint. Second, as the glue releases moisture, causing the wood to swell, clamping overcomes this pressure and prevents the joint from opening up. Third, it overcomes minor surface imperfections between mating surfaces. And fourth, clamping holds parts in position until the glue cures.
Too little pressure will fail to achieve any of these benefits. Conversely, extreme pressure can produce weaker joints, however, this is unlikely with common woodworking clamps. Because modern glues are stronger than the wood fibers, a good glue joint should break in the wood, a process known as wood failure, rather than along the glueline.
So rather confusingly, the higher the percentage of wood failure, the better the joint. The wood-failure percentage starts to diminish as clamping pressure is increased beyond a certain point, because excessive pressure begins to starve the joint of glue and also to compress the wood and reduce its ability to absorb the glue.
| Wood Type Matters | |||
| In general, dense and tight-grained woods require the application of greater force. On hardwoods, glue joints between radial or quartersawn faces require half the pressure of tangential or flatsawn face joints. This is because on hardwoods, the quartersawn face has half the compression strength of the flatsawn face, so the fibers are more easily crushed. On softwoods, the reverse is true, with the quartersawn-face gluelines requiring twice the pressure of the flatsawnface gluelines. |
| Recommended Clamping Pressure (pounds per square inch) |
||||
| Wood Type | Quatersawn glue face |
Flatsawn glue face |
||
 |
Sugar Maple |
600 | 1,200 | |
| Red Oak |
450 | 900 | ||
| Black Walnut |
300 | 600 | ||
| Black Cherry |
250 | 500 | ||
| Ponderosa Pine |
300 | 150 | ||
The chart simplifies the science
The chart above shows the recommended glueline pressure for selected furniture woods. The optimal pressure is roughly twice as high. This peak pressure is the point just before the glueline is starved or the wood fibers are crushed.
For most hardwoods, however, normal woodworking clamps can’t get close to these levels of force. But joints clamped at the recommended levels will be quite strong enough, with the glueline being stronger than the wood itself. You’ll achieve a glueline thickness well under the recommended maximum, which is about 0.004 in. To give a point of reference, the cover of a (like Fine Woodworking) magazine is 0.005 in. thick.
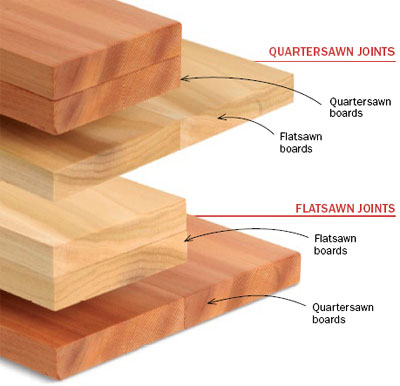
| Wood Orientation When determining whether a joint is flatsawn or quartersawn, consider the two surfaces to be glued rather than the visible surface. |
 |
The next step is to find out how much pressure you are applying with each type of clamp.
-
Wood type matters. See chart below with recommended clamping pressure for 5 different types of wood.
-
Wood orientation matters too. On hardwoods and softwoods, quartersawn and flatsawn lumber require different clamping pressures. See details below.
-
See chart below with recommended clamping pressure for 5 different types of wood.
-
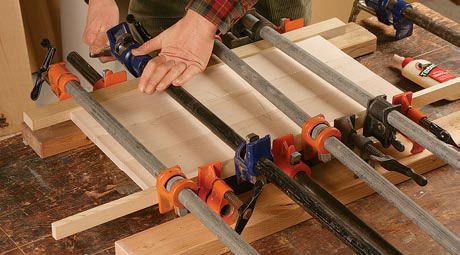
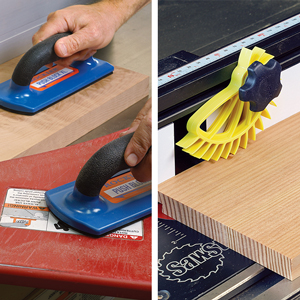
Wood type matters. Different species need different levels of clamping pressure. These maple boards, for instance, need more clamping pressure than pine.


Comments
I am hoping some one can help me.
I bought a used older 6 inch jointer now no good after 2 1 min terst runs./
Being on a disability pension may be 6-12 months before able to buy a newer used 6 inch jointer how else can l prepare boards to glue together and is there a place online to teach me these and other basic's
jim
What's missing from this discussion (and from the original article) is how strength varies with clamping pressure and other joint conditions. For example, let's say I clamp a sugar maple edge joint at 300 psi, just 1/4 of the recommended pressure. Is the joint going to be only 50% as strong? If so, then that might be pretty significant, especially if it means that the strength of the glue line falls below the strength of the wood itself. But if my less-than-ideal joint turns out to have 95% of the strength of a joint clamped at the ideal pressure, then who cares?
Likewise, how perfect does the mating between the two surfaces have to be? If my glue line varies in thickness between 0.005" and 0.015", how much strength am I giving up?
The information in the article is just a starting point. What we need to see is investigations with this level of rigor, but into the strength of joints produced under "real world" conditions. (There have been articles in FWW addressing real-world strength of joints, but most have been all but completely lacking in scientific rigor. I remember one particularly egregious example from some years ago, where the authors concluded, in effect, "Well, the biscuit joint tested significantly stronger than the mortise-and-tenon, but we still think the mortise-and-tenon is better.")
-Steve
Jim. You aren't going to get a perfect edge joint off of a jointer. Hand planing is the only way to really do this. Buy a good jointer plane. Go to tag sales and look for tools. A friend of mine is always finding great tools, some of which were used once and never even sharpened, for less than $50.00.
A jointer plane is the big one, in case you don't know, between 21 and 24 inches long.
Fran
How many people out there are using a gauge to test clamping pressure. RAISE YOUR HANDS!!!
Hey Jim - if it's going to be a little while before getting a jointer, here's something that will get you close on getting straight edges on boards:
If you have a long straight level you can lay this against the fence of your table saw. Hold the board you want straightened, against the level. Then, while performing the ripping, move the board and level together (obviously while against the fence). The long level acts as a very long straight fence on your table saw. Remember two things: 1.be very careful doing this (because your sliding the level and board together against the fence, and it's more you've gotta focus on simultaneously) and, 2.Look at your board before ripping: one edge is normally curved inward a little bit, and one is bowed out. You want to have the inward curved side against the level; this will make sense when you do it. Hope it helps!
According to this article, the math says that I would need 13 3/4" pipe clamps to glue up two pieces of maple 24" long. With that I would need close to 30 clamps to glue up two pieces 52" long. That seems like it's a little much.
I know this is old but what do you mean that the jointer is "no good" now? Unless castings are broken a jointer is an easy machine to repair and get running. Also most of the old jointers are better than what you can buy today unless it's one of the cheap Craftsman but even that can be made into a nice machine.
This is an interesting topic. Going back a good few years, I was working in a boatyard, and epoxy resins such as West and SP Systems were just becoming available. We did a number of tests gluing with epoxy and the normal boat builders' urea-formaldehyde glues of the day. The U-F glues were stronger with a well made joint, but the epoxies were stronger if the joint was not well made, so there was a thicker and irregular glue line.
I'm doing a glue-up of 1.75" thick walnut for a 72" table top. The above math would lead me to believe that I would need 75,600 lbs of pressure for the 126 square inches. Is it just me, or does that sound a little excessive? That is 56 I-Bar clamps for a 6 foot glue up. Anyone have any advice? I don't want to apply so much pressure that I starve the joint of glue by pressing it all out.
Could FWW please produce some kind of meaningful addendum to this article? There is a lot of confusion (beyond just calculating actual psi). There are several examples in the comments. . . not to mention that Titebond recommends a maximum pressure of 250 psi for hardwoods (NOT the 1200 psi FWW recommends).
If a properly constructed joint achieve an adequate glue bond with rubbing alone perhaps, just perhaps, there were some omissions in this article.
For industrial applications with air-bags or hydraulic presses the information in the article might possibly be useful (although I doubt it as most of those machines have their own factory calibrations/calculators). . . for the rest of us actual furniture builders the article was merely confusing and causes undue concern.
Log in or create an account to post a comment.
Sign up Log in