Hi,
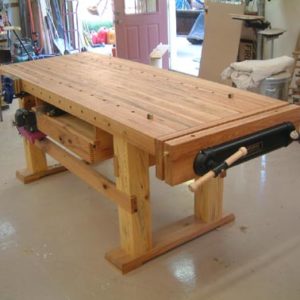
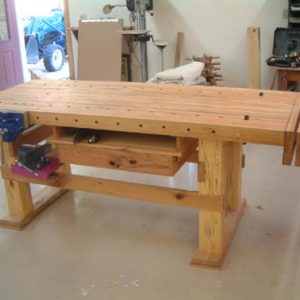
I thought that I would post pics of my bench, built with expert advice and help from all you folks.
Top is 3″ red oak milled from trees we felled and had milled. Base legs are pine beams left over from building our home. Top was glued up in 5″ sections, jointed and run through the planer, then glued into 10-12″ sections, jointed and planed. Final glueup was done on base. Top was flattened with old #5 Stanley plane.
Dog holes were milled with Dado blade on table saw, bench pup holes were bored with forstner bit in drill press. Dogs, pups and end vise are Lee Valley, side vice is Record.
It is a heavy beast!!
Very satisfied with the end result, thanks to all of you for your advice.
Bob


Replies
Bob,
Hey, nice job!
A thing of beauty! Well done.
Almost to nice to use!! looks real good.
That's an awesome bench Bob. I really like the fact that you dropped the wood for the top and salvaged the legs. I'd be darn proud of that bench if I'd bought the lumber, but your story really makes this one special.
Looks great, having a heavy bench with good vices is a revelation. Using salvaged wood and lumber you mill from the tree is icing on the cake.
Troy
That's a staunch looking beast!
Well done - now comes the work, eh?
Malcolm
Good looking bench
Good Work! I like it.
Grits
A great looking bench! I would be interested in knowing more about how you installed the shelf/drawer unit and how you dealt with crossgrain expansion issues of attaching the shelf to the top. Also, is the metal working vise simply attached to a plate which clamps in your front vise? It looks like it would be hard on your back to use it in the position shown! :<)
Regards,
Ron
Ron,
Are you in Ottawa? I was there last week for Canadian Thanksgiving. Weather was perfect as were the leaves. Also visited LV 3 times!
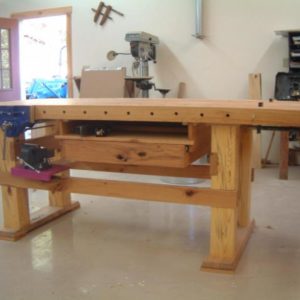
I built the shelf and drawer as one unit with cleats to mount it. I used screws at front and back. Top has been well seasoned and in conditioned space, so I didn't worry about expansion, although a slot at the rear screws could allow for movement if needed.
The biggest issue I had with the shelf and drawer design was allowing clearance for the bench dogs as they extend through the top. My solution was to add the shelf as bench dogs protruding into the drawer could impede operation! This has worked out well as I reach for the shelf more often than the drawer, which I store chisles in.
The metal working vise is mounted on a oak board with carriage bolts. The board has a 1X2 oak cleat glued and screwed to the front so it can be clamped in the side vise.
Bob
I've lived in Ottawa for almost 20 years. And yes, Thanksgiving weekend was wonderful weather...now we just have to remember how great it was for about 6 months until the leaves come back! For those who live South of the border, Canada's Thanksgiving is in October rather than November...it gives us a chance to celebrate a long weekend without having to break out the winter gear!I worked at Lee Valley for a few months back in 2003. A great company with good, hardworking people who care about the customer and the quality of their products.Regards,Ron
I'm jealous! Nice job.
Mitch
"I'm always humbled by how much I DON'T know..."
I get all misty eyed looking at a beautiful bench! Great looking tool you have there. I really like that idea of using the machinist vise on a removeable base. I am going to do that with mine.
I wonder about one thing though, and I am sure you have a good reason for doing this, but why mount the front vise so far from the corner ? Looks like you mounted it in about a foot or so. I just asked because when i mounted my 2 vises I put them at the corners and I would dare say I use the vises from the sides as much as I do face on.
Wicked Decent Woodworks
(oldest woodworking shop in NH)
Rochester NH
" If the women dont find you handsome, they should at least find you handy........yessa!"
Edited 10/19/2005 7:37 am ET by cherryjohn
I get all misty eyed looking at a beautiful bench! Me too! Especially if a Brunette on it!
John,Your bench looks better than mine! It seems the bench is the effort put forth towards a goal, whether we want it be a piece of furniture or something we can use and bang on, or in between. If we are satisfied with the bench, or strive to improve it, that should be the goal (I have noticed the woodworking art moves and pulls us to improve our "talents" and open our eyes). Thank you, Doug Stowe, for opening my eyes to this art!I'll have to confess that when I started this project, I wasn't sure of the end product. It was a kind of a design as I go. I made sure that I had all the hardware as that was not "negotiable" ie: I couldn't "sand it to fit"!The side vise was located per (1)pictures I had on file, (2) the length I wanted for the dog pup holes on the apron and the end vise, and (3) it was a guess!I don't know yet if I would build this exactly the same, but isn't that the pleasure of the woodworking art??!!Build a bench and enjoy the process and the use!Bob
PS!!And post pictures!Bob
Thank you for the compliment. My bench is the second bench I made. It is said you have to make a bench to learn what you should have done. I read The Work Bench book by Scott Landis, three times, before I built #2. I guess the real test comes after you have had the bench for awhile and used it. In my case I have had mine for 5 years and made many projects on it; many different kinds of projects and the versatility is there. If I had to build that bench again I wouldnt change a thing. Well, I do like that pattern makers vise but I doubt Id pony up over $200 for one vise. Like you, I salvaged a tree to make it. I found a rock maple tree cut down and left by the side of the road here in NH. The butt end was 42" in dia and the tree was cut into 3 sections, each about 10 ft long. I hired a log truck to get it for me after the land owner said I could have it. Took it to a guy who has a band saw mill and he cut it up into boards. some of the wood was not salvageable and some went to the guy with the sawmill but I still got enough old groth maple. to make the bench and some projects and still have a bit left. The pic I posted was taken right after the bench was completed but before i bored the holes in the top for the bench puppies ( and also before I rebuilt my shop...... gosh it was a mess ). You'll find that one bench may not be enough. I have 5 and I use 4 regularly.
Wicked Decent Woodworks
(oldest woodworking shop in NH)
Rochester NH
" If the women dont find you handsome, they should at least find you handy........yessa!"
Very nice, Bob!
I don't ever remember mine having such a nice, clear top- always covered in stuff!
Out of interest - what glue(s) did you use?
Again - nice job. I bet you are motivated now!
Take care and stay in touch
Ozzy
Ozzy,I had to clean the top and the shop to take the pics!!I used Titebond with a lot of run out!Bob
Ah-ha!
The truth is out!
Take care, and stay in touch, Bob.
Ozzy
Great job
NOTHING like MY Bench! I got all sorts of stuff on mine!
This forum post is now archived. Commenting has been disabled