Thanks.
Discussion Forum
Get It All!
UNLIMITED Membership is like taking a master class in woodworking for less than $10 a month.
Start Your Free TrialCategories
Discussion Forum
Digital Plans Library
Member exclusive! – Plans for everyone – from beginners to experts – right at your fingertips.
Highlights
-
Shape Your Skills
when you sign up for our emails
This site is protected by reCAPTCHA and the Google Privacy Policy and Terms of Service apply. -
 Shop Talk Live Podcast
 -
 Our favorite articles and videos
 -
E-Learning Courses from Fine Woodworking
-
-
 Fine Woodworking New England Event
 -


Replies
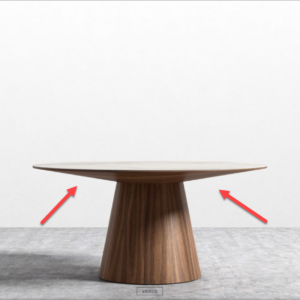
You'd need a really, really big bandsaw to cut that bevel on a bandsaw.
For the individual boards? Sorry, I think I could have been clearer. After dryfitting/aligning the boards, I'd break it down and bevel each of the boards indpendently before refitting, gluing and then sanding to finish/clean-up the shaping.
Thats a good project for a CNC if you want it made of solid wood.
If you are planning to glue this up from solid stock you'll need to bandsaw angles in 2 directions on curves that will change as you move from board to board.
If you cooper it (the base looks coopered) you'll just need to flatten the ends and fair the surface before adding a top.
A huge lathe would do the job, or a router & sled combo, similar to a slab-flattening jig but built on an angle. Lots of time and tons of chips...but you'd get there. It might even be the way to clean up the coopered and bandsawn versions.
The lathe was my first taught, and you don’t want to rough it out too much before since it will involve the tool catching a lot of air between the cuts and at that diameter, that could create a major catch.
Being a cone shape, there is no way to get close to it by bandsawing large parallel pieces of solid wood and glueing them together. You could get closer to final shape by face laminating « V »planks side by side each shorter than the next starting from the center, it would also be a nice mathematical chalenge to compute and trace each plank. There would be a step between each plank that could be milled down to final shape on a CNC, a lathe or a router or even a hand plane .
I am imagining that the top is made of parallel-sided boards, rather than wedge shaped ones. If so, if you cut away a lot of wood before glue-up (and figuring out what wood to remove can be challenging for a cone like the top) you will have serious trouble applying clamping pressure where it needs to be.
I would glue it up with full thickness boards, cut it round with a router and long base pivoting from the center, then make a sloping plunge router sled that also pivots from the center. (You will have to figure out a way to lock in place the outer end of the sled in stepped increments. Lots of material to remove! I would then probably clean it up with a cabinet scraper; easier to keep cutting than a hand plane, and less subject to tear-out where the grain changes direction.
I don't advise trying to make the top out of wedge shaped pieces, as there is no way to accommodate seasonal dimensional change. The top will either buckle or split with changes in relative humidity and hence wood moisture content. The fan-shaped table designs are all done with veneer over dimensionally stable plywood or MDF.
I think you're on to it there.
I was trying to think of how to do it with hollow forms, but it's defo too hard basket.
I was thinking the original is veneered. It's the only way to ensure a pleasing pattern on the top.
This forum post is now archived. Commenting has been disabled