Hi
After almost 2 years of procrastination and saving up for timber, mattress and bedding, the time has come!
This is a follow-up post from the first design. (Here is the link to that: https://www.finewoodworking.com/forum/rookie-building-a-bed). Read through all the comments and my dad and I sat down to refine this bed structure.
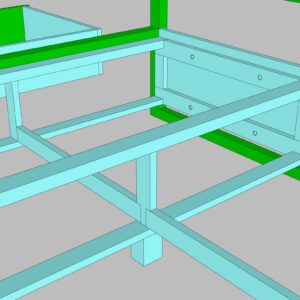
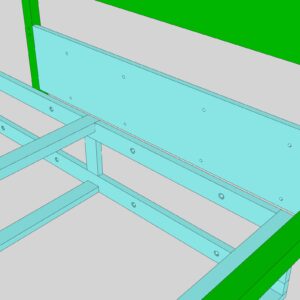
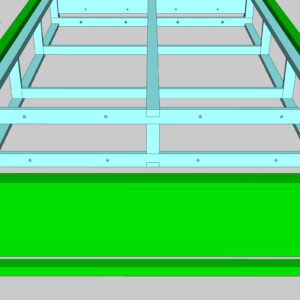
Green wood will be white oak, blue will be pine
Main objective was to be able to disassemble the head and foot board in order for easier transportation. Just to give more background info. The idea is to have a “floating” bed, with the only visible support being the head and footboard and with “riser” blocks in the middle of the bed for added support (see attached pics).
To quickly sum up the construction and our thought process, here are some of the main joints and connections (apologies for my woodworking terminology in advance)
2x 40x70mm rails with dowels joints that slides into the head and footboard (this is just to act as guides)
Once in place, on the headboard, we have 8 nut & bolt connection points to fix the ‘mid-frame- to the headboard. The bed will always be against a wall, so no need for hidden fixing points
On the footboard however, we’re going to glue + biscuit join 2 pine strips to the back of the Oak. We’ll insert 8 screw in sleeves into the pine. The ‘mid-frame’ will get screwed into that.
Most of the pine ‘mid-frame’ will either be glued and screwed together or my dad mentioned mortise & tenon joints (he has some experience with that and the right tools)
Not too worried about the rest of the head and foot board & drawer construction. We’ve got that figured out.
In terms of cleaning. I will just slip out the drawers and clean with a vacuum pipe. I’ll sacrifice form over function.
Any feedback, comments, critique will greatly be appreciated. Quite proud with what we’ve designed and if you guys have any better ideas, I’d love to hear from you!


Replies
The last bed I built was a pencil post. When I built a few many years ago, I used iron angle to hold the box spring. But mattresses have gotten incredibly thick since then. The longest angle iron I could find was still too short for thick mattresses.
For the new bed I used the stubby frame they give you with the mattress and box spring. The bed I made isn't actually attached at all. It simply surrounds the mattress, box spring, and frame. It actually solves the issue of making the dust skirt go around the angle irons
I do have some concerns regarding what appears to be a lack of physical connection between the narrow oak side rails and the headboard and footboard, other than guide dowels. You seem to be relying on a few screws into pine to deal with all the stresses that beds can be subject to. Some people can be very active sleepers, if you know what I mean, and I can see that assembly racking quite a bit and eventually failing, but I'm no engineer and certainly haven't done any stress analysis on the joints. My observation is purely based on 40 years of woodworking and having built a few beds, including one similar to yours, but then I tend to over build and don't usually test the limits of how little structure can actually get the job done. I hope it works out well for you.
PS. Listen to your father and do the mortise and tenons all screws eventually fail, especially in softwood.
Thanks for your comment! Yes, we're also slightly concerned about that, So were going to increase the depth of the oak rails a tiny bit. We have a similar bed at home with the same dowel system and that holds up quite well. My dad is seeing our old neighbour in the coming week. He also has years of experience, so I'll see what advice/solutions he has :)
Actually, this bed could live without a head and foot board, the box frame can support the mattress. There is design work to do to improve joinery, I can see half lap joints for stringers going side to side. If there are no box spring the center lengthwise support could be made 1/2 inch higher than the sides so the mattress support boards are higher at the center keeping the mattress from caving in at the center.
Thank you for your comment. The whole idea of the bed was to create a floating bed with storage space underneath. Please follow the link to see the bed I used for inspiration: https://www.dwr.com/furniture-groups/matera-bed/5114.html?lang=en_US
Awesome work and a nice design - it will look good.
I think this will work well enough but:
1. If you make the upper long rails deeper, you will not need the centre legs (I'd use 120mm deep x 18-20mm thick stock) - this is a big advantage as it's a pain to level a bed with 6 legs and you don't want the middle legs banging on the floor when the occupant moves. This will also eliminate any risk of the sides sagging over time. 120x18 will resist sag much better than 70x 40
2. How will you get such a large box into the room? It's not an easy feat. Most beds of this style are usually made in two halves with a single drawer on each side in each half. You bolt the halves together in the bedroom (or just push them together and slap a mattress on top) What if you move somewhere with stairs? What if the stairs are narrow? It will depend a lot on your personal circumstances, but making sure you can get the bed into small enough pieces to transport is essential - removing the head and foot helps, but if the box will not get round a corner, it'll be heart-breaking.
3. DO check the dimensions of the mattress you intend to buy. There are general standards so you can look them up, but there is nothing like having a look at a mattress before you build a bed.
I approached this problem both similarly and differently from you:
I made the head and foot as separate pieces, just as you have done. My joining method was almost exactly what you propose save that I hid the nuts in the end of the frame (there is an article on a pencil post bed in FWW that shows how this is done) rather than using KD bed bolts.
I made the rails from 120 x 18mm stock and suspended three hefty cross-braces between them. A full Queen size bed with four enormous drawers all suspended from that - the key being that the end braces are just inside the ends of the frame - that way I only have four fixing points but can carry almost all the weight from the centre of the bed to the sides right next to the joints where sagging is not going to happen.
I hung the drawers off the cross-braces using full extension slides (sadly quite an expensive option) but this meant that the bed frame itself was relatively light and albeit quite large, was very thin so easy enough to manoeuvre intact. You can of course hang the box you have designed the same way - it will probably cost about the same as one pair of slides, if that, and will work just as well in the longer term, I was just lazy!
Good luck, and welcome to the world of woodwork. It's a fun place to live. Please post pics when done!
Hi Rob, thank your for the amazing feedback.
1. Noted, however, 120mm deep rails will take away the much needed drawer depth that we need for storage. We're looking at 80x40mm now, which should be sufficient.
2. I haven't added dimensions, but this will only be a double bed (+- 1400x2000mm). My gf and I are on the smaller side of human anatomy. My dad has a pickup, so transport won't be a problem. The apartment e went to go look at is quite spacious and by flipping the bed vertically, it will easily get up the stairwell and through all the doors. Understand your concern though :)
3. We have bought the mattress already too :)
"I hid the nuts in the end of the frame (there is an article on a pencil post bed in FWW that shows how this is done) rather than using KD bed bolts." Do you perhaps have the link to that post?
And I will also use full extension slides, saved up for 2 years, so doing this properly.
I'll definitely post pics as we progress.
Hi Rob
Bed is completed :) Here is the link:
https://www.finewoodworking.com/forum/double-bed-built#comment-663927?utm_medium=email&utm_source=notification&utm_campaign=comment_notification&utm_content=view
For connecting your headboard and footboard to the side rails they do sell hardware that accomplishes your ability to disassemble the bed for moving. They come in mortise and non mortise versions and are virtually unchanged for a least a couple of hundred years. They will easily support more weight than wooden dowels. It is necessary for practically every bed to be disassembled otherwise you could never get them into a room. If your using a boxspring, boxsprings are self supporting so a center supporting leg would not be necessary. Though in your case they may be a good idea for supporting your drawers. A cross member or members are there to keep the side rails from possibly bowing out. If you not using a box spring then more slats would be called for the center support legs are a good idea.. Or, are those blue boards out side your drawing extra slats? My hope to be a musician didn't pan out so since then I have some experience with sleeping. I'm a big fan of box springs!
Hi there. I believe you're referring to KD bed bolts as mentioned in a previous comment? While this is not a problem for the headboard as the end of the bolt will be facing the wall and hidden from plain sight, it will be a problem at the foot board. Don't want to see any hardware :)
We might get some adjustable center footings just as extra support yes. And you're right, all the blue boards on the side are pine slats for the mattress. This will get screwed into the side rails
The slats on my bed are made of ash, 5/8th thick, 3 inches wide and curved upwards at the center when meeting with the center beam.
No I'm not suggesting bedbolts but what are referred to as bedframe or bedrail hardware or bed frame hooks. The mortise type are completely hidden. There are other types which I have not used but they're not visible from the outside either. I think Woodcraft and Rockler both sell versions of these and a Google search will probably have a hundred other sources . There are two parts, a flat plate with slots that is mortised and screwed into the stile and a plate with hooks that is mortised into the end of the rail. Heavy gauge steel the " hook" is designed so that when you insert it( them) into the slots it pulls the rail tight against the stile and locks there . They come in different lengths for different rail widths with at least 2 or more hooks. When you want to break it down you rubber mallet them up out of their locked position.
No problem! Would you like me to send you the sketchup file?
This forum post is now archived. Commenting has been disabled