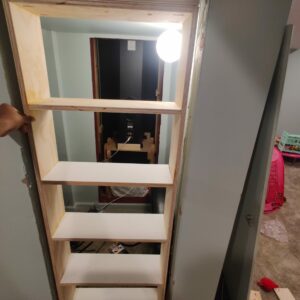
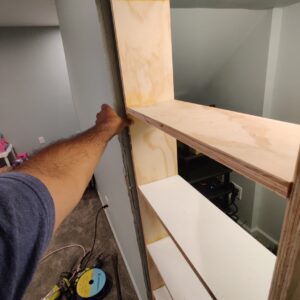
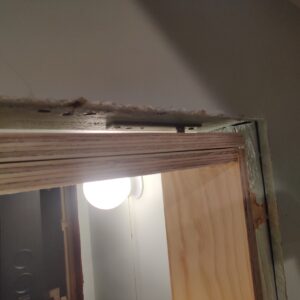
Hello folks – I am in the process of making a hidden door book case. I test fit the assembly and it fits with the only issue below. I am using pivot hinges. The bottom hinge is not exactly aligned with the top due to which it looks like the door is slightly leaning. The place where this will create an issue is I am planning to attach a 1×3 on the left side so that it also acts as a door stopper to stop the door from swinging inside and also act like a molding. If you look at the pictures below you will see the inclined angle. How do I fix this? If I attached the molding on this there will be a gap at the top and no gap at the bottom. The pivot hinge install at the top is complex and I don’t want to dig more holes there. Can I bump up with a few additional layers of wood on the top and then attach the molding and caulk it?
Discussion Forum
Get It All!
UNLIMITED Membership is like taking a master class in woodworking for less than $10 a month.
Start Your Free TrialCategories
Discussion Forum
Digital Plans Library
Member exclusive! – Plans for everyone – from beginners to experts – right at your fingertips.
Highlights
-
Shape Your Skills
when you sign up for our emails
This site is protected by reCAPTCHA and the Google Privacy Policy and Terms of Service apply. -
 Shop Talk Live Podcast
 -
 Our favorite articles and videos
 -
E-Learning Courses from Fine Woodworking
-
-
 Fine Woodworking New England Event
 -


Replies
The door assembly has nothing holding it square. Fix that before anything else or you'll be chasing your tail forever.
One or both hinges needs to be moved to align the door with the wall.
How to add something to hold it square?
Best thing to do is install the back, assuming that the bookcase will be closed on one face. Take it out and lay it flat, square it up, glue & screw / nail. Let it set up to full cure before shifting it at all.
To fix the issue of the bottom hinge not aligning with the top hinge on your hidden door bookcase, try the following solution: Remove the door and reposition the bottom pivot hinge to align it with the top hinge. Fill any existing holes with putty, then reinstall the hinge. Test the door for proper alignment before attaching a 1x3 as a door stopper and molding. To address the slight angle, use caulk or wood filler to create a seamless transition between the door and molding. Once dry, paint or stain the door and molding to match the rest of the bookcase for a polished finish. Good luck with your project!
Quick question. Since the top is a bit behind than the bottom hinge and since the bottom hinge is the one that is flush with the wall wouldn't I be doing it wrong if I set the bottom hinge back? As in door won't be flush with wall.
I have corrected the situation and the door sits square within the opening. However the left side wall is not aligned with the right side wall. So when I place a piece of trim on the left side of the bookshelf so that it also acts as a stop against the wall and does not let the door swing to the other side I expect the trim to have an overhang over the wall and sit flush with the bookshelf. When the bookshelf opens it will open along with the bookshelf. But I see an uneven gap like that shown in the second picture. How do I fill this up? I tried wedging thin pieces but it doesn't work. Any other better way? I have seen scribing techniques but I am not sure it will apply here.
I would measure the top and bottom gap and the length then create a long tapered piece to fill it.
If you paint the shelves, no-one will ever see.
I second Rob here. It's not hard to cut such a piece if you make it the off-cut on a long rip. First cut the long angle on a piece a few inches wide that starts out square--I use a small shim taped to one edge toward one end to establish the angle against the rip fence. Then remove the shim and cut off the piece you need on the left side of the blade. If it doesn't quite fit, it's easy and quick to try another.
Thank you. I am trying to visualize the cut. Can you add some clarity on terms of steps I would use to get this cut?
I am with mj--I think it would be a really good idea to put a back on the thing before you go any further. For one thing, as soon as you put any actual books or other stuff in there, the non-hinge side is going to want to sag and it will possibly bind in the opening. It will certainly interfere with the fit that you're spending so much time and effort to fine-tune.
Also, it's possible that the 2 sections of wall are out of plane, but it is also possible that your case assembly has some twist in it, which is especially possible if your hinges may not be aligned and your case has no back.
Seems like this case needs to be really stiff because it's going to be cantilevered out over the pivot or hinge area, and there's the possibility of quite a lot of force on it (books are heavy!). Attaching a back not just to the perimeter of the case but also to the shelves will help stiffen it up. And maybe your trim will be more than just trim--it may need to function as a face frame to stiffen the case from the front as well.
Cool project. I had aspired to something similar when my daughter was into Nancy Drew mysteries. Alas, I procrastinated too long and now she has grown up and moved away.
Another point after doing some zooming in... It looks like you are mounting the door in the rough opening with no jambs. Installing a square jamb is the first step in the installation of any door.
If it were my project I would pull the door out and properly line the opening with a solid hardwood 5/4 jamb. Shim the crap out of it and get it perfect. Starting with a square opening will make your life easier, even at the cost of rebuilding the door a little smaller.
Normally yes but this is a pivot hinge. Does not really need a jamb. I am using existing framing. I posted sn update. The door is uniform now. I just need to get the trim aligned with the wall because the left side wall is not on the same plane as right side wall. A jamb will not help there
Agreed, your hardware will go always go through to the framing even on a normal hinged door. A jamb serves a couple other functions too. It "lands the plane" around the rough opening & takes the rough out of it, squaring everything up to give you a solid place for your stops, trim and latch hardware.
I love the project, makes me wish I had a room I could hide! Will it swing into the room or the hall?
The door will swing out. With the jamb I suppose I would still have the coplanar issue because the wall on left and wall or right are slightly offset. So I could get the door to align with one wall on the right. This creates a small gap between where the door ends on the left and the wall which has to be filled by a shim before I attach the trim. I am trying to find the best ways to cut the shim.
You could treat it like a prehung door and split the diff left to right. All the trim work winds up "evenish" because the corrections are spread out. 2 Qs: What is the shim being cut from, and do you have a tablesaw?
Yes I have a table saw. I was cutting it from plywood unless you know of a better option. What do you mean by split the difference? The right side won't have the issue as it's flush with the wall.
If you install a jamb you would set it "even" in the rough opening, splitting the needed correction in half, sort of balancing it between the 2 sides. Instead of calling one side good and one side bad, call them both out of line a bit.
Is the shim the full length of the door?
Yes shim will be full length of door. I am thinking of doing the following. Can you tell me if this is right? I will measure the distance between door and front drywall at multiple points from top to bottom and then trace it on a piece of plywood and then cut it.
You can do that, but using solid stock for the shim would be better.
I have to say that I think you're headed into a cycle that might end badly. Once you shim that edge the shelves will be inset on one side by varying amounts from top to bottom, and while the edge will line up with the wall, the door is still swinging out of plumb. I'm sure the hardware set came with specs for a clean install; each "fix" moves you further from that target.
In the end I still think the smart move is a restart. Either way, please post photos when you're all done!
If I started fresh and did a jamb the jamb would still have to align with one wall or the other isn't it? So how will the issue be solved where two walls are not aligned?
Build the jamb square in the shop and brace it to stay that way when you install. Place it to span the space between the studs at either side, not necessarily in plane with either wall section. Shim & fasten it that way and you'll have a nice square & plumb opening to put your hidden door in with half of the walls' "error" on either side.
Project done. Picture attached and video link below.
https://youtube.com/shorts/uZv_mjWiRGg?feature=share3
Nice.
Thank you for sharing!