Cooking with leftovers
Keeping it simple for students, and why we don't do the fiddly stuff in a two-day class.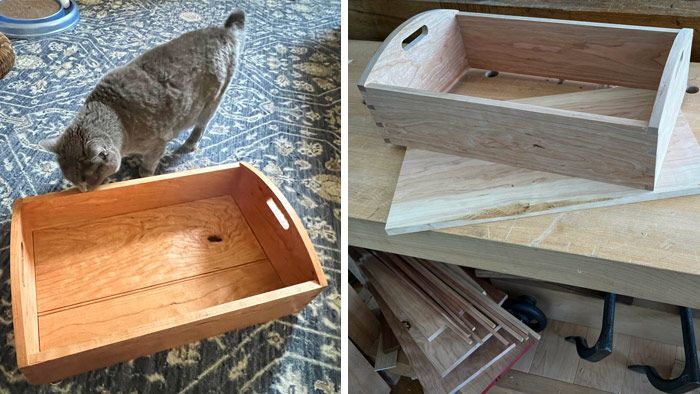
I usually make enough extra pieces for every project I teach in the Lost Art Press shop so that at least two of the six students can cock things up, and I can simply hand them a new piece. If I have extra pieces sitting around, odds are no one will need them. If I don’t, at least one person will.
And because I’ve taught two back-to-back classes in making a simple dovetailed Shaker tray, I have two full trays’ worth of extra parts sitting around. The catch is, they’re from the dregs of my cherry: pieces with enough reversing grain that they’re a bear to hand plane; knot holes that, though they might add attractive visual interest, tend to snag on soft goods (and if large enough, let things fall through); cathedral grain in inconvenient places (harder than mild, straight grain for beginners to dovetail); too much white wood (to which some students object); small checks (which can be sufficiently restrained from further splitting by at-least OK joints).

The best of the worst
The unfinished tray shown just above is made from the best of the worst pieces from the second of my recent classes – the pieces my students didn’t pick. I guess it’s destined to become a container for the attic cat toys? Or a last-minute gift for someone with bad eyesight, as one tail isn’t as tight on both sides as it should be – too much looking up and talking while transferring or cutting, I suspect. So I can’t sell it. (Perhaps the next one – the leftovers tray I’ll make the next time I need the stress relief of bashing out dovetails – will be good enough to exchange for cash or cat food.)

And perhaps I’ll make my stress-relief “leftovers tray” more like the original – the period inspiration for this project, with the bottom inset in grooves. The one I teach uses 1/4-in. by 1/4-in. strips to hold up a two-part bottom.

Never enough hours in a day
So, why, asked a recent student, do I not teach them how to cut the stopped grooves? And how would they cut they grooves by hand were they to do so? The short answer is because this is a two-day class for beginning hand-tool dovetailers, which also involves cutting and fairing curves (by hand or by power, as time allows), and there isn’t always time to even get that done, much less time to make a more involved bottom.
But it’s also because I have two skew rabbet planes – and if time allows, we take turns with those planes to rabbet the two-piece bottoms, and perhaps use my two beading planes (the gateway drug to all molding planes) to add a shadow line and nice visual detail to hide the gap and ease the sharp edge.
Shallow rabbets and stopped grooves
A grooved bottom would require multiple plow planes (I don’t have even one that’s decent; I borrow Christopher Schwarz’s when I need it), and multiple small router planes (I have but one). I can’t expect students new to the craft to have those specialty items. To cut a stopped groove by hand (which one must do in the side boards –the tail boards – on this project to avoid having the groove show), I drill a hole to the groove depth, then use the plow plane to take out all the waste between the holes that it can reach, and finish the groove at both ends with the small router plane. (On the end pieces—the pin board—one can plow a through-groove.)
I also like to teach rabbeting rather than grooving in this project because it brings us back to a question at least one student always asks at the beginning of class, when we jump into dovetailing: “Do you ever cut a shallow rabbet at the baseline on the tail board?” The short answer is yes. A shallow rabbet (I aim for 1/32 in. deep) the width of the stock’s thickness at the baseline creates a stop. It makes transferring the tail shapes to your pin board (or vice versa I guess … but I almost always cut tails first) much easier. The mating board nests into the rabbet, making it easy to align the pieces.
Practice makes perfect
But I don’t teach that method in beginner classes because it’s difficult to pick up a rabbet plane for the first time and cut a perfect 90° rabbet. And it must be a perfect 90° rabbet. Inevitably, that first (or 10th) rabbet will be sloped, so then one has to chase 90° with a straight rabbet plane or shoulder plane. Failure/frustration is no way to introduce folks to the fun of dovetailing! (If the dovetailed project is large enough to warrant the help of a rabbet, we “extrude” one instead, by tacking a straight-edged piece of wood at the baseline.)
Practicing rabbets at the end of the project, on bottom boards where 90° isn’t strictly necessary, is lower risk. Then following up with a beading plane, which quickly delivers fast and attractive results, makes everyone leave happy, and with two additional successful skills.

But when I’m working with leftovers, I can cook things up however I like. Assuming Chris will let me borrow his nice plow plane.
More from Megan Fitzpatrick
 |
Gentle on my mindWhether you’re marking, sawing, or chiseling, a light touch is often the key to success. |
 |
Free your mind, and the rest will followTry a new method, learn a new technique, be open to new possibilities. You might like it. |
 |
Do what’s difficultYou can watch ’em make chairs till the cows come home. But doing it? That’s another thing entirely. |
Fine Woodworking Recommended Products
Titebond I

Marking knife: Hock Double-Bevel Violin Knife, 3/4 in.
Veritas Standard Wheel Marking Gauge


Comments
Thanks so much. It's illuminating, seeing what decisions you make and why. Thanks.
Nice post. There is a way to have through dovetails and to use a through groove without it showing. It was a buried detail in one of Paul Seller's videos on the keepsake box.
For the rebate to help register the tails for transfer, rather than do a 1/32" rebate. Do, say a 1/4" deep rebate. With a 1/4" deep rebate, you could run a 1/4" deep groove without it showing (though I would go 3/16" just to make sure).
I've never really seen anyone discuss it. Would make for a great blog at some point for other to see. Hard to see by words but really obvious with photos.
Log in or create an account to post a comment.
Sign up Log in