The Gentleman’s Tool Chest
An avid tool collector builds his own version of a classic tool chest.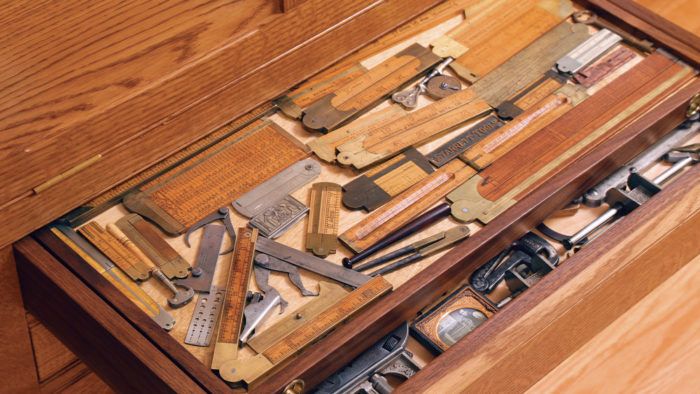
I’d been avidly collecting woodworking tools for thirty years before I saw a Hammacher Schlemmer Gentleman’s Tool Chest in person. When I did, at Brown’s Tool Auction in Pennsylvania in 2013, I decided pretty much on the spot that I wanted to build a chest just like it, but with a few changes to suit my style of building and the tools I would put in it.

The chest was patented in 1896, and sold during the first few decades of the 20th Century. I found old Hammacher, Schlemmer ads and catalogs that gave me a lot of information about how it was built.

Then a friend of mine found someone with an original H-S chest who agreed to let me visit and take photos and measurements of his tool chest, which was made of mahogany.

Hammacher-Schlemmer sold them in quartersawn white oak as well as mahogany, and I decided to make mine in white oak. It took me two months to build the chest, but three months to select, arrange and custom fit all the tools.
Plane storage

One of the changes I made from the original chest was to add a sliding shelf under the workbench. I wanted to store some of my favorite handplanes on it, and their total weight made it hard to get a smoothly sliding shelf. It’s all about weight and friction.But then I wound up using some drawer friction tape, and it worked miracles.
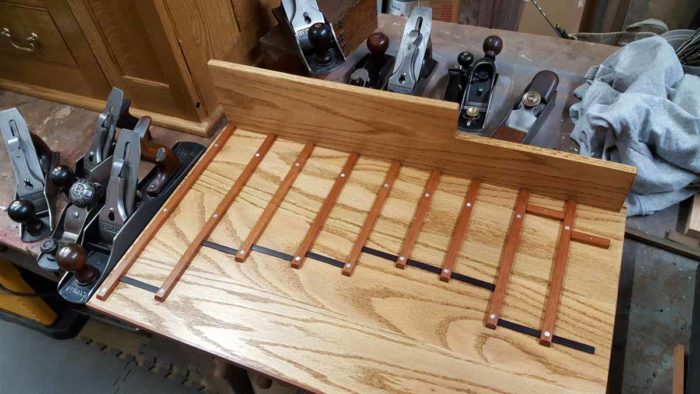
With the spacers installed I plugged the counterbores with figured plastic to simulate mother of pearl, and added thin ebony riser strips to keep the plane blades slightly elevated.
|
|
|

Although there are about ten Stanley plane models that are rarer to find, the Stanley No. 1 always takes top shelf or center stage in a tool collection. No exception here. My five dollar yard sale Stanley No. 1 sits at the front on the slide out shelf.
Flip-down lid

When you flip down the front lid to access the sliding shelf of planes under the curly maple top, you see a scaled down plane and back saw on matched walnut panels. I made the plane from holly with an ebony blade. The back saw is holly and rosewood. This embellishment was fun to make. I thought about trying to make the tools with marquetry. Marquetry was traditionally used inside tool chest lids to show off the skill and artistry of the carpenter or cabinetmaker. Lacking any experience with marquetry, I took the easy way out!

An backsaw from the late 1700s was the model for my wooden saw.
|
|
|

Auger bit storage
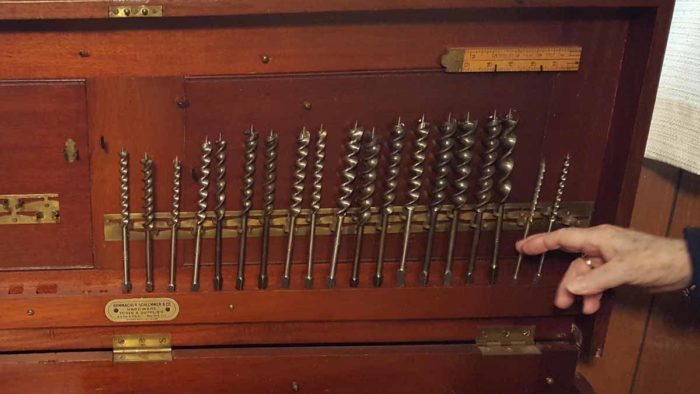
One change I made from the original was the holder for auger bits. I couldn’t replicate the stamped metal hardware in the vintage chest, so I came up with another solution.

I have a set of mint double-spur Russell Jennings auger bits, and I had to figure out the best method to hold them in place with the lid closed.

My rack, which took about four days to build, owes something to the great Studley tool chest.

The numbering within circles is a design found in the Studley. The numbers represent the diameters of the bits in sixteenths.
Chisel storage
 |
 |
I also needed a way to keep the chisels–a set of dead mint Stanley 720’s and 750’s–firmly in place whether the lid was open or closed. And I didn’t want to use turn latches or pocketed holders, both of which would obscure their beauty. So I embedded rare earth magnets in the rack.

I saw a neat jewelry box in my travels. It had a swing-hinged top tray over a lower compartment. That design was perfect for my two side drawers. This drawer has machinist’s layout tools in the tray and a matched set of Buck Brothers chisels in the drawer itself.
On the level
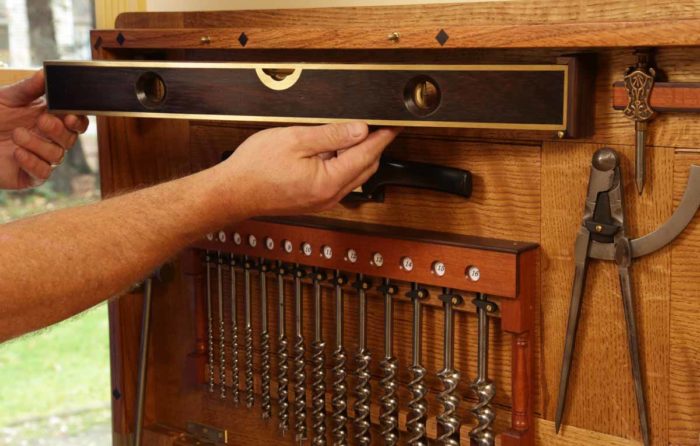
Another favorite tool fits under the lid, a No. 10 ½ Stratton Brothers level. This level is solid Rosewood 20” long, 2 “ wide and one inch thick, fully brass bound, level and double plumb. Interesting fact about Edwin and Charles Stratton: they worked before, during, and after the Civil War making rifles at the Springfield Armory in Massachusetts. In 1869, the brothers formed their own company making high quality woodworking levels in Greenfield, Mass. By 1902, cheaper levels in soft wood, cast iron and stamped steel flooded the market and that spelled the end of Stratton Brothers Level Company.
Heirlooms

An ebony miniature baseball bat? What gives? This reflects my passion for baseball, coaching, and time on the ball fields with my sons and daughter. Also, all my kids turned pens and mini bats on the lathe in the shop. That bat holds a special spot in the chest.

Home from college on winter break, my daughter stops into the shop to see me. She really just wanted to get a look at the toolchest, but she got the whole story of the build!

Happy dad and happy daughter. My three boys all saw the chest during construction, but they missed out on a photo with Pops!
A collector’s collection

Things are a bit tight upstairs, too, what with my collection of some 10,000 vintage woodworking tools…but it was time to bring the toolchest out in public. And time for its beauty shots.
 |
 |
When Fine Woodworking editor Jon Binzen came to photograph the chest, we had to move a lot of tools to give him space to work (that’s him wedged in the corner). Lots of laughs and stories that day.
With the chest built, the shoot finished and the article written, what more is there to do?

Well, there are always more tools–so I recently added some glass shelves above the chest!
Fine Woodworking Recommended Products

Starrett 4" Double Square

Starrett 12-in. combination square
Lie-Nielsen No. 102 Low Angle Block Plane




Comments
Lee Valley have sold plans to make this bench for a few years now.
Part number 05L2501
https://www.leevalley.com/en-ca/shop/tools/plans/69603-apartment-workbench-plan
If he's married, his wife is a keeper.
Nothing short of WOW!
Thanks! I had posted comments on the other article and just realized this article in the comments had plans.
I purchased the plans today. Any good ideas for the vise to use? I think the plans have something and the article did something else. Just curious as to what are my options that would work well for this config.
I received the plans. They are very detailed so building it won't be a problem from a plan perspective. Also, they have a part number listed for a vise that can easily be removed from the front when closing up the unit.
Log in or create an account to post a comment.
Sign up Log in