Greene and Greene: Master the Details
Perfect the classic cloud lift and ebony accents while building this iconic bed
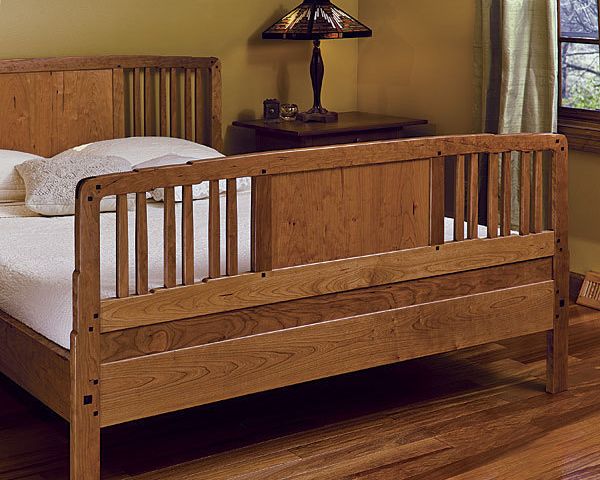
Synopsis: If you are an admirer of beds designed by Charles and Henry Greene for the Gamble House in Pasadena, Calif., you’ll love this queen-size version. There’s a lot to like about the way the cloud lifts lighten the mass of the bed and the ebony plugs and splines pop against the cherry bed parts. The cloud lifts might seem difficult, but you can cut them with little trouble at the bandsaw. There are great techniques for fitting the spindles between the top and middle rail, and fitting the mitered top rail between the two legs. Stepped mortises in the top rail make it possible to hide the spindle’s top shoulder, so you have to worry only about a tight shoulder on the middle rail. And fitting the top rail to the legs when they’re dry-fit with the lower rails gives you a solid and square assembly to work from.
I’m a big fan of Arts and Crafts furniture, so when it came time to build my daughter her first big-girl bed, I looked at a lot of beds in the style. But I returned time and again to beds designed by Charles and Henry Greene for the Gamble House in Pasadena, Calif. The design features the Greenes’ signature cloud lifts, and ebony plugs and splines that pop against the cherry parts. Though classic, the design fits well in a modern setting, including a little girl’s room.
For this article, I made a queen-size version of the bed. The cloud lifts might seem difficult, but I’ll show you how to bandsaw them and how to make the ebony plugs. The biggest challenges are fitting the spindles between the cloud-lift steps in the rails, and fitting the mitered top rail between the posts. I have great techniques for both. Stepped mortises in the top rail hide the spindle’s top shoulder, which means you don’t actually have to fit it.
When working with shaped parts, it’s smarter to cut joints while the parts are still square. But with this bed, there are grooves and mortises that can be cut only after the cloud lifts are cut into the rails in the foot and head boards. So, the joinery is broken into two sessions: one before the cloud lifts are cut and the other after.
Start with the posts. They join the upper rail with a splined miter joint. Before cutting the posts to length, cut the 45° miters on the top of them, but don’t cut the miters on the upper rail yet.
Because the joint is so prominent in the completed bed, it must be perfectly tight. The easiest way to get it there is to fit the top rail after all the joinery below it is cut and you can dry-clamp the posts to the bottom and middle rails. That creates a rigid, square assembly that allows you to dial in the top rail’s fit.
Now cut the posts to length, chamfer the bottom edge to prevent splintering, and cut them to width. You have to leave about 3⁄8 in. extra near the top to accommodate the inside curve of the miter where the top rail meets the post. Cut this notch on the bandsaw. Smooth the cut with a handplane, using a file to get into the corner.
Next, cut the mortises for the head- and footboard rails and the side rails. I hog out most of the waste at a drill press using a Forstner bit, then square up the mortises with a chisel.
For the full article, download the PDF below.
Fine Woodworking Recommended Products

Dividers

Blackwing Pencils

Circle Guide

Get the Plan
CAD-drawn plans and a cutlist for this project are available in the Fine Woodworking store.


Comments
I'm building this and it's been a fun challenge. The plans are queen size, so any other size you'll have to do a little math and adjustment to build what you want. But it's impressive I wish I hadn't taken a year so far to get it done! (Confession: I'm slow)
ChipSawdust,
I've got you beat with being slow. I've had the plans since 2018, the Sepele rough lumber for over a year and still have not started the project. Today is the day I begin with modifying the dimensions to make a King bed. Rome was not built in a day or so I've been told. Neither will this bed.
Hi WC,
I'm curious about your conversion to a king-sized bed. What do you plan to do with the head and foot boards? Will you just add to the central panel or will you add spindles? Will you add a center rail down the length of the bed with a foot or two underneath? Are you planning to use the platforms or go with the more traditional slats?
Dave
Dave,
I will add 16 inches width to the head and foot board central panels. If I were to add spindles I feel they will not blend as well with the existing ones which are one lift per pair of spindles. It would look more to the original design. The platform will get two adjustable feet on small blocks glued underneath to the 3/4" plywood. But until I can see how a wider panel looks this idea may change. I could always add more lifts to accommodate more spindles. Maybe a sketch or scale model will be best before I begin. I'm open to suggestions.
I was looking at the model I did for the printed and digital plans of the bed trying to figure out how I would go about making the change. I came to the same conclusion you did about making the panel wider although I might be inclined to split the panel with a center stile that is tapered like the spindles. I think to make the change with the spindles would require making the spindles wider (which doesn't appeal) or by adding spindles but I would think you'd want three spindles per lift and I don't think there's room for that unless you make the bed a king plus a twin. :)
Certainly a sketch would be a good idea.
In my opinion splitting the center panel with a stile would certainly work but it would also bring more attention to the center where the focal point should be the lifts. Making the spindles wider would throw the whole design off balance and make it appear clunky. Through this discussion I've decided to simply widen the center panel without altering the entire design. After all the original is quite nice thus would be a shame to change it all over simply to make it a king. But the nice thing about what we do is we can make it however we want. My choice does not require anyone to follow. Good luck my friend.
Yes, you are quite right all the way around.
Good luck to you with the bed build. I for one will be interested in seeing photos of it.
Just for the fun of it, I "made" a king sized version by widening the panels.
https://flic.kr/p/2ikuyaz
I was playing with slats instead of the platform, too.
Interesting look with your sketch. Thanks for sharing. After seeing this it does look a little bulky. Some scroll work cut into the panel may lighten the look of the panel. Or maybe some inlay of cloud lift design. You've impressed me with your ability to use SketchUp. Do you see an advantage of slats vs plywood?
I saw a photo this morning of the twin beds McClendon's bed is based on. There is a piercing in the panels on them. I think it would be a good addition. I'll see if I can show that when I get back to my computer.
As for the slats over plywood, I d expect a bit of spring in the slats. I think they would be easier to deal with if the bed needs to be moved and they're more traditional. But there's no problem with the ply.
I found an image of one of the twin beds in the Greene and Greene Archives and made screen grabs showing the panels on the head and foot boards. I also found a better image of the ebony bit although in this case there's no piercing of the panel. It's from the side of a desk in the Gamble house.
I think a couple of those on the panels would be a nice touch.
Edit to add: I found a nice image of this motif on the back splat of a chair. It looks like the ebony was cut so it overhangs into the opening but doesn't cover the edge of the hole in the panel. It looks ok and might be an interesting tactile thing but my inclination would be to rabbet the ebony pieces (or whatever it's made of) so they meet and cover the edge of the panel. It would be easier to keep clean for one thing.
You may like a book I bought a while back Dave called Greene & Greene Furniture-Poem of Wood & Light by David Mathias. It has the history of the Greene brothers with Photos of housing and furnishings they and their craftsman built over the years. Quite a stunning coffee table book. It was $35.00 but well worth it in my opinion. I've enjoyed conversing with you and appreciate all of your input. I will certainly share photos with you once this is completed.
I do like that book. I have a copy autographed by the author. :D It's very good. I also have Darrel Peart's books which are excellent.
I enjoyed the conversation, too. You have me thinking about some design ideas.
Hi. I was thinking about this bed some more. If the panels seem to be too large or two long, what about something like this? It would be a typical sort of detail.
Hello again Dave, I do like the newest design change you made with the stiles. It helps to reduce the long appearance of the panels for a king size frame. I believe you hit the nail squarely and has swayed me to go with this design. It's nice to know I've given you motivation and this has helped me to feel better about the panels being larger. I can see the benefit of mastering Sketch Up. I use a book for my hand sketches but that limits me compared to using the program. Cheers.
I'm glad you like that change.
As for SketchUp, it has a lot of benefits over hand drawn sketches. I've never erased a hole in my computer display. :) Don't give up on sketching by hand, though. I find it useful to start with paper and pencil and after I have some ideas more firmly in my head, switch to SketchUp. Changes are easier to make and working in 3D makes it easier to see how shapes work together from different viewpoints. Being able to make views that other people can easily decipher is handy, too.
If you have any interest in getting to terms with SketchUp and want a hand, get in touch with me. I can help.
Taking a flyer here: for anyone who has built this bed or thought all the way through how you are going to, how did/will you secure the large ebony plugs that cover the bed bolt holes? They need to be removable for disassembly or just to tighten things up a bit from time to time, but I don't want them to just pop out due to wood movement.
I'm thinking of hide glue, then heat and/or vinegar or water to soften it enough so the plug can be pried out. Any thoughts?
Log in or create an account to post a comment.
Sign up Log in