The Ins and Outs of Drawer Stops
Four clever ways to keep a drawer in its place
Synopsis: What’s the first thing you do when looking at a piece of fine furniture? Chances are, if the piece contains drawers, you pull one out. You’re looking for well-crafted half-blind dovetails, an even reveal, a smooth glide in and out of the drawer pocket. You may not be thinking about the drawer stops — those unseen agents that keep the drawer from being pushed in too far or pulled out too far, and keep the reveal consistent — but you can bet they are in there, doing their job. Peter Turner offers the lowdown on four clever drawer stops that have served him well in the furniture he builds — two in-stops and two out-stops. They are positive and durable, and worthy of fine furniture.
From Fine Woodworking #205
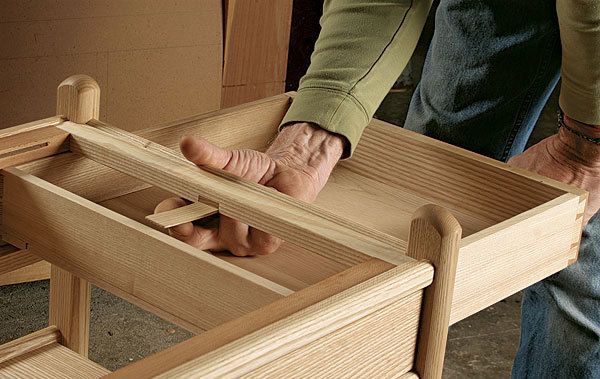
A well-fitted, smooth-gliding inset drawer is a testament to fine furniture making. This type of drawer, often made with half-blind dovetails at the front and through-dovetails at the back, fits into a pocket built into a case or a table. In a case piece, the drawer usually is supported on a frame; in a table, it slides on a rail and runners, steered in and out of the pocket by guides.
But the unseen grunts of the drawer pocket are the stops, which serve as the brakes to keep a drawer from being pushed in too far (in-stops) or unexpectedly pulled out too far (out-stops). Stops also help keep the drawer reveal consistent, whether you want a flush drawer front or one that’s recessed a bit.
I’ve screwed in-stops behind the front rail, and I’ve mortised them into the rail (see pp. 58-59). For out-stops, I favor a couple of clever mechanisms (see pp. 60-61).
There are simpler methods to stop a drawer. But I stick to these few because they are positive and durable, making them worthy of fine furniture.
In-stops
In my furniture, grain typically plays an important role— whether I’m looking to play up contrast or work toward seamless transitions between parts. When building tables with drawers, I often cut the drawer face and its rails, above and below, from the same plank and then install them in the same order they were oriented in the plank.
This method has two advantages. First, it unifies the front of the piece, with a continuous grain match from the top rail to the bottom. Second, because I rip the parts after they’ve been jointed and planed, they are identical in thickness. This allows me to install two stops on the back of the bottom rail, making it easy to create flush drawers. The back of the drawer face, below the drawer bottom, rests against the face of the applied stop. If I want inset drawer fronts, I just dial in the setback by creating a small step in the stop. You’ll need a full ¼ in. below the drawer bottom to accommodate the stop.
For the full article, download the PDF below:
Fine Woodworking Recommended Products

Bessey K-Body Parallel-Jaw Clamp

Stanley Powerlock 16-ft. tape measure

Jorgensen 6 inch Bar Clamp Set, 4 Pack


Log in or create an account to post a comment.
Sign up Log in